Edit a User Account
Permissions
Your user account or group membership must have the following permissions to edit a user account unless your user account has the Make this user a Super Admin setting selected:
Users: Edit User
Users: View Users
See the Users permissions or ask your Administrator for assistance.
Follow these steps to edit a user account:
View all user accounts. The Users tab displays.
Click the Options
 menu, and then select the Edit User option for the user account to edit.
Edit the following settings as needed:
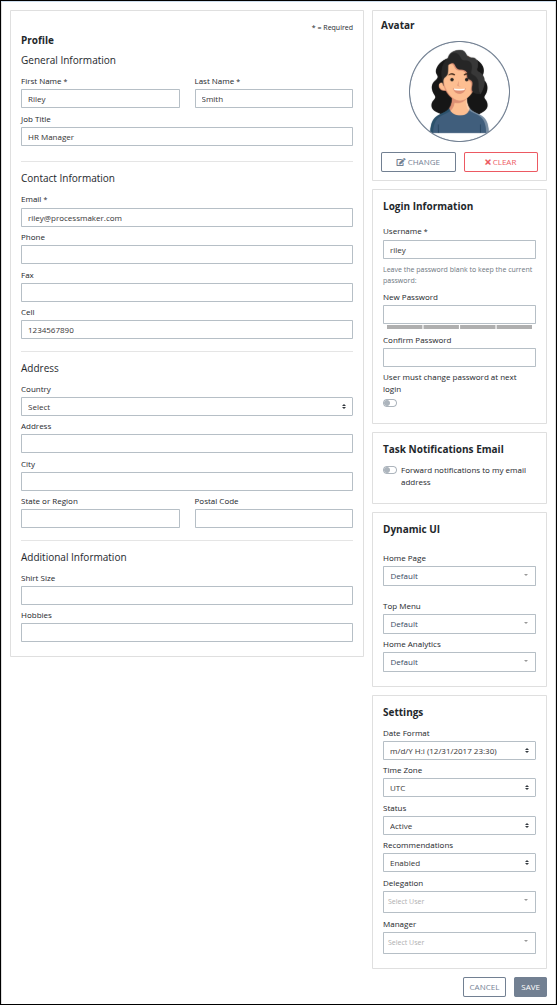
Edit General Information
Follow these steps to edit general user settings:
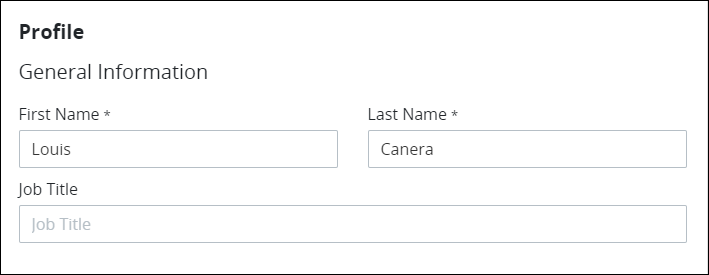
Locate the Profile section.
In the General Information section, change the following information:
In the First Name setting, edit the person's first name. This is a required setting.
In the Last Name setting, edit the person's last name. This is a required setting.
In the Job Title setting, edit the person's organizational job title.
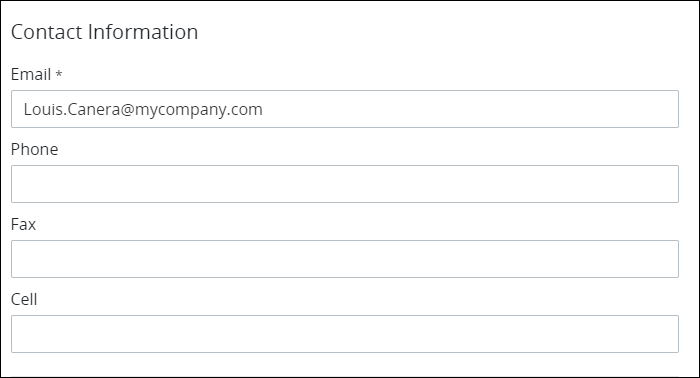
In the Contact Information section, change the following information:
In the Email setting, edit the person's business email address. This is a required setting.
Note:
Email address for users created via SAML synchronization cannot be edited manually.
Additionally, if a user has integrated their account with Slack notifications, the connection is tied to their original email address. Changing the user's email does not automatically update the Slack integration. In this case, an administrator should remove and reconfigure the Slack Notification connector using the new email address.
Confirm Identity
To prevent unauthorized changes to user accounts, a confirmation modal may appear when saving data, requiring you to verify your identity with your current password before updating your email.

In the Phone setting, edit the person's business telephone number.
In the Fax setting, edit the person's business fax number.
In the Cell setting, edit the person's cell phone number.
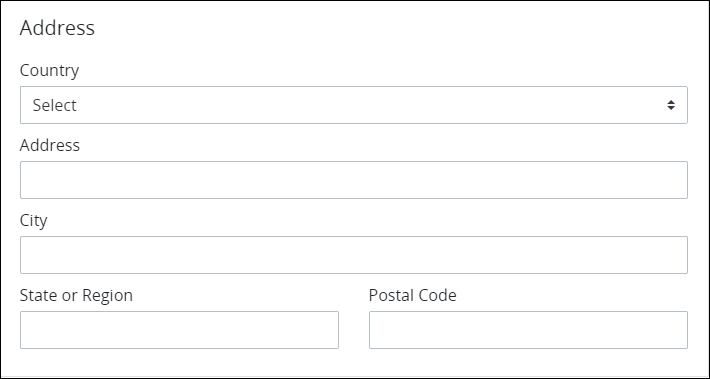
In the Address section, change the following information:
From the Country drop-down menu, select the country for the person's business address.
In the Address setting, edit the person's business address.
In the City setting, edit the city for the person's business address.
From the State or Region drop-down menu, select the state, region, or province for the person's business address.
In the Postal Code setting, edit the person's business postal code.
Click Save.
Edit the User Avatar
Follow these steps to change the user’s avatar
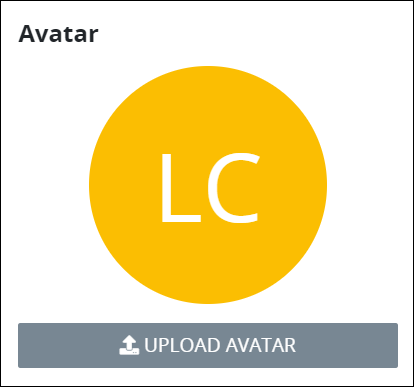
Locate the Avatar section.
Do one of the following:
Upload an avatar: If there is no avatar image, the initials for that person's full name display. Click the Upload Avatar button. The Browse button displays. Continue to step 4.
Change an avatar: Select the Change button to upload a new avatar image. Continue to step 4.
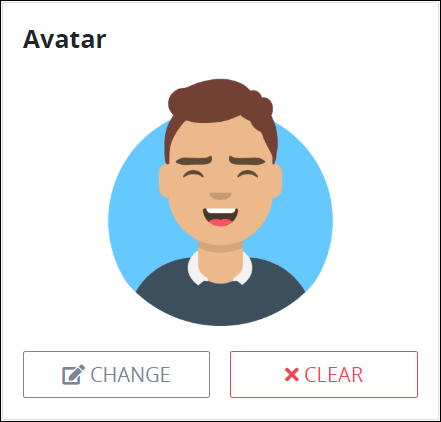
Remove the current avatar: Click the Clear button. The initials for that person's full name display. Continue to step 7.
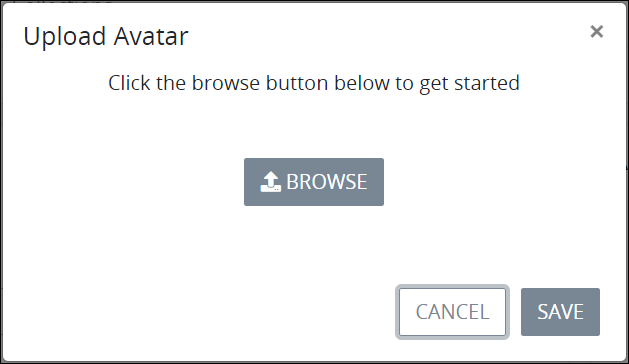
From the Upload Avatar screen, click the Browse button to locate the image to be your avatar.
Locate and then select the image to be your avatar. The image fits into the Upload Avatar screen.
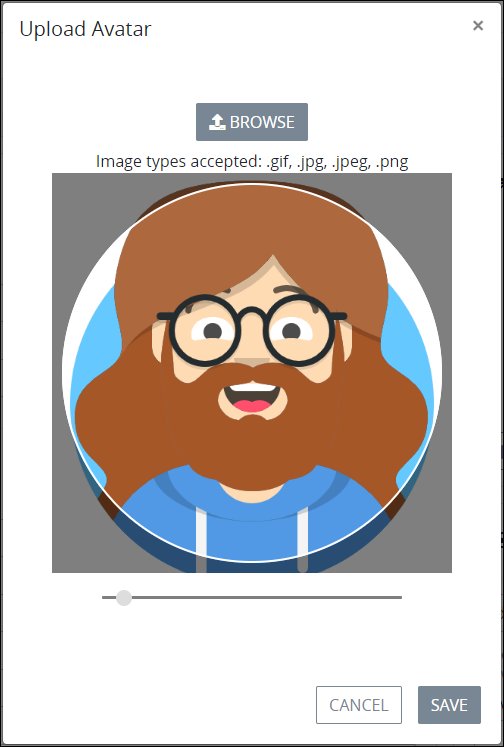
Adjust the size of the image using the image size indicator
 to fit well inside the circle where the avatar displays, and then click Save. The avatar displays in the Avatar section.
 Click Save to save the profile.
Edit the User Login Information
Usernames and passwords must adhere to the following protocol:
Aside from alphanumeric characters, ProcessMaker Platform allows only the following characters in usernames:
commercial at (
@)hyphen (
-)period (
.)plus (
+)underscore (
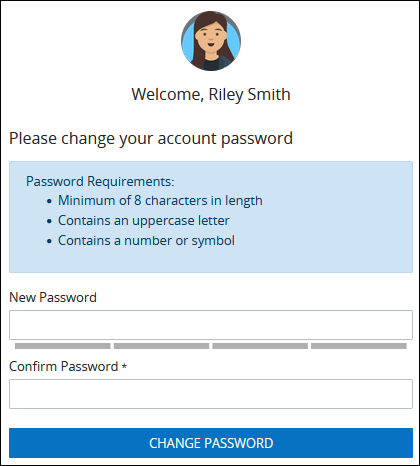
_)Passwords must be at least eight (8) characters long, must contain at least one uppercase letter and a number or symbol. Password special characters are recommended.
Notice to Administrators
Enhance security for your ProcessMaker Platform instance by following these best practices.
Require all users to periodically reset their passwords through Login Settings.
Enable the User must change password at next login toggle, for each user to require a password change at their next login.
Follow these steps to edit the user login information:
Locate the Login Information section.
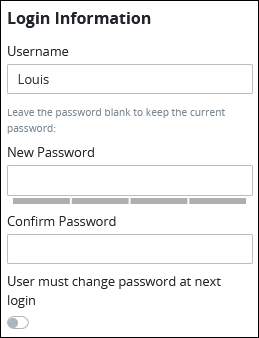
In the Username setting, edit the username for the person's user account. Aside from alphanumeric characters, ProcessMaker Platform allows only the following characters in usernames:
commercial at (
@)hyphen (
-)period (
.)plus (
+)underscore (
_)
This is a required setting.
In the New Password setting, edit the password. Leave the New Password setting blank to keep the current password. Passwords must be at least eight (8) characters long, must contain at least one uppercase letter and a number or symbol. Password special characters are recommended. Password validation indicates how strong your password is and, at a minimum, it should meet the medium strength requirements described above.
In the Confirm Password setting, re-enter the password.
Enable the User must change password at next login toggle key to require this user to change the password at next login.
If the Two Factor Authentication is enabled, the Two Factor Authentication section will display all available authentication modes.
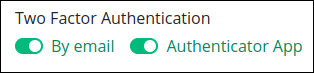
All modes are enabled by default, however, users can enable or disable the following options depending on the configured two-factor authentication methods:
Code Validity
The length and validity of the security code depend on the selected 2FA method.
When 2FA codes are delivered via Email or SMS, users receive an 8-digit code that is valid for 5 minutes. This extended validity accounts for potential delivery delays caused by background processing, external providers, or email and mobile carriers.
When using an authenticator app (such as Google Authenticator), users receive a 6-digit code that is valid for 1 minute, following standard industry practices since the code is generated locally on the user’s device.
Click Save.
Edit Task Notifications Email Settings
Task notifications are sent to requesters, process participants, and process managers and are configured in the properties of a Form Task. For more details, see Form Task Notification Panel Settings.
These Notifications are delivered as both in-platform alerts and emails. To disable email notifications while keeping in-app notifications enabled, adjust the following settings. In-app notifications will continue to be sent based on the task's configured properties..png)
Configure the Home Page Dashboard, Redirect URL, and/or Menu
Configure a custom home page, and/or a menu for a user. A custom home page is either a dashboard that displays to the user or redirects that user to a specified URL. The redirected URL may be to an external site, such as to an organization's portal, or to a ProcessMaker Platform location such as a specified Collection or Saved Search to which that user has access.
Select the Home Page Dashboard
A dashboard displays important and relevant business management information (BMI) and key performance indicators (KPI) to specific business stakeholders when they need it. After the user logs on to ProcessMaker Platform, the dashboard displays instead of the default ProcessMaker Platform page.
Dashboards on Mobile Devices
When a custom home dashboard is configured, accessing the platform from a mobile device will default to Desktop Mode. If switched to Mobile Mode, the custom dashboard will not be available in the home menu, as this mode is designed exclusively to display the platform’s default mobile dashboard experience.
Follow these steps to select the dashboard for the user account's home page:
Locate the Dynamic UI section.
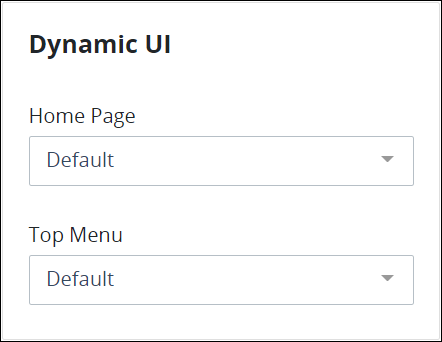
From the Home Page drop-down menu, select the My Dashboard option.
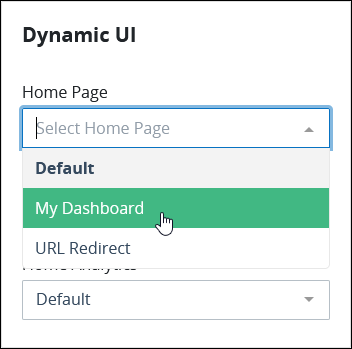
From the Dashboard drop-down menu, select the dashboard as the home page for the user account.
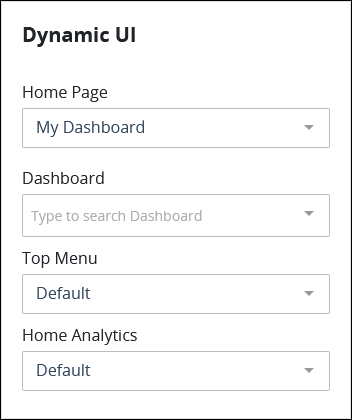
Click Save. The user will see the newly assigned dashboard the next time they log in.
Configure the Home Page to Redirect to a URL
Configure a custom home page for a user that redirects to a specified URL when that user next logs on. The redirected URL may be to an external site, such as to your organization's portal, or to a ProcessMaker Platform location such as a specified Collection or Saved Search to which that user has access.
Follow these steps to specify a URL that redirects a user to an external site such as to your organization's portal:
Locate the Dynamic UI section.
From the Home Page drop-down menu, select the URL Redirect option. The Redirect Url setting displays.
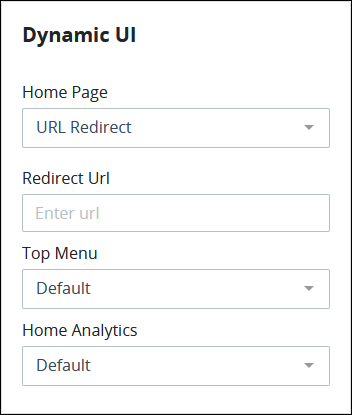
In the Redirect Url setting, enter the external site's URL to redirect to that location upon next log on.
Redirect to a Collection
Specify a URL that redirects a user to a Collection. Locate the Collection's URL and enter it in the Redirect URL setting. Ensure that the user has the following:
Collection permissions, as configured from a user's account or a group
Access to at least view the records in that Collection, either as individual users or as group members
Otherwise, that user cannot access the Collection.
If a user cannot access a Collection, the following message displays instead of the Collection: Unauthorized.
Redirect to a Saved Search
Specify a URL that redirects a user to a Saved Search. Locate the Saved Search's URL enter it in the Redirect URL setting. Ensure that the user has been shared the Saved Search; otherwise, that user cannot access the Saved Search.
If a user cannot access a Saved Search, the following message displays instead of the Saved Search: Unauthorized.
Select a Menu
A custom menu replaces the default top menu that displays in ProcessMaker Platform. The user does not experience the change until the next time that user logs on.
Follow these steps to select the menu for the user account's home page:
Locate the Dynamic UI section.
From the Top Menu drop-down menu, select the custom menu for the user account to replace the default top menu.
Click Save.
Edit User Settings
Follow these steps to edit user settings:
Locate the Settings section.

From the Date Format drop-down menu, select the format for how dates are displayed for this user.
From the Time Zone drop-down menu, set the time zone for this user.
From the Status drop-down menu, select the status of the user account from the following options:
Active: This user has access to login to ProcessMaker
Inactive: This user doesn’t have access to login in to ProcessMaker.
Out of Office: This user is currently out of office, and their tasks will be automatically delegated to a specified user. Use the Delegation setting below to configure the designated user for task delegation.
Scheduled: This user is available for tasks only during certain times. If unavailable, tasks can be auto-delegated using the Delegation setting.
From the Recommendations drop-down menu, select the Disabled option to prevent the user from receiving recommendations. For more information about recommendations, see Recommendations Engine.
From the Delegation drop-down menu, select the user to delegate Tasks if this user is not available because of status or schedule.
From the Manager drop-down menu, select the manager for this user. Tasks that this user are assigned can be configured to escalate to the manager specified from this setting. If no user is selected, Tasks are assigned by default to the Process Manager. As a best practice, Process designers should configure the Process Manager for each Process.
Click Save.
Edit User's Group Membership
Specify the group(s) this user belons to. As a best practice, do not assign the same user to multiple groups that contain distinct sets of permissions. For example, do not assign a user to a group in which its members have Requests category permissions and to another group assigned with all permissions; otherwise, that user has all permissions.
Follow these steps to edit a user’s group membership:
Click the Groups tab. The Groups tab displays the following information:
Name: The Name column displays the name of the group.
Description: The Description column displays the description of the group.
A toggle key represents whether the user is a member of that group.
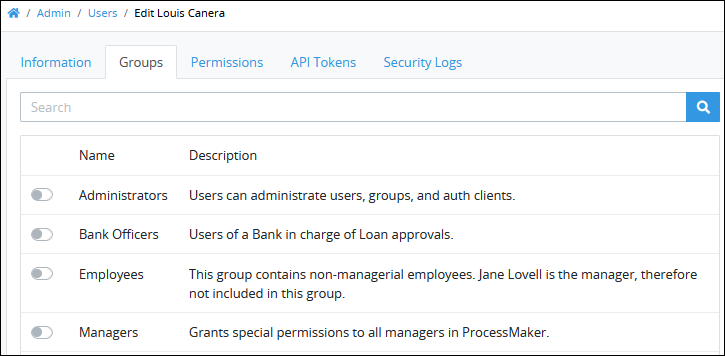
Select the toggle key for each group to add the user to that group.
Click Save.
Edit User Permissions
Follow these steps to edit user permissions:
Click the Permissions tab. The Permissions tab displays permissions assigned to that user account.

In the Permissions tab, change the permissions to assign to that user account. Follow these guidelines to change permission assignments:
Super Admin: Assign the Make this user a Super Admin option to grant unrestricted access to the entire ProcessMaker Platform. For more detailed information, see Permission Descriptions for Users and Groups. No permissions checks are performed for Super Admins.
To maintain platform security, only users with the Admin role assigned have the permissions to assign or modify Super Admin access. If a user does not have Admin privileges, the Make this user a Super Admin option will not be displayed.
Select the Assign all permissions to this user checkbox to assign all permissions to the user account.
Click on a permission category to view the individual permissions within that category and enable/disable them using a toggle key.
See Permission Descriptions for Users and Groups.
Click Save.
Manage API Tokens for the User
Use an API token with a user account to successfully make calls to ProcessMaker Platform's REST API from an external third-party application or a Script. For security purposes, the API token must not be expired for that API token to work.
A user must have a valid API token to successfully make calls to our RESTful API from an external third-party application.
Follow these steps to manage API tokens for a user account:
Click the API Tokens tab.
Manage the API tokens for the user account as necessary:
Generate an API Token
An API token is required to successfully make calls to our REST API from an external third-party application or a Script. For security purposes, the API token must not be expired for that API token to work. An API token is valid for one calendar year from its creation date.
To share the generated API token with the person to whom uses the user account requires copying the API token and the time that the API token generates. If you neglect to copy and share the generated API token at the time ProcessMaker Platform generates it, there is no opportunity to view and copy it again; you must generate another API token.
Follow these steps to generate an API token that allows that user account:
Click the API Tokens tab.
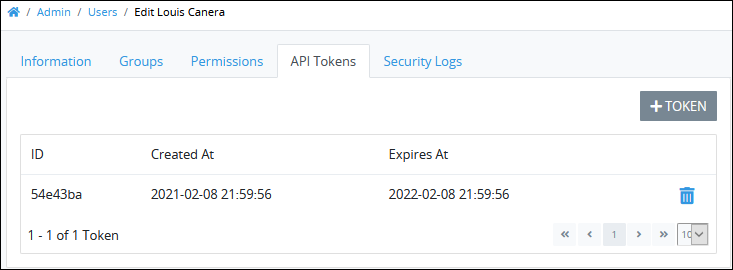
The API Tokens tab displays the following information about each generated API token:
ID: The ID column displays the automatically-generated ID for the API token.
Created At: The Created At column displays the date the API token was generated.
Expires At: The Expires At column displays the date the API token expires.
Click +Token. The New Token screen displays.
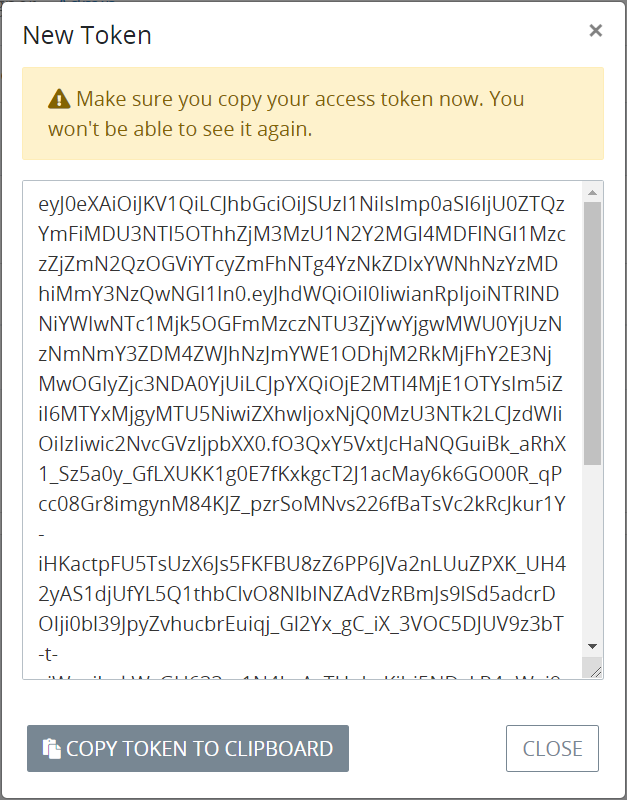
Click the Copy Token to Clipboard button.
Share the API token with the person to whom uses this user account. Ensure not to close the New Token screen until you do so.
Click Close. The API token displays in the API Tokens tab. Make note of when the API token automatically expires.
Click Save.
Delete an API Token
Delete an API token from a user account when that API token expires or to restrict that user from making calls to the ProcessMaker Platform RESTful API from an external third-party application or a Script.
Deleting a valid API token revokes the user holding the token from using an external third-party application from successfully making calls to the ProcessMaker Platform RESTful API. Deleting an API token cannot be undone.
Follow these steps to delete an API token:
Click the API Tokens tab.
Click the Delete icon
 for the API token to delete. A message displays to confirm deletion of the API token. The API token is referenced by its ID value.
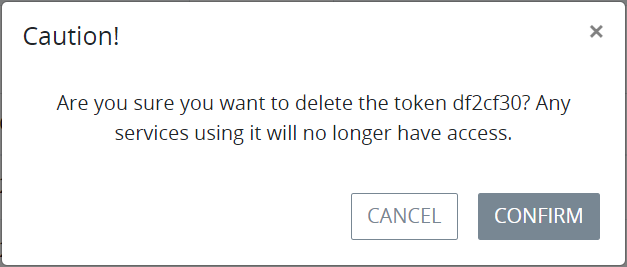
Click Confirm.
Click Save.
View All Security Logs for a User
In the Security Logs tab within each user account, ProcessMaker Platform maintains a record of the datetime, and IP address for the following activities that user performs:
Log on: Each successful and unsuccessful log on attempt
Log off: Each log off from ProcessMaker Platform
User profile changes: Any changes to that user's profile, including:
profile information
group memberships
permissions
API tokens, including creation, update, and deletion
Collections: Reading, creating, updating, and deleting any Collection or Collection record
Settings: Changing settings, including:
Create or revise any email server or changes in their configuration options (including IMAP)
Enable new SSO options or change configuration options
Enable or change configuration options to other systems, such as DocuSign and IDP
Enable LDAP or SCIM or change their configuration options
Enable or disable User Signals
Update User Extended Properties or change their designated time zone
Customize UI: Changes within the Customize UI menu (inputs to change setting values, including deletions)
System messages: System alerts and errors (including within Requests)
Other user activities: Other user activities in the platform, including:
Create, update, publish, archive, or unarchive a Process
Create, update, or delete any Designer asset, including Process Templates, Screens, Scripts, Environment Variable, Data Connector, PM Blocks, or Decision Tables
Create, update, or delete any non-Designer assets, including Saved Searches, Saved Search Charts, auth client, Script Executors, Dynamic UI dashboards or menus, or Translations
Perform global or local search queries
Access, reassignments, retries, rollbacks, and completion of Tasks, including parent Request ID
Start, cancel, and complete Requests
Access Queue Management/Laravel Horizon by section name
Create a user or group
See Security Log Events for a description of each user activity event.
In addition to the other user permissions required to edit a user account, the Security Logs permission is required to view security logs.
Follow these steps to view all activities in ProcessMaker Platform for a user:
Click on the Security Logs tab. That user's activity displays in a tabular format.
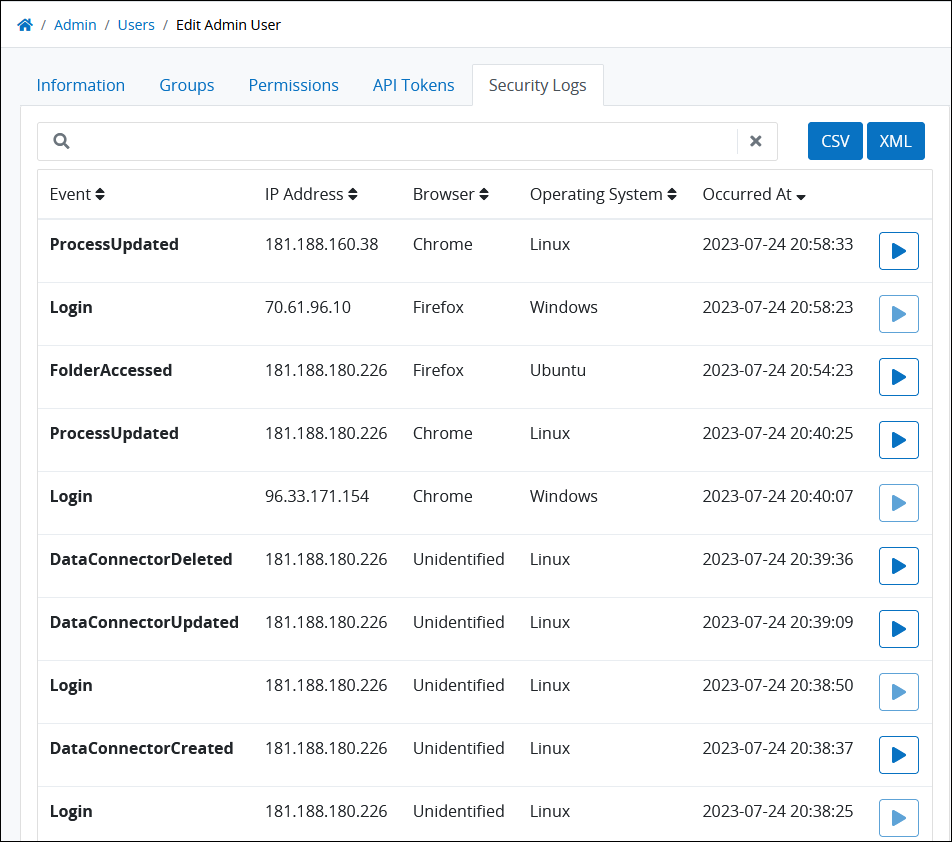 Each log entry contains the following information about that log event:
Event: The Event column displays the nature of the event.
IP Address: The IP Address column displays the IP address from which the event occurred.
Browser: The Browser column displays the name of the Web browser from which the event occurred.
Operating System: The Operating System column displays the name of the operating system from which the event occurred.
Occurred At: The Occurred At column displays the datetime at which the event occurred.
View Information About a Security Log for a User
Follow these steps to view information about a user's security log:
Click on the Security Logs tab.
Click on the
 icon to view more information about a user activity event.
Login and Logout events do not contain additional information, so the icon for their events are disabled.
Download the Security Logs for a User
Download a user's activity logs in CSV or XML formats.
In addition to the other user permissions required to edit a user account, the Security Logs permission is required to view security logs.
Follow these steps to download a user's activity logs:
Do one of the following:
Click the CSV button to download this user's activity logs in CSV format.
Click the XML button to download this user's activity logs in XML format.
The security logs compile in the background. While doing so, the following message displays: The file is processing... Please wait for an alert with the download link..
ProcessMaker Platform compiles the security logs from your your AWS S3 bucket in the background. You may continue working as necessary in ProcessMaker Platform. The following message displays from the currently displaying page when the security logs are ready to download: Click on the link and download the file. This link is available for 24 hours.
Click the Download link.
Search the Security Logs for a User
Use the Search function to filter the security logs based on a certain criteria. For example, use an IP address in the Search field to see log on or log off attempts from that IP address only.
In addition to the other user permissions required to edit a user account, the Security Logs permission is required to view security logs.
Follow these steps to search a user's security logs:
Enter in the Search setting the text to filter security logs using any of the following criteria:
Event: Filter by the name of the event that displays in the Event column.
IP address: Filter by the IP address from which the event occurred that displays in the IP Address column.
Web browser: Filter by the Web browser from which the event occurred that displays in the Browser column.
Operating system: Filter by the operating system from which the event occurred that displays in the Operating System column.
Datetime: Filter by the datetime that the event occurred that displays in the Datetime column.
Enter text into the Search setting, and then press Enter. Logs for that user display that match your entered text.
If there are no search results, the following message displays: No Results.