View the data details of a Saved Search's result in tabular format based on the type of Saved Search.
Overview
Types of Saved Searches
Regardless of whether you created a Saved Search or if it has been shared with you, you may view the data details of that search result that is based on the ProcessMaker Query Language (PMQL) parameters configured in that Saved Search.
An image represents each Saved Search from the left sidebar, but only display on pages associated with its type. Saved Searches are organized by type:
Request-related Saved Searches are accessed from Requests pages.
Task-related Saved Searches are accessed from Tasks pages.
Saved Searches for Collection records are accessed from the Collections sidebar icon
 in the Admin top menu option. (Your user account or group membership must have the "Collections: View Collections" permission to view the list of Collections unless your user account has the Make this user a Super Admin setting selected. See the Collections permissions or ask your Administrator for assistance. Lastly, your user account or group membership must have the View record permission from a Collection's configuration to view that Collection's records. See Configure a Collection or ask the manager of that Collection for assistance.)
Columns that display in the tabular-formatted results for a Saved Search can be customized by the user that created the Saved Search. See the following topics:
If a Saved Search has been shared with you, you may not change the type of information that displays in its results.
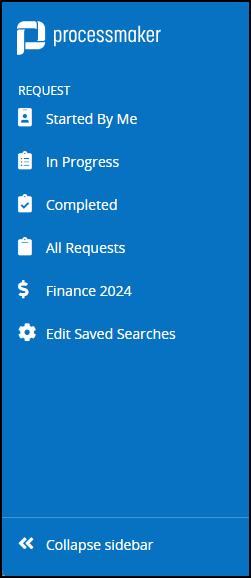
To quickly view how many search results pertain to each Saved Search that either you have created or have been shared with you, click the logo that displays from the left sidebar to expand that sidebar. View at a glance how many items pertain to each Saved Search as well as Saved Searches for that type.
Locate Data in a Saved Search
While viewing a Saved Search, use the Search function to locate data in that Saved Search. Locate data using the following methods:
Perform a PMQL query based on a Request-, Task- or Collection-type Saved Search.
Perform a plain-text search for data in that Saved Search.
View Request-Type Saved Search Results
Saved Searches that pertain to Requests display on the following Requests pages:
My Requests page. See View Your Requests That You Started.
In Progress page. See View Requests That Are In Progress.
Completed page. See View Completed Requests.
All Requests page. See View All Requests. (Note that your user account must have the Requests: View All Requests permission to view the All Requests page.)
An image represents each Saved Search from the left sidebar. Saved Search icons display below the icons to access the default Requests pages.
Follow these steps to view results from a Saved Search pertaining to Requests:
Go to a Request-related page.
Click the image that represents the Saved Search. The results for that Saved Search display.
Create charts of Saved Search results to visually analyze results.
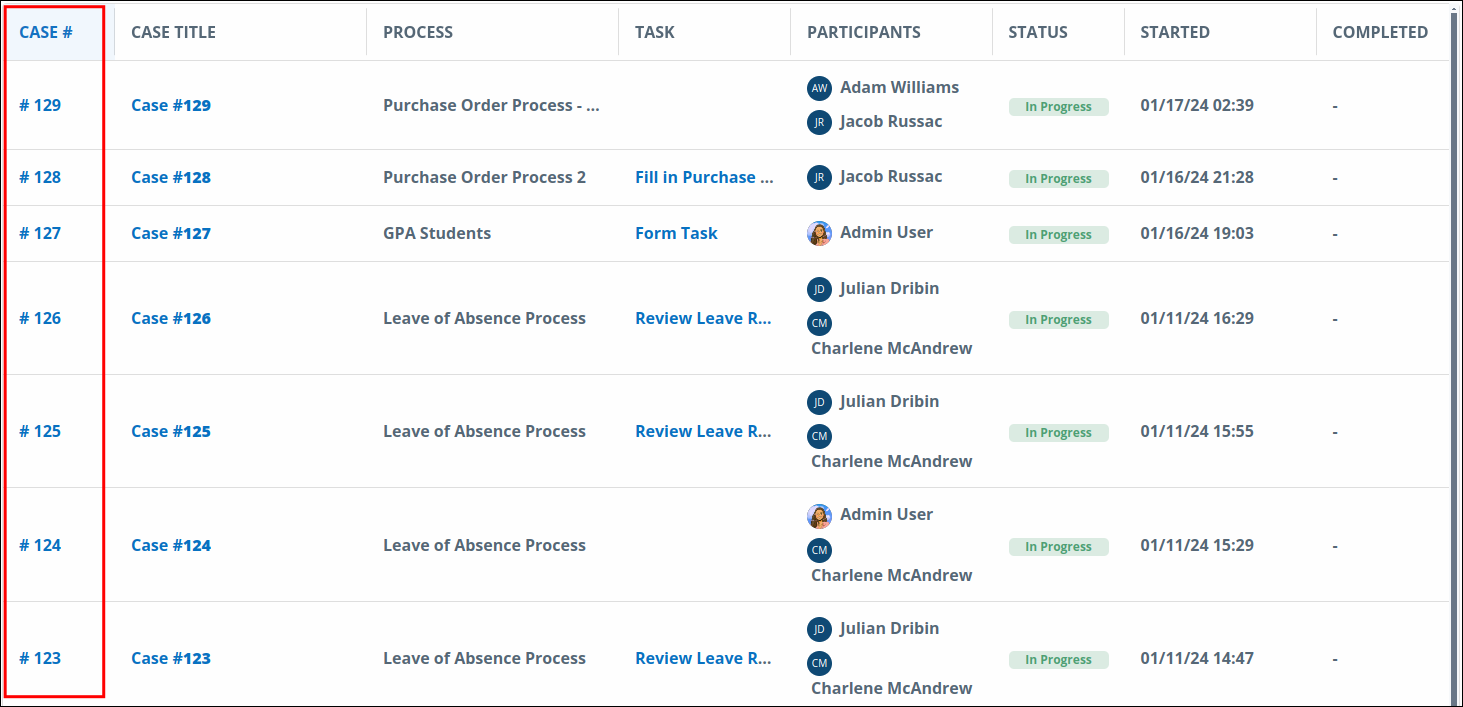
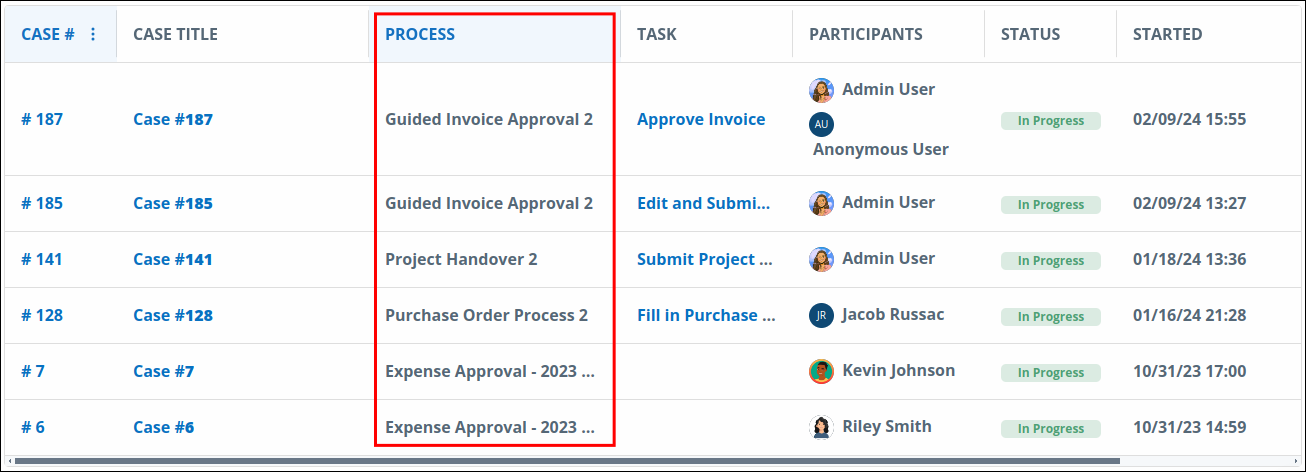
Below are results for a Request-related Saved Search.
.png)
View Task-Type Saved Search Results
Saved Searches that pertain to Tasks display on the following Tasks pages:
To Do page. See View Tasks You Need to Do.
Completed page. See View Completed Tasks.
Self Service page.
An image represents each Saved Search from the left sidebar. Saved Search icons display below the icons to access the default Tasks pages.
Follow these steps to view results from a Saved Search pertaining to Tasks:
Go to a Task-related page.
Click the image that represents the Saved Search. The results for that Saved Search display.
Create charts of Saved Search results to visually analyze results.
Below are results for a Task-related Saved Search.
.png)
View Collection Record Saved Search Results
Permissions Required
Your user account or group membership must have the "Collections: View Collections" permission to view the list of Collections unless your user account has the Make this user a Super Admin setting selected. See the Collections permissions or ask your Administrator for assistance.
Furthermore, your user account or group membership must have the View record permission from a Collection's configuration to view that Collection's records. See Configure a Collection or ask the manager of that Collection for assistance.
Saved Searches that pertain to records in a Collection display from the Collections icon![]() in the left sidebar after selecting the Admin top menu option. An image represents each Saved Search from the left sidebar. Saved Search icons display above the icons to access Collections.
in the left sidebar after selecting the Admin top menu option. An image represents each Saved Search from the left sidebar. Saved Search icons display above the icons to access Collections.
Follow these steps to view results from a Saved Search pertaining to records in a Collection:
Ensure that you are logged on to ProcessMaker Platform.
Click the Admin option from the top menu. The Users page displays.
Click the Collections icon
from the left sidebar. The Collections page displays the Collections that you are allowed to view.Click the image that represents the Saved Search. The results for that Saved Search display.
Create charts of Saved Search results to visually analyze results.
Below are results for a Saved Search related to records in a Collection.
.png)
View a Task Summary from Search Results
Hover over the row, click the
menu, and then select the Open Task option for the Task you want to open.
View a Request Summary from Search Results
From the Case # or Case Title column, click the link for the assigned Task.
Hover the row, then click the
View a Collection Record from Search Results
To view a Collection record from search results, click the Edit icon
for the record you want to edit.
Search for a Saved Search's Search Result
Use the Search setting to filter the Saved Search's search results that display.
No Search Results from the Saved Search?
If there are no search results from the Saved Search, the following message displays: No Data Available.
Display Information the Way You Want It
Control how tabular information displays in collection Record Saved Searches, including how to sort columns or how many items display per page.
Filter Information in Tasks and Requests Saved Searches
Filter your information with different criteria in Saved Searches.
Follow the next steps to filter information:
View one of the following:
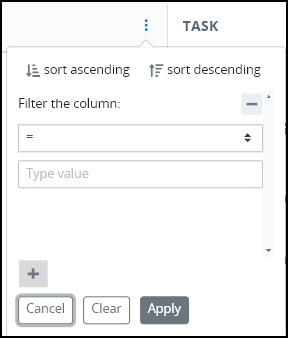
In a list column header, click the three dots. A window displays filter criteria.
.png)
Filter Criteria Apply one or more filter criteria as follows:
Click sort ascending to sort data in alphanumeric order or sort in chronological order if the data is dates/times.
Click sort descending to sort data in alphanumeric descending order or sort in inverse chronological order if the data is dates/times.
The Filter the column section displays by default. Click + to add a filter column. Configure the column filter as follows:
From the Operator setting, select one of the following according to the data type:
If the column data type is a number or a date, it displays the following operators: =, <, <=, >, >=, between, in, contains, regex.
If the column data type is a string, it displays the following operators: =, in, contains, regex.
If the column is a task status, it displays the following operators: =, in.
In the Type value setting, enter the information accordingly.
If there is more than one filter row, from the Select an operator setting, select And or Or to filter a subsequent filter.
Click Apply to apply filter criteria. The list filters data as configured.
Otherwise, click Cancel to cancel the filter criteria and close the window.
If want to clean previous filters, click Clear to remove all previous filters.
Filter information does not support the Task columns.
What is Regex?
Regular expressions, or regex, are patterns composed of characters and symbols used to find specific sequences in text. For an introduction to regex syntax, check out this primer. To practice and refine your regex skills, RegExr is an excellent tool, offering interactive examples and a platform for testing your patterns.
Filter cases that have a number in their process name. Do the following:
From a list of cases, go to the Process column.
Click the ellipses to the left of the column to view filter options.
From the Operator setting, select regex.
In the Type value setting, enter the regex pattern
\d.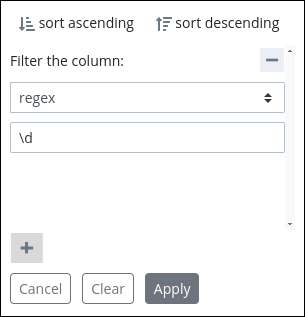
Only process with a number in their are displayed.
Filter cases that start with 12 in its case number. Do the following:
From a list of cases, go to the Case # column.
From the Operator setting, select regex.
In the Type value setting, enter the regex pattern
(12)+.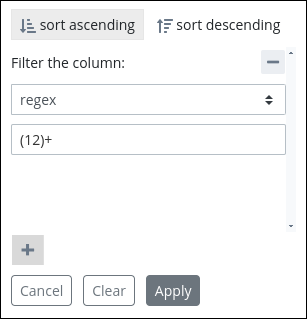
All case numbers starting with 12 are displayed.