Learn how to use PM Blocks in processes. Watch the following product tour to begin.
Add a PM Block to Your Process Model
Permissions
Your user account or group membership must have the following permissions to add and configure a PM Block to the Process model unless your user account has the Make this user a Super Admin setting selected:
Processes: Edit Processes
Processes: View Processes
See the Process permissions or ask your Administrator for assistance.
Add a PM Block from one of the following locations in Process Modeler:
Object Panel: Located to the left of the Process Modeler, the Object Panel contains various process modeling objects.
Object Bar: Located at the bottom of the Process Modeler, the Object Bar contains pinned process modeling objects for quick access.
Ensure that at least one PM Block is created and is not archived. Archived PM Blocks cannot be added to a Process model.
Follow these steps to add a PM Block from the Object panel to the Process model:
Ensure that the Object panel is visible. If not, click the Add icon
 from the Object bar at the bottom.
Click the PM Blocks tab. All active PM Blocks in your organization display. Each PM Block may be represented by a different icon.
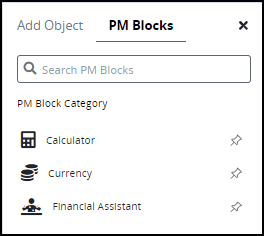
Click the PM Block object from one of the following sections:
Pinned Objects: The PM Block object appears in the Pinned Objects section when it is pinned.
Object Category: The PM Block object appears in the Object Category section when it is not pinned.
Click the location in the Process model to place this object. Follow these guidelines when placing this PM Block:
Optionally place this PM Block between two existing Process model objects already connected with a Sequence Flow element. See Place an object between two connected objects.
If a Pool element is in your Process model, the PM Block cannot be placed outside of the Pool element.
Follow these steps to add a PM Block from the Object bar to the Process model:
Ensure that the object is pinned to the Object bar. If not, pin it.
In the Object bar at the bottom center, click the object's icon. This object's icon displays adjacent to the mouse icon to indicate this PM Block may be placed into the Process model.
Click the location in the Process model to place this object. Follow these guidelines when placing this PM Block:
Optionally place this PM Block between two existing Process model objects already connected with a Sequence Flow element. See Place an Object Between Two Process Model Objects Already Connected with a Sequence Flow Element.
If a Pool element is in your Process model, the PM Block cannot be placed outside of the Pool element.
Add boundary events
- Boundary Timer Event element
- Boundary Error Event element
- Boundary Signal Event element
- Boundary Conditional Event element
- Boundary Message Event element
Settings
The PM Block has the following panels that contain settings:
Configuration panel
Loop Characteristics panel
Configuration Panel Settings
Edit the PM Block Name
Follow these steps to edit a PM Block's name:
Select the PM Block from the Process model in which to configure its settings.
Ensure that the Configuration panel displays. If not, show it. The Name setting displays. This is a required setting.
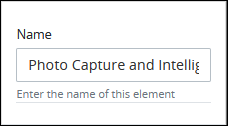
In the Name setting, edit the selected PM Block's name and then press Enter.
Loop Characteristics Panel Settings
Use the Loop Activity panel settings to specify how to run multiple instances of this object. The following loop modes are available:
No Loop Mode
Select the No Loop Mode option to perform this object's function only once.
Follow these steps to specify characteristics to perform multiple instances of the object:
Select the object from the Process model. Panels to configure this object display.
Expand the Loop Activity panel. By default, the Loop Mode setting is set to No Loop Mode and the function is performed only once.
.png "image(135).png")
Loop
Select the Loop option to sequentially repeat this object's function multiple times until an exit condition is True. This is useful when a function should be performed multiple times with the same set of data, such as, processing a credit card payment. This loop mode has the following characteristics:
The object's function is repeated until the exit condition is
Trueor the maximum iterations limit is reached.At any given time, only one instance of the object is active. The subsequent instance does not begin until the current instance completes.
The same exit condition evaluates at the end of each instance; however, value(s) of the Request variable(s) used in the exit condition can change during an instance resulting in the exit condition to eventually evaluate as
True.If any one instance of that function does not complete, workflow pauses.
All active instances are terminated if an interrupting boundary-type event object triggers.
An object configured in this mode shows the Loop icon
.png "image(137).png") in Process Modeler.
in Process Modeler.
Follow these steps to specify characteristics to perform multiple instances of the object:
Select the object from the Process model in which to specify multiple instance characteristics. Panels to configure this object display.
Expand the Loop Activity panel to display the Loop Mode Setting.
From the Loop Mode setting, select the Loop option. The settings for this loop mode display:
.png "image(136).png")
In the Maximum Iterations setting, enter an integer value representing the maximum number of times this Task should be performed.
In the Exit Condition setting, enter a condition in FEEL syntax. When this condition is True the loop activity is halted.
Multi-instance(Parallel)
Select the Multi-instance (Parallel) option to perform this object's Task multiple times in parallel a fixed number of times. This is useful when performing any action in bulk, such as sending an email to several people. This loop mode has the following characteristics:
Instances of the object are governed by the size of an array-type Request variable where a new instance is created for each item in this variable. For example, an array with 10 items will create 10 parallel instances of this function that each contains data from its respective array index.
All instances begin simultaneously when this object triggers; however, they perform their function independently of each other.
The function as a whole completes when all instances are complete.
The output from each instance can either be saved in the source Request variable or a new array-type Request variable.
All active instances terminate if an interrupting boundary-type event object triggers.
A object configured in this mode shows the Multi-instance (Parallel) icon in Process Modeler.
Follow these steps to specify characteristics to perform multiple instances of the object:
Select the object from the Process model in which to specify multiple instance characteristics. Panels to configure this object display.
Expand the Loop Activity panel to display the Loop Mode Setting.
From the Loop Mode setting, select the Multi-instance (Parallel) option. The settings for this loop mode display:
.png "image(138).png")
In the Request Variable Array setting, enter the name of an array-type Request variable. The size of this array will determine how many times this loop iterates.
In the Output Data Variable setting, enter the name of an array-type Request variable in which to store the results of all instances. Each instance of the loop saves to a separate JSON object within the array of the specified Request variable. If the Output Data Variable setting is not configured, then the output data replaces the source data in the Request Variable Array.
Multi-instance(Sequential)
Response Mapping Panel Settings
Map Data from the Data Source to the Request's JSON Data Model
Configure how data from the PM Block integrates with Request data.
The procedure to integrate the data source's data to the Request JSON data model is called response mapping: specifying into which Request variable to store the data source's data. The PM Block may be configured with response mapping, whereby a specified source name in the body or header of the data source response's is mapped to store that value in a specified Request variable. By relying on the PM Block's response mapping, the Process Designer only needs to select the Request variable name as mapped in the PM Block's response without knowing technical details for this mapping.
Each JSON object contains a key name that references the JSON object, and the value for that key. If the JSON object already exists in a Request's JSON data model, then the PM Block overwrites the existing JSON object value with that from the data source. If the JSON object(s) to map the data source data does not exist, then the PM Block adds the JSON data object(s) to that Request's JSON data model.
Follow these steps to specify the Request JSON data object(s) to which to map the data source's data:
Select the PM Block from the Process model to map the data source's data to the Request JSON object(s).
Ensure that the Configuration panel displays. If not, show it. Panels to configure this element display.
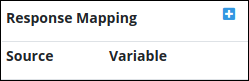
Expand the Response Mapping panel if it is not presently expanded. The Response Mapping setting displays.
Click the
 icon to add a JSON object to which to map data from the data source. The Source and Set to Request Variable settings display to add the JSON source name and its variable, respectively, for the JSON object.
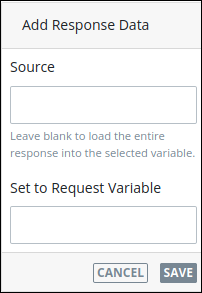
In the Source setting, enter the name of the source from which to store the response. If the source is from Request data, such as from a Collection, the source name is
data.datais the name of the JSON object that stores all data for each Request. However, the Source setting corresponds with how the PM Block maps the data response: by selecting a mapped Request variable from the Set to Request Variable setting below, its corresponding source name displays in the Source setting. Optionally, specify the source name as a Request variable using mustache syntax.In the Set to Request Variable setting, enter the Request variable as configured in the PM Block's response mapping in which to store the data source's response. Optionally, specify the source name as a Request variable using mustache syntax. After doing so, the Source setting displays the source's name configured for that response mapping.
Click Save.
Repeat Steps 4 through 6 for each Request variable to store the data source's response.
Click the Delete icon
to delete a mapped response from the Response Mapping setting.