Permissions
Your user account or group membership must have the following permissions to edit a group unless your user account has the Make this user a Super Admin setting selected:
Groups: Edit Groups
Groups: View Groups
See the Groups permissions or ask your Administrator for assistance.
Edit a Group
Follow these steps to edit a group:
View all groups. The Groups page displays.
Click the
 menu, and then select the Edit Group option for the group to edit. The Group Details tab displays.
 Edit settings for any of the following in the group:
Edit Group Settings
Follow these steps to edit general group settings:
Edit the group in which to edit its settings. The Group Details tab displays.
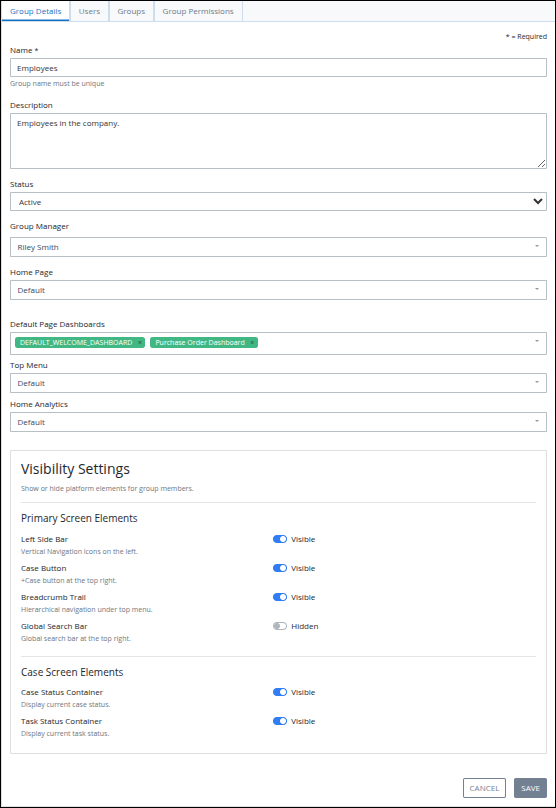
In the Name setting, edit the name of the group. This is a required setting.
In the Description setting, edit the description of the group.
From the Status drop-down menu, select the status of the group from one of the following options:
Active: An Active group is one to which user accounts can be assigned as members.
Inactive: An Inactive group is one to which user accounts cannot be assigned.
If configured Two-Factor Authentication in Log-In Option Settings, enable the Two Factor Authentication toggle for the members of this group.
Code Validity
The length and validity of the security code depend on the selected 2FA method.
When 2FA codes are delivered via Email or SMS, users receive an 8-digit code that is valid for 5 minutes. This extended validity accounts for potential delivery delays caused by background processing, external providers, or email and mobile carriers.
When using an authenticator app (such as Google Authenticator), users receive a 6-digit code that is valid for 1 minute, following standard industry practices since the code is generated locally on the user’s device.
From the Group Manager drop-down menu, select the user who manages all members of this group. Tasks assigned to this group can be configured to escalate to the group's manager specified in this setting. If no user is selected as this group's manager, Tasks are assigned by default to the Process Manager.
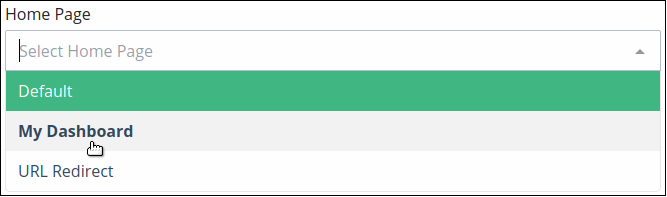
From the Home Page drop-down menu, select the type of home page to display for all members of the group:
Default – Displays the standard home page configuration.
My Dashboard – Shows a custom dashboard. For details, see Select the Home Page Dashboard for the Group's Member..
URL Redirect – Redirects users to a specific URL. For configuration steps, see Configure the Home Page to Redirect to a Destination for the Group's Members.
If you select Default, configure the Default Page Dashboards setting to define which dashboards appear in the left menu of the Participant Home Screen.
From the Top Menu drop-down menu, select the custom menu that replaces the default top menu for all users in this group. See Select the Home Page Dashboard for the Group's Member.
Enable Allow to set a Password to allow members of this group to log on with username and password credentials, which enhances the security with SSO enabled. If this option is disabled, then as a best practice block the option to set or change the password.
Click Save.
Select the Home Page Dashboard for the Group's Members
A dashboard displays important and relevant business management information (BMI) and key performance indicators (KPI) to specific business stakeholders when they need it. After the group's user logs on to ProcessMaker Platform, the dashboard displays instead of the default ProcessMaker page.
Dashboards on Mobile Devices
When a custom home dashboard is configured, accessing the platform from a mobile device will default to Desktop Mode. If switched to Mobile Mode, the custom dashboard will not be available in the home menu, as this mode is designed exclusively to display the platform’s default mobile dashboard experience.
Ensure that at least one dashboard exists in your ProcessMaker Platform instance. Follow these steps to select the dashboard for the group's members home page:
From the Home Page drop-down menu, select the My Dashboard option.
The Dashboard setting displays.
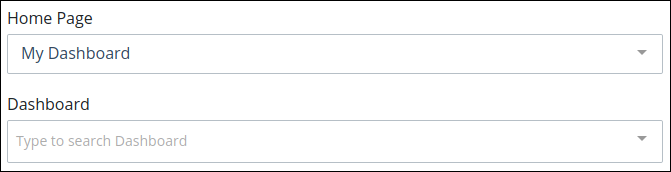
From the Dashboard drop-down menu, select the dashboard as the home page for the group.
Click Save. The group's members will see this change the next time they log on.
Configure the Home Page to Redirect to a Destination for the Group's Members
Configure a custom home page for a group's member that redirects to a specified URL when that user next logs on. The redirected URL may be to an external site, such as to your organization's portal, or to a ProcessMaker Platform location such as a specified Collection or Saved Search to which that group's member has access.
See the following sections for information to redirect to a Collection or Saved Search since both require unique conditions to configure properly:
Redirect to an External Site
Specify a URL that redirects a group's member to an external site such as to your organization's portal:
From the Home Page drop-down menu, select the URL Redirect option.
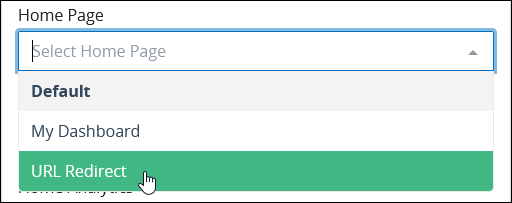
The Redirect Url setting displays.
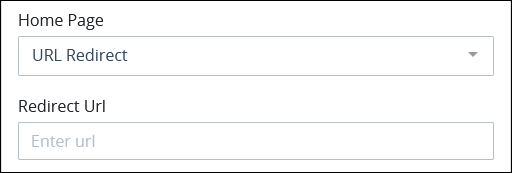
In the Redirect Url setting, enter the external site's URL to redirect to that location upon next log on.
Click Save.
Redirect to a Collection
Specify a URL that redirects a group's member to a Collection when that user next logs on. Locate the Collection's URL prior to configuring this setting.
Ensure that the group has the following:
Collection permissions, as configured from a group
Access to at least view the records in that Collection as group members
Redirect to a Saved Search
Specify a URL that redirects a group's member to a Saved Search when that user next logs on. Locate the Saved Search's URL prior to configuring this setting.
Ensure that the group's member have been shared the Saved Search.
If a group's member cannot access a Collection or Saved Search, the following message displays instead of the Saved Search: Unauthorized.
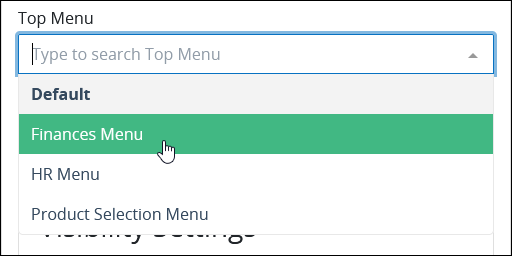
Select the Menu for the Group's Members
A custom menu replaces the default top menu that displays in ProcessMaker Platform. Ensure that at least one custom menu is in your ProcessMaker Platform instance.
The group's members do not experience the change until the next time each user logs on.
Follow these steps to select the menu for the group's home page:
From the Top Menu drop-down menu, select the custom menu for the group to replace the default top menu.
Click Save.
Configure Visibility Settings
Show or hide ProcessMaker Platform user interface (UI) elements for members of a group and provide a customized view of the options available in their dashboard. Changes made to these settings affect the UI immediately. However, any currently logged on group members must log off and then log back on to see these changes.
Use the toggle keys in the Visibility Settings section to show/hide the following UI elements:
Primary Screen Elements
The Primary Screen Elements group has the following toggle keys:
Left Side Bar: Use the Left Side Bar toggle key to show/hide the left sidebar for the members of this group. When the Left Side Bar toggle key is set to Hidden, group members cannot view Request by status type or Saved Searches.
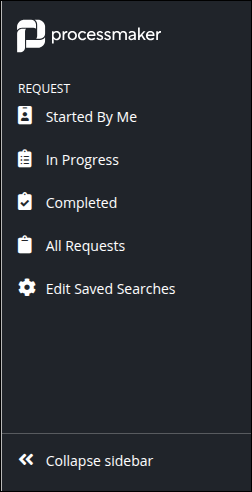
Case Button: Use the Request Button toggle key to show/hide the +Request button for the members of this group. The +Request button allows users to start a Request for a Process. When the Request Button toggle key is set to Hidden, group members cannot start Requests from their dashboard.

Breadcrumb Trail: Use the Breadcrumb Trail toggle key to show/hide the breadcrumb menu at the top of each page in the platform. When the Breadcrumb Trail toggle is set to Hidden, group members cannot view the breadcrumbs throughout the platform.
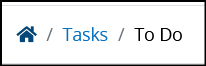
The Breadcrumbs Menu
Global Search Bar: Use the Global Search Bar toggle key to show/hide the Global Search bar for the members of this group. When the Global Search Bar toggle is set to Hidden, group members cannot view the Global Search bar throughout the platform.

Case Screen Elements
Case Status Container: Use the Case Status Container toggle key to show/hide the Request Details and Comments for members of this group. When the Case Status Container toggle key is set to Hidden, group members cannot view the Request Details and Comments container.
Task Status Container: Use the Task Status Container toggle key to show/hide the Task Details and Actions for members of this group. When the Task Status Container toggle key is set to Hidden, group members cannot view the Task Details and Actions container.
Manage Group Members
Manage which user accounts and/or groups are members of a group. Follow these steps to manage members for a group:
Click the Group Members tab.
Manage the members for this group as necessary:
Manage users within this group
Manage groups within this group
View the User Accounts in a Group
Follow these steps to view the user accounts in a group:
Manage the group in which to view members, and then click the Users tab. The Users tab displays the user accounts that are members of this group. If there are no group members, the following message displays: No Data Available.
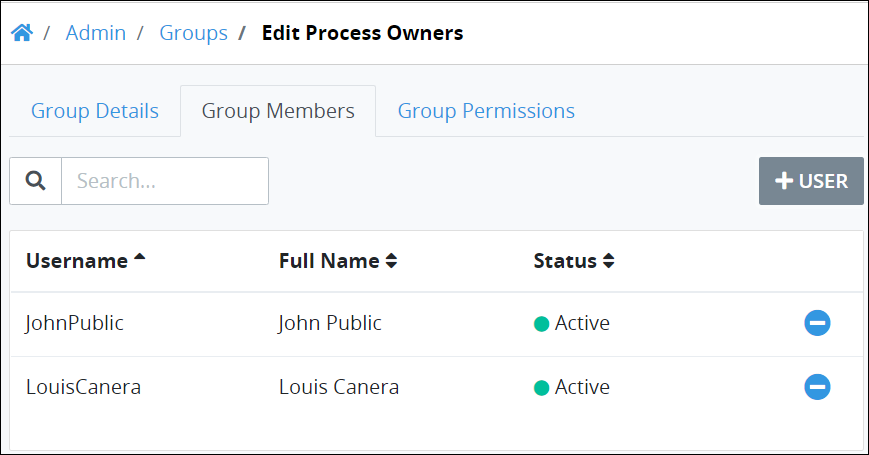
The Users tab displays the following information:
Username: The Username column displays the user account's username for the group member.
Full Name: The Full Name column displays the full name for the group member.
Status: The Status column displays one of the following statuses for the user account:
Active: An Active user account is one in which a person can use his or her user account to log on to ProcessMaker Platform.
Inactive: An Inactive user account is one in which a person cannot use his or her user account to log on to ProcessMaker Platform.
Click the Search setting and then enter text to filter the list of user accounts. As you enter text into the Search setting, user accounts display that match your entered text.
Add/Remove a User Account from a Group
Follow these steps to add user accounts to a group:
Click the +User button. The Add Users screen displays.
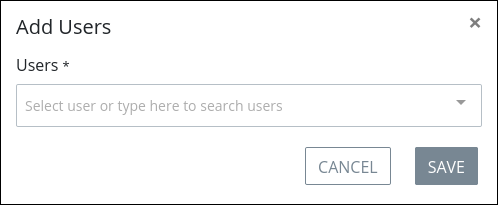
From the Users drop-down menu, select which user account(s) to include as members of this group by selecting the person's full name. Multiple users may be added, one at a time, to this setting. You may click the Remove icon to remove a user account from the Users drop-down menu.

Click Save. The user account(s) from the Users drop-down menu display in the Group Members tab.
To remove a user, click the Remove from Group icon
 for the user account. The Caution screen displays to confirm the removal of the user from the group.
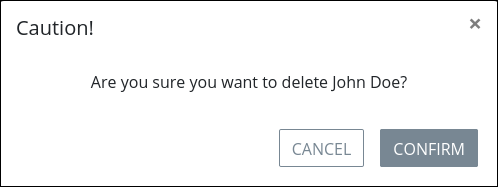
Click Confirm.
View the Groups in a Group
Follow these steps to view the groups in a group:
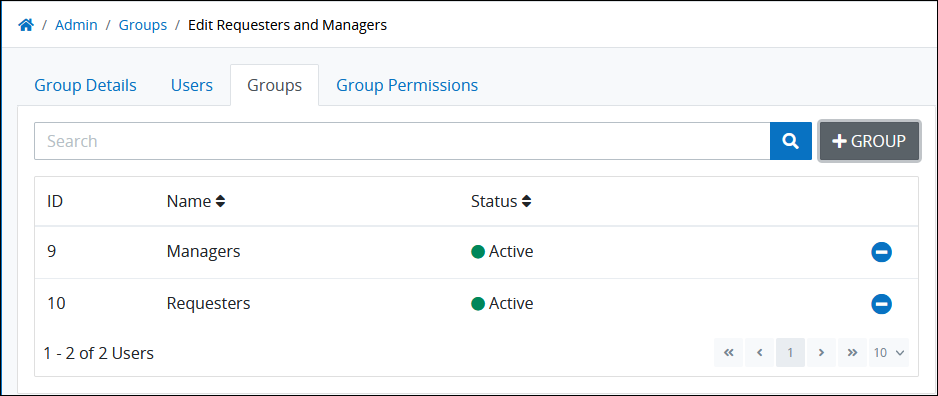
Manage the group in which to view members, and then click the Groups tab. The Group Members tab displays. The Groups tab displays the groups that are members of this group. If there are no groups within this group, the following message displays: No Data Available.
Groups tab to configure which groups are within the current group
The Groups tab displays the following information:
Name: The Name column displays the name of the group.
Status: The Status column displays one of the following statuses for the group:
Active: An Active group is one to which user accounts can be assigned as members.
Inactive: An Inactive group is one to which user accounts cannot be assigned. When a group becomes inactive, user accounts that were members of that group are no longer members.
Click the Search setting and then enter text to filter the list of groups. As you enter text into the Search setting, groups display that match your entered text.
Add/Remove a Group from a Group
Circular Group Assignment
Avoid assigning circular group assignments. For example, if you have three groups like Group A, B, and C, follow the next steps:
Add Group A to Group B.
Add Group B to Group C.
Add Group C to Group B.
Assign Group A to a Start event to start a request.
There is no possibility to start requests. The start request windows display always loading. To avoid it, remove Group B from Group C.
Follow these steps to add a group to a group:
Click the +Group button. The Add Groups screen displays.
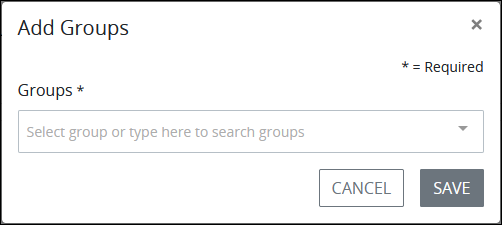
From the Groups drop-down menu, select which group(s) to include as members of this group by selecting the group's name. Multiple groups may be added, one at a time, to this setting. You may click the Remove icon to remove a group from the Groups drop-down menu.
Click Save. The group(s) from the Groups drop-down menu display in the Groups tab.
To remove a group, click the Remove from Group icon
for the group. The Caution screen displays to confirm the removal of the group from this group. 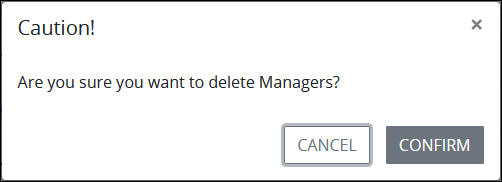
Click Confirm.
Edit Group Permissions
Permissions assigned to the group apply to all user account members and/or groups within this group. Follow these guidelines to change which permissions from each permission category that are assigned to all group members:
Click the Group Permissions tab. The Group Permissions tab displays permissions assigned to all members of that group.

Group Permissions tab in a group's settings which are additive to user account settings for group members
Switch on the Assign all permissions to this group toggle to assign all permissions to the members of this group.
Click a permission category to expand the view of individual permissions within that category.
Click an expanded permission category to collapse that category.
Assign permissions for all members of this Group by switching on its toggle. See Permission Descriptions for Users and Groups.
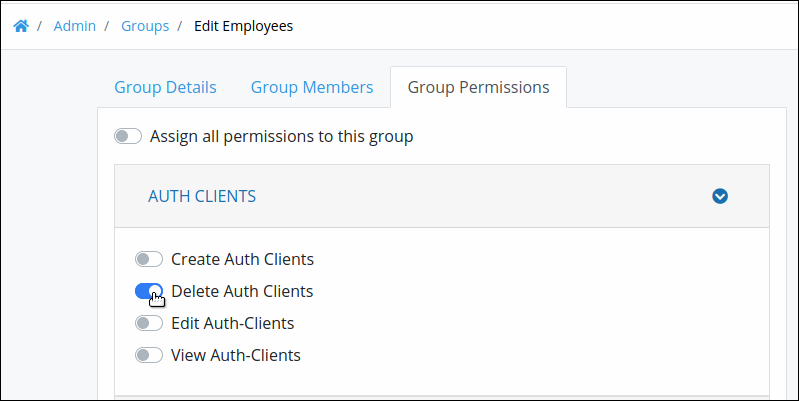
Unassign permissions for all members of this Group by switching off its toggle. See Permission Descriptions for Users and Groups.
Click Save if you made any changes in the Group Details or Group Permissions tabs.