A Decision Table is a two-dimensional grid that outlines various potential business rules and their corresponding data outputs. These outputs subsequently influence the workflow routing for any process that utilizes the Decision Table. Essentially, the Decision Table serves as a framework for evaluating business rules and determining the appropriate routing for processes.
Decision Tables are saved as Decision Model and Notation (DMN) files. DMN is a standard notation to model and run decisions in business contexts, used by business analysts, developers, and process designers to manage complex decision-making scenarios.
Why Use Decision Tables?
Decision Tables offer several key benefits that make designing and managing business rules easier and more efficient:
Easily create and manage complex sets of business rules with improved readability and transparency.
Build rules without writing code, making them accessible to both technical and non-technical users.
Decision Tables are referenced in processes but function independently, allowing for reuse across multiple workflows
Evaluate expected outcomes by testing Decision Tables before integrating them into a process.
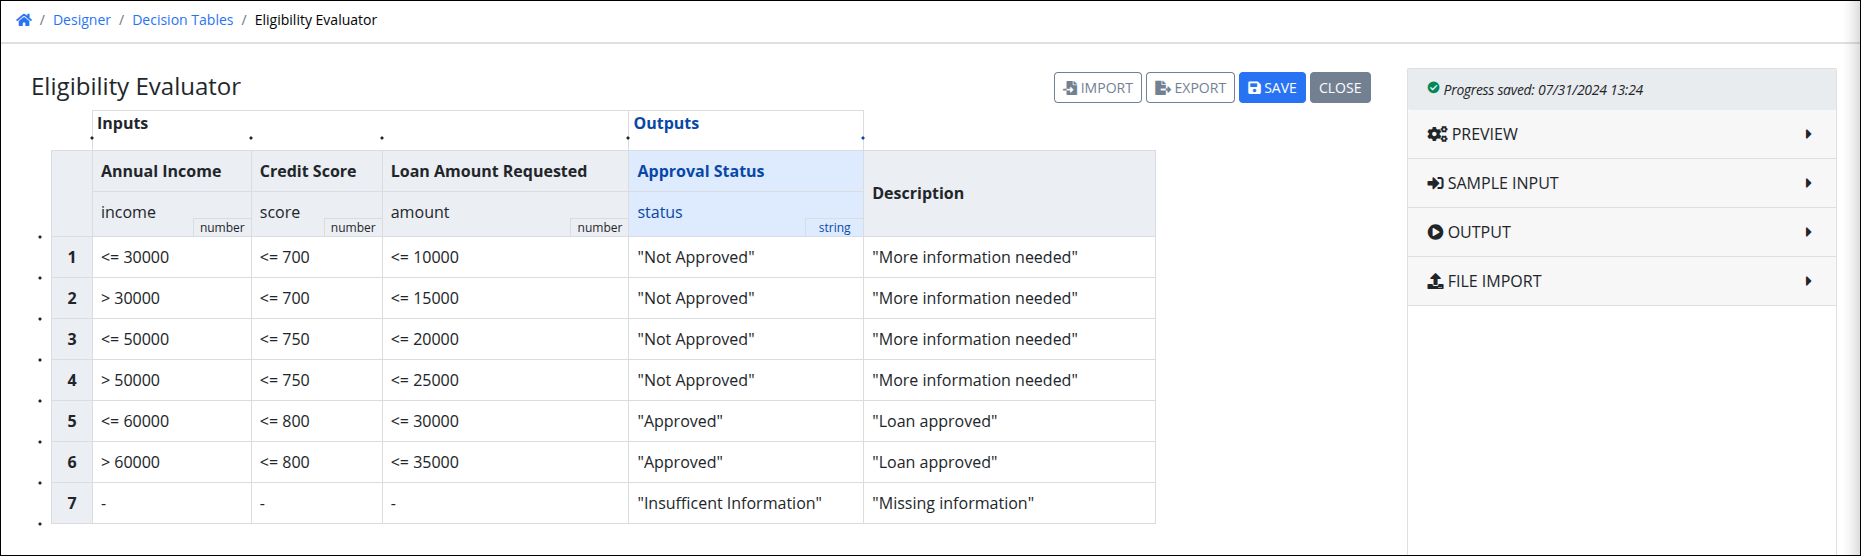
Components of a Decision Table
Each row in a Decision Table represents one decision. As a best practice, add a descriptoin for each decision for greater clarity. Collectively, a set of decisions represents business rules for that use case.
Each decision contains the following components:
Inputs
Inputs are the conditions that must occur for each decision. A decision may have at least one input
Outputs
When certain conditions are met, an output is generated and saved in a decision variable. Each decision has one output. The decision variable can then be mapped to a process variable which will be used for workflow routing.
Each input and output for a decision has the following:
Label
Labels for both inputs and outputs provide brief descriptions of their functions. You can identify these labels easily in the Decision Table header as they are displayed in bold.
Decision Variable
Both inputs and outputs must have a decision variable assigned to them. Decision variables are displayed below their labels in the header.
A decision variable represents the value of input and output columns in a Decision Table. These variables exist inside a Decision Table only, and they must be mapped to process variables to access them in cases.
By default, decision variables are of string data type, but can be changed to any of the following data types:
boolean: Represents one of two possible values (usually denoted
TRUEandFALSE).date: Represents a date. The date is in the following format:
YYYY-MM-DD. For example:2020-07-01.datetime: Represents a datetime. The datetime is in the following format:
YYYY-MM-DD HH:MM:SS. For Example:2020-07-01 14:25:15.number: Represents a number.
string: Represents a string.
time: Represents time. For example:
14:25:15.formula: The decision variable's value is computed using a formula. This formula can be built using Request variables, constants and arithmetic operators. For Example:
price * 0.15
The formula data type can only be used for input columns in a Decision Table.
Single-Hit vs. Multi-Hit Decision Tables
Decision Tables support both single-hit and multi-hit policies, offering flexibility for different rule evaluation needs.
Single-hit decision tables return only one matching rule based on a predefined order, ensuring clear and deterministic outcomes—ideal for scenarios like eligibility checks or approvals where only one rule should apply.
Multi-hit decision tables, on the other hand, evaluate all matching rules and aggregate their results, making them suitable for complex scenarios requiring multiple conditions to be considered simultaneously.
Single: Returns a single result based on the selected single-hit policy. | |
|---|---|
First | Evaluates rules sequentially and returns the output of the first satisfied rule, ignoring the rest. Users can reorder rules to control priority. |
Unique | Ensures that only one rule is satisfied and returns the output of a single satisfied rule. If multiple rules are satisfied, the decision table returns an error. |
Any | Returns the output when multiple rules are satisfied, but only if they all produce the same result. If conflicting outputs exist, the decision table fails. |
Multiple: Evaluates all matching rules and aggregates the results based on the selected multi-hit policy. | |
Collect Sum | Returns the sum of the outputs from all satisfied rules. Outputs must be numerical values or durations. |
Collect Min | Returns the smallest output value among all satisfied rules. Outputs must be comparable, such as numbers, durations, strings, dates, or times. |
Collect Max | Returns the largest output value among all satisfied rules. Outputs must be comparable, such as numbers, durations, strings, dates, or times. |
Collect Count | Returns the total count of outputs of all satisfied rules. Each rule's output can be of any type, but the decision table always returns a number. |
Rule order | Returns the outputs of all satisfied rules in a list, maintaining their evaluation order. |
With both policies available, decision tables can handle everything from straightforward rule enforcement to advanced calculations and prioritizations.
Configuring Hit Policies
See a complete example of using different decision policies.
For details on configuring single vs multi-hit policies, see Test a Decision Table.
See an example of a Decision Table that uses a Collection and variables as inputs.
Using Conditions
Inputs and outputs of a Decision Table can have conditions to evaluate business rules. Decision Tables use the Drools engine for these conditions, which is based on the Decision Model and Notation (DMN) and Friendly Enough Expression Language (FEEL) standards. Following are some examples of using conditions in a Decision Table.
Concatenate strings by using the
+symbol as follows:"Spring" + "2024" = "Sring2024"Split strings using the
splitfunction. The next example splits a string by specifying the delimiter symbol, in this case that is space (\\s).split( "Kate Norris", "\\s" ) = ["Kate", "Norris"]
Use
.yearto extract the year from a date:date( "2023-12-31" ).year = 2023
Use number ranges within conditions.
[ 100000 .. 199999 ]: A range where the number is greater than or equal to 100000 and less than 199999.] 0 .. 99999 ]: A range where the number is less than 100000.
The following example calculates the value of a Decision column using a formula.
ShippingCost = weight*2NetIncome = income-(income*tax)
Use the mustache syntax {{variable_name}} to use process variables and Magic Variables in a Decision Table. This syntax avoids hard-coded constant values..png)
Some FEEL expressions require an explicit reference to the variable. For example,
contains(variable, string). Use mustache brackets to reference the variable in order to search for the string inside of it.Follow these steps to reference Collection data:
In a condition, enter
{{. A gray-colored data icon suggests possible Collections to call values within it.Select a Collection.
Press the
TABkey. The autocomplete enters a mustache syntax expression with a Data icon to access the selected Collection. If there are no Collections, the suggestion disappears.
See Drools Documentation and Drools DMN FEEL handbook for more information on using conditions.
See a detailed example of using formulas in a Decision Table
View All Decision Tables
Permissions
Your user account or group membership must have the "Decision Tables: View Decision Tables" permission to view and search for Decision Tables unless your user account has the Make this user a Super Admin setting selected.
See the Decision Tables permissions or ask your Administrator for assistance.
ProcessMaker Platform displays all Decision Tables in one location making it easy to manage Decision Tables.
Follow these steps to view all Decision Tables in your organization:
Log on to ProcessMaker Platform.
Click the Designer option from the top menu to view the Designer Welcome Screen.
From the Assets panel, hover over Decision Tables, and then select View All Decision Tables. Alternatively, you can also click the Decision Tables icon
 from the sidebar on the left.
.png)
The Decision Tables page displays the following information:
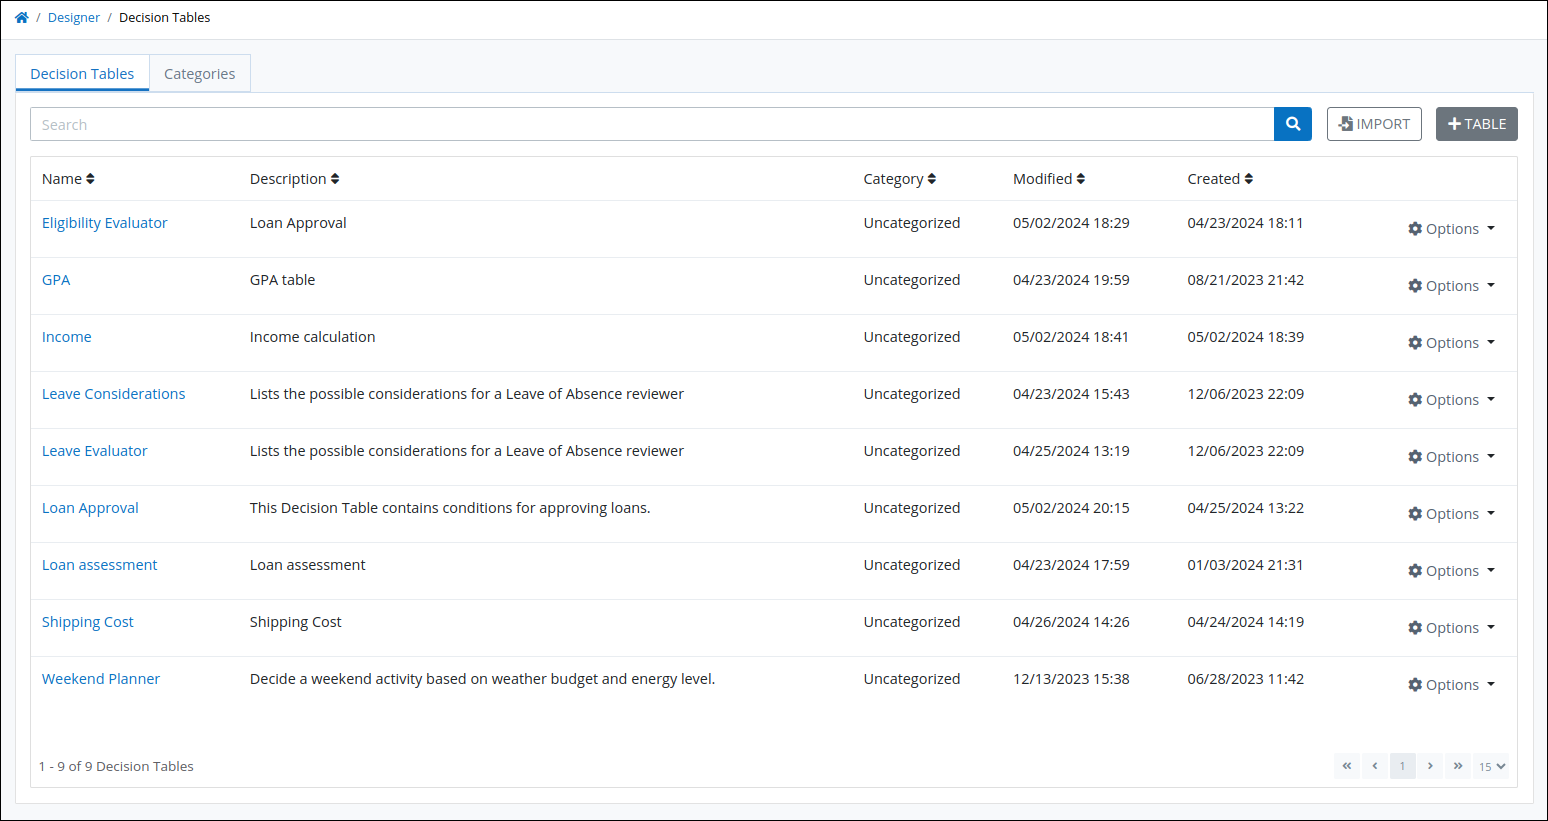
The Name column displays the name of the Decision Table. Click the name to edit the Decision Table in Decision Table Editor.
The Description column displays the description of the Decision Table. See Configure a Decision Table.
The Category column displays the Decision Table Category.
The Modified column displays the date and time the Decision Table was last modified.
The Created column displays the date and time the Decision Table was created.
Create and Test Decision Tables
Follow the links below to create, manage and test decision tables.