Create a new Decision Table that can be referenced from any Decision Task in a process.
Permissions
Your user account or group membership must have the following permissions to create a new Decision Table unless your user account has the Make this user a Super Admin setting selected:
Decision Tables: Create Decision Tables
Decision Tables: View Decision Tables
See the Decision Tables permissions or ask your Administrator for assistance.
Follow these steps to create a new Decision Table:
View your Decision Tables. The Decision Tables page displays.
Click the +Table button. The Create Table screen displays.

In the Name setting, enter the name of the Decision Table. Decision Table names must be unique and can only use apostrophe characters (
') and spaces.In the Description setting, enter the description of the Decision Table.
From the Category drop-down menu, select one or more Decision Table Categories to associate with this Decision Table. To remove a Decision Table Category that is currently selected, click the
 icon for that selection or press
 Enterwhen the drop-down is visible.From the Project drop-down menu, optionally select the Project(s) for this Decision Table. This setting only displays Projects where you are a member. To remove a Project that is currently selected, click the
icon for that selection or press Enterwhen the drop-down is visible.Click Save to create the Decision Table.
See an example of how to create a Decision Table that uses a Collection and variables and inputs.
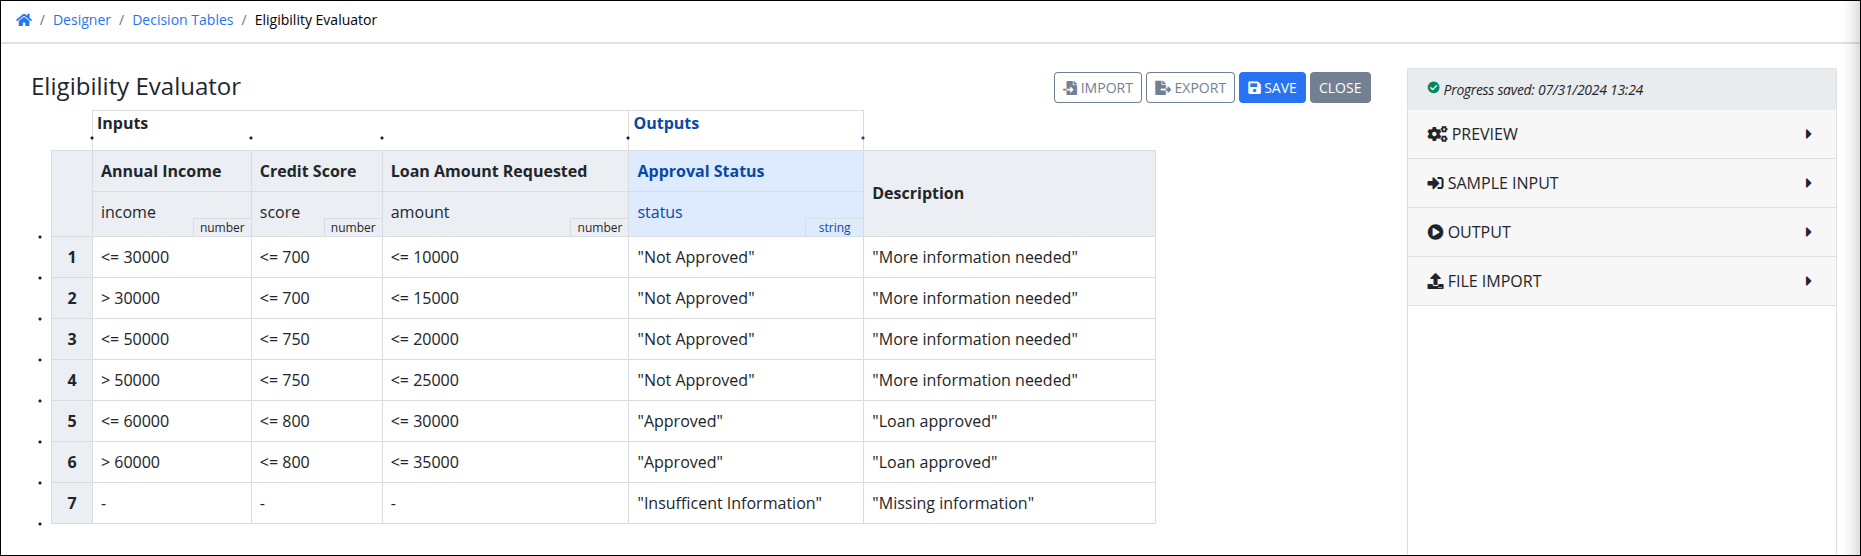
Add or Remove Input and Output Columns
Decision input columns display immediately below the Inputs section. Decision output columns display immediately below the Outputs section. Dots above each column separator indicate where to add a new column to the right of the existing column.
Follow these steps to add or remove an input or output column:
To add a column, do one of the following:
Add a new column to the right of a selected column: Hover over the dot to the right of the existing column to add a new column, and then click the
 icon.
icon.
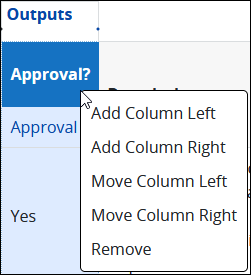
Add a new column to the left or right of a selected column: Right-click the column, and select one of the following options:
Select the Add Column Left option to add a new column to the left of the selected column.
Select the Add Column Right option to add a new column to the right of the selected column.
Replace the placeholder values for the input/output labels.
Replace the decision variable names, if needed.
To remove a column, do one of the following:
Click the label of the column to be removed, and then click the
 icon. A Decision Table must have at least one Input and one Output column. Attempts to remove a column when it is the only column in that section are ignored.
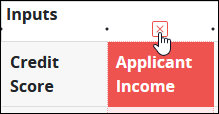
Right-click on the label of the decision column to be removed, and then select the Remove option.

The Caution screen displays to confirm the removal of the decision column.

Click Confirm. The decision column will be removed.
See the example in Use of Quotation Marks in Decision Output for
StringData Type when using quotation marks as punctuation in the output string.
Change the Data Type for a Decision Variable
Follow these steps to change the data type for a decision variable:
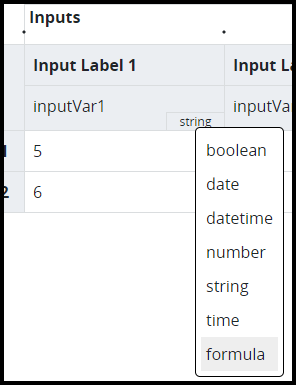
Identify the decision input or output variable you want to change. The current data type is displayed in the lower-right corner of the decision variable.
Right-click on the current data type.
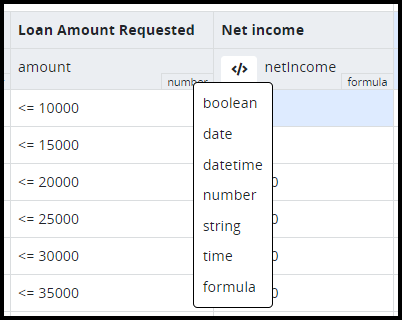
Select one of the following data types:
boolean: The decision variable represents one of two possible values (usually denoted
TRUEandFALSE).date: The decision variable represents a date. The date is in the following format:
YYYY-MM-DD. Example:"2020-07-01".datetime: The decision variable represents a datetime. The datetime is in the following format:
YYYY-MM-DD HH:MM:SS. Example:"2020-07-01 14:25:15".number: The decision variable represents a number.
string: The decision variable represents a string.
time: The decision variable represents a time. Example:
14:25:15.formula: The decision variable is calculated using a formula (only available for input columns). Example:
income-(income*tax)
Add a Formula to a Column
The formula data type can only be used for input columns.
Formulas in a Decision Table are built using process variables, constants, and arithmetic operators to generate values for input columns. Follow these steps to add a formula to a Decision Table column:
Identify the input or output variable you want to change. The current data type displays in the lower-right corner of the decision variable.
Right-click on the current data type.
Select the data type formula.
Click the formula icon
 to open the editor and enter your formula. The column's value will be calculated based on the specified formula. In the example shown here, income and expense are process variables that will be assigned values during a case.
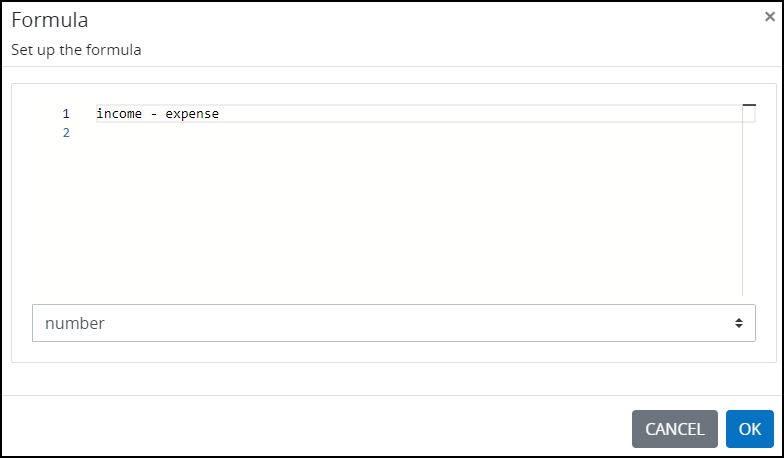
Click OK to save your changes, otherwise, click Cancel.
See a detailed example of using formulas in a Decision Table
Add or remove a Decision
Follow these steps to add a decision to a Decision Table:
Do one of the following:
Add a new decision below a selected decision: Hover over the dot to the right of the existing row to add a new row, and then click the
icon. 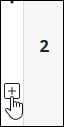
Add a new row above or below a selected decision: Right-click on the decision, and select one of the following options:
Select the Add Row Above option to add a new decision above the selected decision: .
Select the Add Row Below option to add a new decision below the selected decision:
Enter the business rule (input and output values) for the new decision.
To remove a decision, do one of the following:
Click the index number for that decision row, and then click the
icon. 
Right-click on the index number for that decision row to be removed, and then select the Remove option.
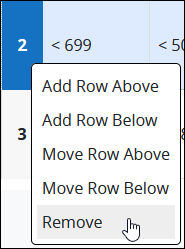
The Caution screen displays to confirm the removal of the decision.
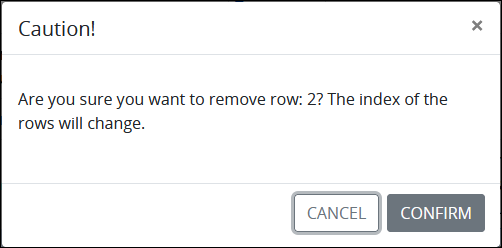
Click Confirm. The decision is removed if it was not the only decision in that Decision Table.
Note that the Decision Table must have at least one row. Attempts to remove a decision row when it is the only decision displays the following message:
It cannot be delete because there should always be a rule..
Move an Input or Output Column in a Decision Table
Follow these steps to move an input or output column in a Decision Table:
Edit the Decision Table. Decision input columns display immediately below the Inputs section. Decision output columns displays immediately below the Outputs section.
Do one of the following:
Move a decision input column to the left or right of other input columns: Right-click on the decision input's label, and then select the Move Column Left option or the Move Column Right option to move that column to the left or right of its current position in its section, respectively.
Note: Decision input columns cannot be moved outside of the Inputs section. Attempts to move a decision input column to the Output section are ignored.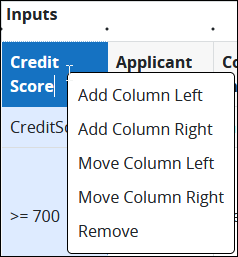
Move a decision output column to the left or right of other output columns: Right-click on the decision output's label, and then select the Move Column Left option or the Move Column Right option to move that column to the left or right of its current position in its section, respectively.
Note: Decision output columns cannot be moved outside of the Outputs section. Attempts to move an output column to the Input section are ignored.
Resize an input or Output Column in a Decision Table
Input and output columns of a Decision Table can be resized to improve data visibility. Follow these steps to remove an input or output column from a Decision Table:
Hover your mouse between two column headers until the shape of the cursor changes.
Drag the column to the desired width.
Save and Close a Decision Table
Follow these steps to save a Decision Table:
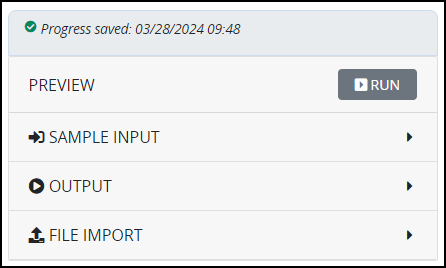
Click Save. The following message displays: The Decision Table was saved.
Changes made to a Decision Table are also automatically saved. The date and time of the last save are displayed in the top right corner of the Decision Table Editor.
To save a Decision Table, click Close.
If the Decision Table has unsaved changes, then the Caution screen displays to confirm saving the changes prior to closing the Decision Table.
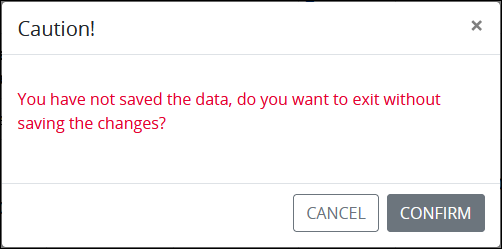
Click Confirm to save changes prior to closing the Decision Table.