Keep your inbox organized and empty it faster with Smart Inbox. By creating customized rules, you can efficiently manage your workload and maintain a clutter-free inbox. The smart inbox offers the following new features:
Create rules to handle frequent scenarios effectively.
Autofill forms with commonly used data, simplifying repetitive tasks.
Prioritize important tasks by flagging them for immediate attention.
Save drafts of forms, enabling you to refine and send them at your convenience.
With these advanced features, managing your inbox becomes more intuitive and efficient, allowing you to focus on what matters most while maintaining organization and productivity.
Set Task Priority and Save Drafts
Important tasks can be quickly prioritized simply by setting a flag. Additionally, ProcessMaker automatically saves a draft of your form as you enter data in it. Watch the following product tour to learn how to set priority for tasks and how your changes are saved automatically as drafts.
Quick Fill in Forms
Use the Quick Fill feature to reuse data from completed requests and save time while filling in commonly used data. Watch the following product tour to learn how to auto fill forms.
Quick Fill utilizes data from previously completed tasks of the same type to fill in empty fields.
If a form is partially filled, Quick Fill retains the existing information and only fills the empty fields.
If no tasks have been completed previously, the displayed list will be empty. Click Cancel and Go Back to return and manually fill out the form.
Inbox Rules
Inbox Rules are customizable guidelines or conditions set by participants or process owners to automate task management. These rules are defined through the Inbox Rules button and can be tailored to specific trigger conditions such as metadata fields (e.g., Due date, Requester, Previous Assignee), allowing for versatile customization.
Inbox Rules define actions to be performed automatically by the server, such as auto-approval, auto-reassignment, or saving a draft, based on the specified conditions. Additionally, features like rule review, manage rules, rule history, mass actions/task multi-selection, and quick fill enhance the efficiency of task management by providing summaries, editing options, historical tracking, and bulk actions for tasks.
View Inbox Rules
Follow these steps to view business rules currently setup in your organization:
Ensure that you are logged on to ProcessMaker Platform.
Click the Tasks option from the top menu. The To Do Tasks page displays. Alternatively, click the To Do icon
 from the left sidebar.
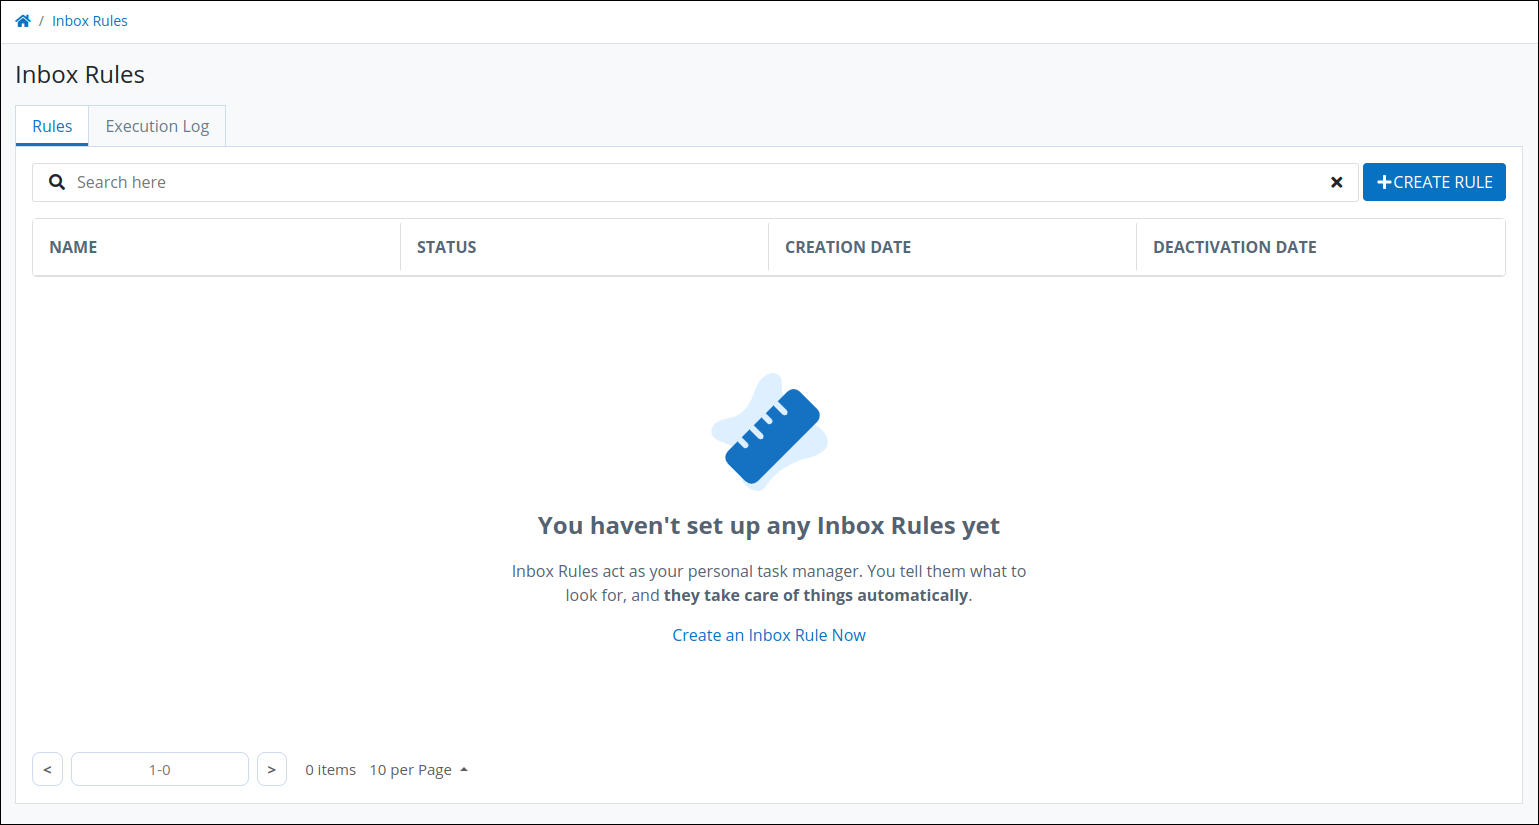
Next to the search field, click the Inbox Rules button to see all inbox rules in the Rules tab.

If there are no rules defined, a screen message suggests creating an Inbox Rule.
Create an Inbox Rule
Watch the following product tour to learn how to create Inbox Rules.
Inbox Rules can be created either from the Tasks page or when viewing the form for a task. Select one of the tabs below to see more information.
Follow these steps to create a rule from the Tasks page:
Click the Tasks option from the top menu to view a list of Tasks.
Next to the search field, click Inbox Rules button to see all inbox rules in the Rules tab.
Click the + Create Rule button to begin creating a new rule.
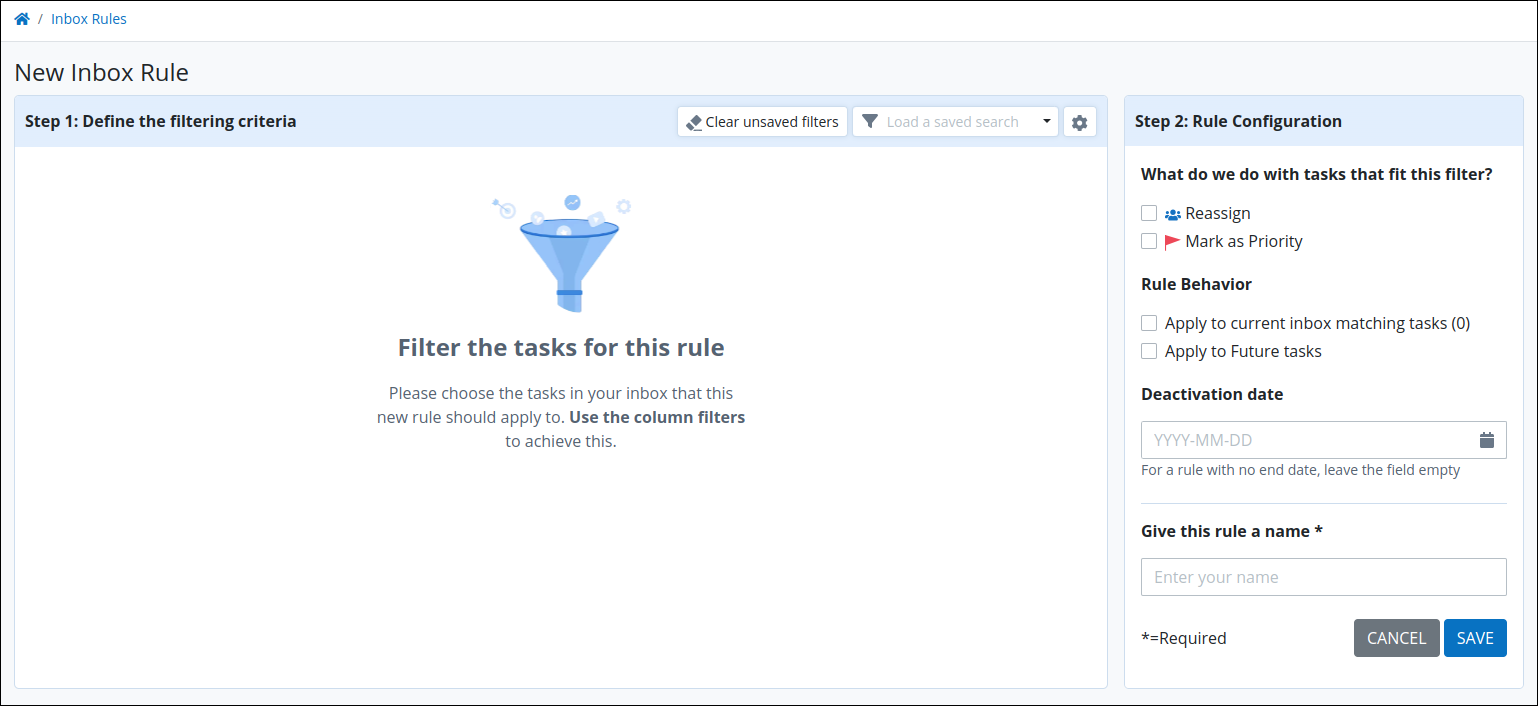
From the Define the filtering criteria panel, select a Saved Search or a Task list in the Load a saved search field. Tasks in the select list are displayed.
Click the Configure icon
 to configure how columns display in this list.
Hover over a column header, then click the three dots to filter information using various criteria.
Click the Clear unsaved filters button to clear filters applied to the task list.
From the Rule Configuration panel, configure the following settings:
Select Reassign to reassign tasks in the list to a selected person.

Select Mark as Priority to mark tasks in the list as urgent. These tasks will then appear in the Priority task list.
Select Apply to current inbox matching tasks to apply rules to the current tasks in the list.
Select Apply to Future tasks to apply rules to future tasks that match the defined criteria.
In the Deactivation date field, select a date to automatically deactivate the rule. Otherwise, leave it empty to configure the rule without a time limit.
In the Give this rule a name field, enter a name for the rule. This is a required setting.
Click Save to save the rule configuration. The Inbox Rules list will display the created rule.
From the Status column, enable the toggle key to activate the rule.
All tasks (current or future) included in the rule will now route based on the configured settings.
Follow these steps to create a rule from an open form:
From the Tasks page, click on a task to view its form.
From the Task Details on the right, click the +Create Rule button to begin creating a new rule. A filtered task list will be displayed according to the selected Form-Task.
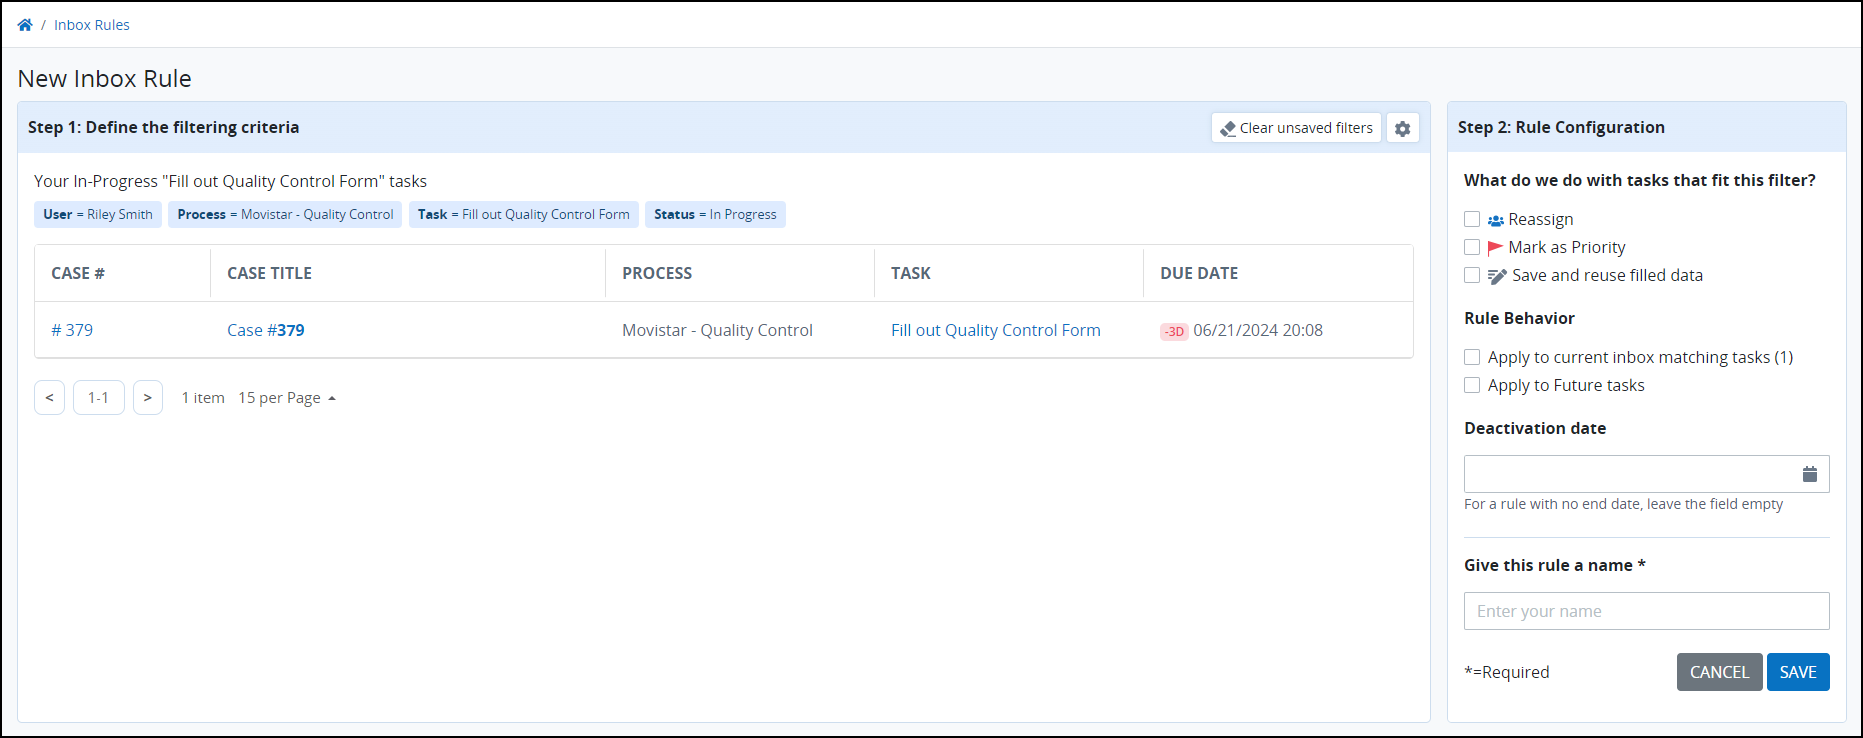
From the Define the filtering criteria panel, configure the following settings:
Click the Configure icon
 to configure how columns display in this list.
Hover over a column header, then click the three dots to filter information using various criteria.
Click the Clear unsaved filters button to clear filters applied to the task list.
From the Rule Configuration panel, configure the following settings:
Select Reassign to reassign tasks in the list to a selected person.

Select Mark as Priority to mark tasks in the list as urgent. These tasks will then appear in the Priority tab.
Select Save and reuse filled data to reuse the data entered in the current form to automatically fill current or future tasks. Users will see the data auto-filled when they open a form and can edit it, if needed. See step 5 for more information.
Select Apply to current inbox matching tasks to apply rules to the current tasks in the list.
Select Apply to Future tasks to apply rules to future tasks that match the defined criteria.
In the Deactivation date field, select a date to automatically deactivate the rule. Otherwise, leave it empty to configure the rule without a time limit.
In the Give this rule a name field, enter a name for the rule.
If you selected the Save and reuse filled data option, click Next to choose whether to also automatically submit tasks after they are auto-filled. In this case, the auto-filled data can't be modified before submitting.
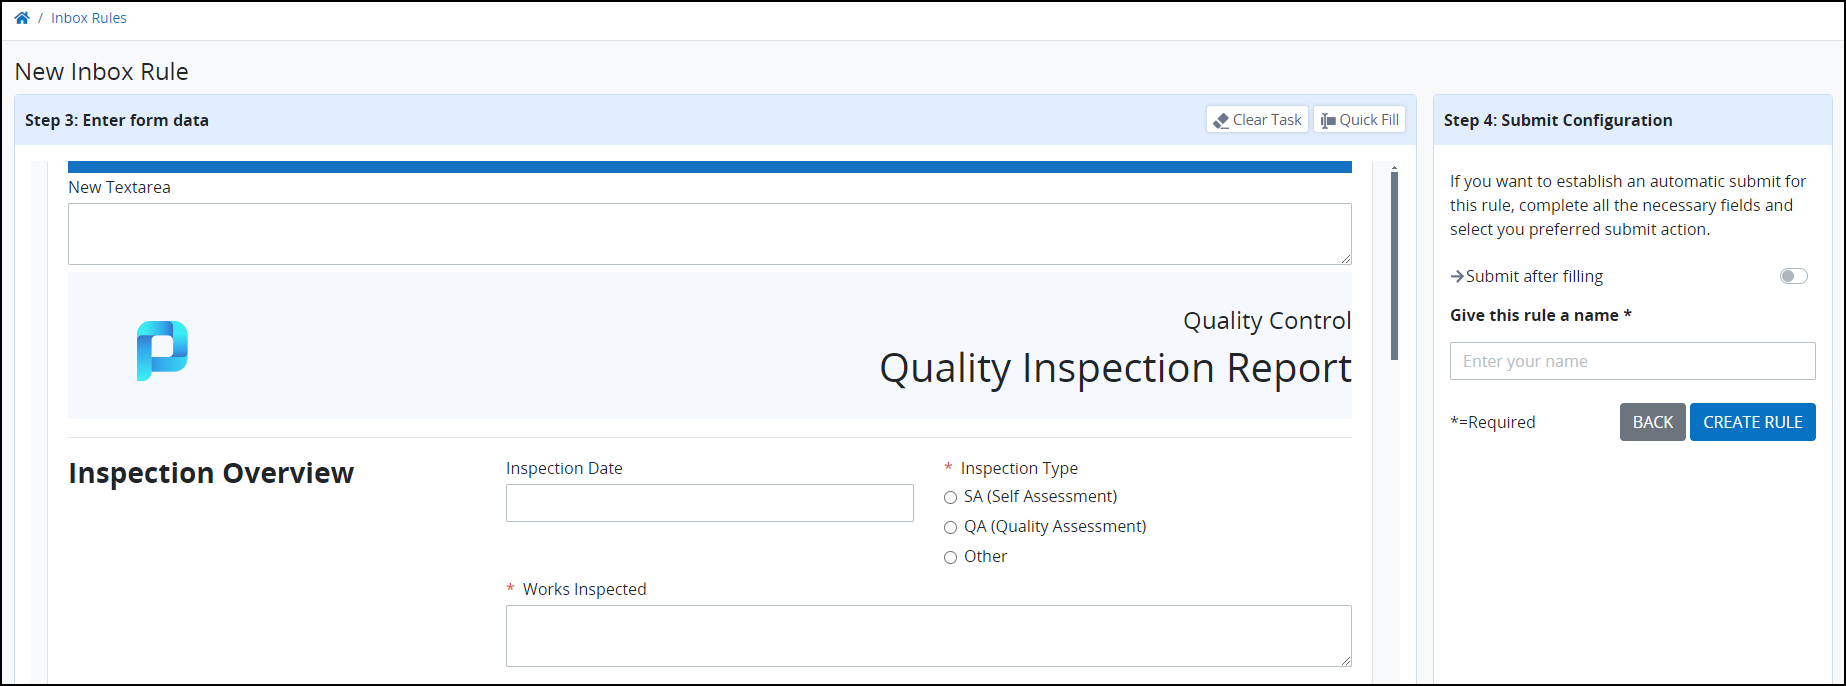
From the Submit Configuration section, enable Submit after filling to automatically submit the tasks matching this rule.
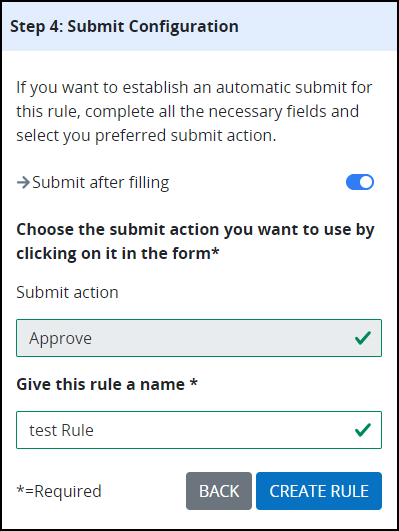
Find a submit-action button in your form and click on it to select it. (Buttons configured with submit actions are usually placed at the bottom of a form). The form will now be auto-filled and submitted using the selected submit action.
In the Give this rule a name setting, enter a name for the rule.
Click Save or Create Rule to save the rule configuration. The rule will be displayed in the Inbox Rules list.
From the Status column, enable the toggle key to activate the rule.
All tasks (current or future) included in the rule will now route based on the configured settings.
Edit or Delete a Rule
Follow the next steps to edit a rule:
View your Business Rules. All your Business Rules display.
Hover over a rule row to see options on the right.
Click the icon
 to edit the rule. Edit the rule using the same instructions when creating a rule.
Click the icon
 to delete the rule. Below the icon a bubble displays.
Click Delete to confirm the rule deletion.
View Rules Execution Log
Follow the next steps to view execution logs for Inbox Rules:
Click the Tasks option from the top menu to view the To Do Tasks list. Alternatively, click the To Do icon
 from the left sidebar if navigating to other lists.
Next to the search field, click Inbox Rules button. The Rules tab displays by default.
Click the Execution Log tab. The logs display the cases to which rules have been applied and show the rule names along with the date they were applied.
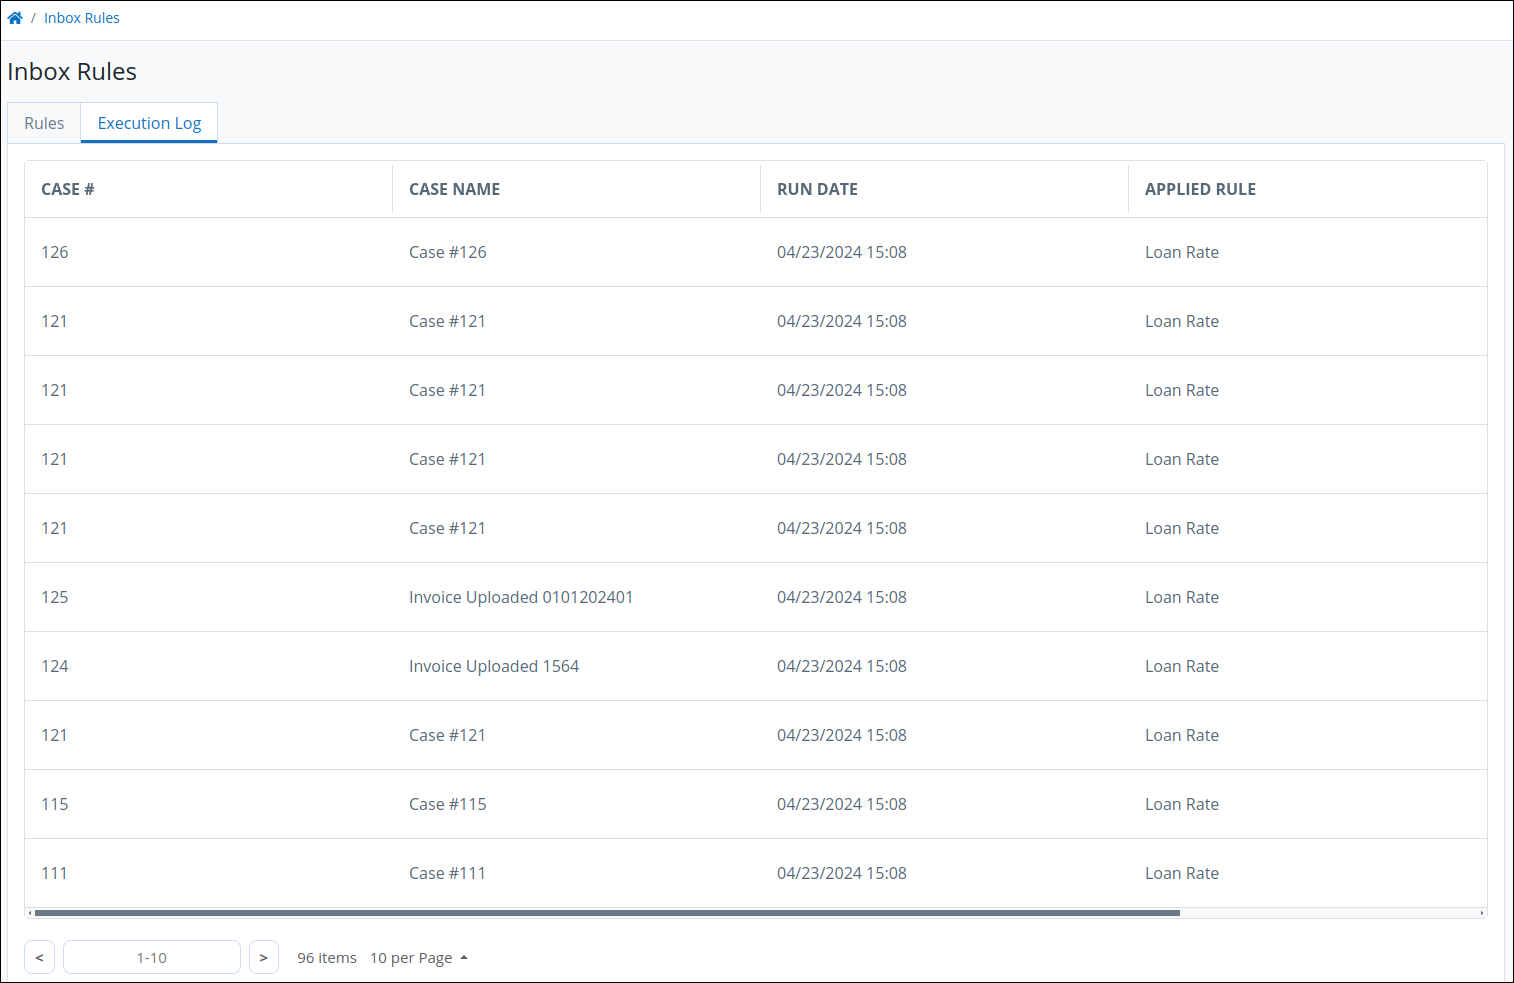
The table displays the following data:
The Case # column displays the Case number associated with the Process. This number represents the sequential occurrence of that Process.
The Case Name column displays the title of the Case. The Case title may vary for each Case based on Request variable values for that Case. Process Managers specify which Request variables to reference from that Process's configuration.
The Run Date column displays the date when a business rule was applied to tasks.
The Applied Rule column displays the rule that was applied to the case.