Follow these BPMN best practices to develop business processes that not only showcase a stunning design but also help increase the efficiency of your organization.
For each example, the Bad Practice tab displays by default. Click the adjacent Good Practice tab to view the best practices to follow. These practices cover the following design aspects of a business process:
Scope of the Process
Before beginning the actual development of a Process, clearly define the scope of business requirements using the following guidelines:
Why: Clearly define the purpose of a Process. If the Process is replacing an existing one, document the problems encountered in the current Process. This will ensure that the new Process being developed resolves all issues currently being faced.
Who: Define the participants of your Process. This includes internal and external users and stakeholders.
What: Document the intended outcome of the Process. Define the expected results and the targets to be achieved.
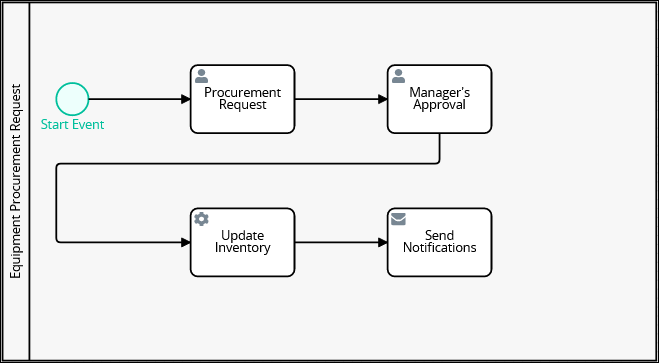
Process Map
Process Naming Conventions
Use a descriptive name for a Process that concisely defines its purpose. Avoid using the name of your organization in the Process name, but instead, highlight the business requirement the Process fulfills. When naming a child Process, use the parent Process's name to highlight the relationship.
Bad Practice | Good Practice |
|---|---|
MyBank Loan Process | Residential Loan Application |
The HR Process | Employee Onboarding |
Training Sub Process for HR | Employee Onboarding - Training Request |
Consistent Direction of Workflow
Maintain a consistent left-to-right direction for Sequence Flow elements and avoid crossing lines. This makes a Process map well-organized and easily readable for all stakeholders.
Bad Practice
An inconsistent direction of flow makes it harder to comprehend the Process model.
.png)
Good Practice
A clear left to right workflow makes it easy for a viewer to understand the Process model.

Consistent Direction of Message Flow Elements
While it is recommended to use horizontal (left to right) Sequence Flow elements, use vertical Message Flow elements to send messages across different Pool elements.
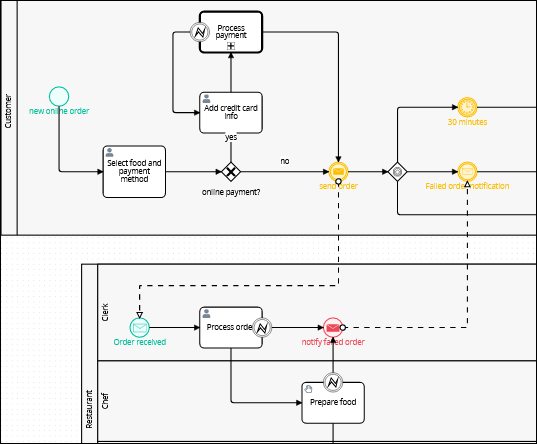
A Process using horizontal Sequence Flow elements and vertical Message Flow elements.
Define a Default Workflow Path
Every Process must have at least one clearly defined default path. This is the path that an instance of this Process follows when there are no errors or exceptions. In ProcessMaker Platform, an instance is called a Request. After defining a default path, configure alternate paths for error handling.
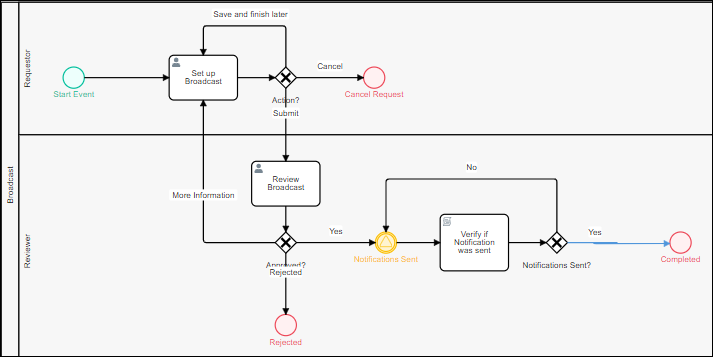
A Process showing a clear default path and some alternate paths for error handling.
Use Descriptive Labels
Use the Text Annotation elements to clearly label and define the purpose of different elements in a Process.
Use Sub Processes
Instead of creating one large Process with many Tasks, simplify Process design by dividing the Process into sub processes. This action not only helps design more efficient Processes, but also streamlines error handling and maintenance procedures for these Processes.
Pools and Lanes
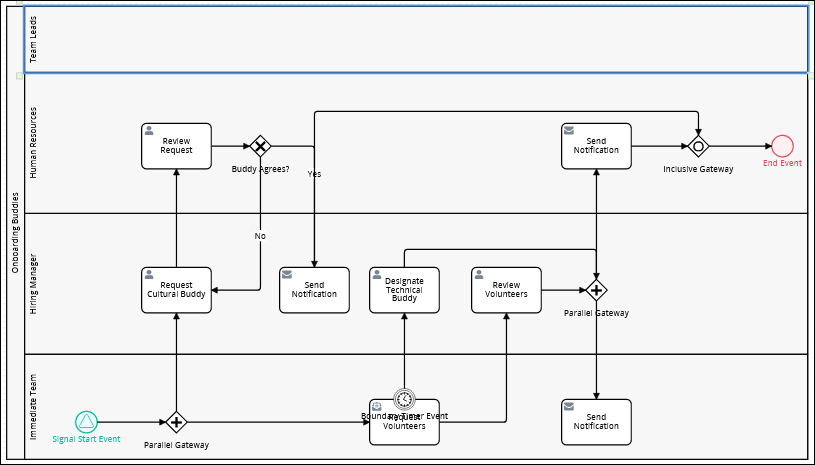
Use Pool Elements
As a best practice, use at least one Pool element in a Process model. Organize BPMN elements within this Pool element to indicate the default and alternative workflow paths. Each Pool element in a Process model constrains workflow for an incident of that Pool element, called a Request. Moreover, it provides a concise workspace for Process designers to organize all Process elements.
Bad Practice
Do not create a Process without at least one Pool element.
Good Practice
Use at least one Pool element in every Process.

Use Lane Elements
Lane elements clarify the participants in a Process and provide a pictorial representation of how tasks are distributed amongst teams or personnel in your organization. Each Lane element indicates a role, actor, or participant within the Pool element.
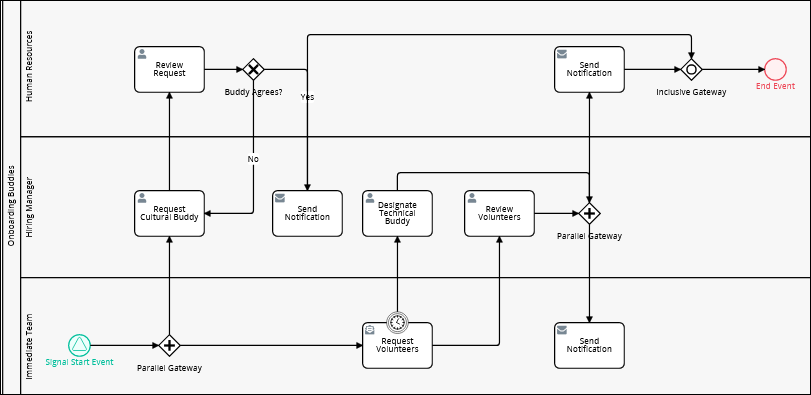
A Process with well-defined lanes effectively explaining the design.
Avoid Empty Lanes
Do not leave a Lane element within a Pool element empty. If steps do not fit into a Lane element, remove that Lane from the Pool element.
Bad Practice
Good Practice
Element Placement in Lanes
Place every element clearly within a Lane element. Process elements should not be placed on Lane boundaries.
Bad Practice
Do not place Process elements on Lane boundaries.
Good Practice
Every Process element must be clearly contained within the boundaries of its Lane.
Tasks
Task Naming Conventions
Use a descriptive name for all Task-type elements which clearly defines the work being performed in these Tasks. Task-type elements include Form Tasks, Manual Tasks, and Script Tasks. Follow these naming conventions:
Use a verb to describe the work to be done and a noun to describe the object on which this work is being performed. For example,
Review Contract,Manager ApprovalandSend Booking Details.If there is a need to use two verbs to describe the Task, consider splitting it into two Task elements.
Script Tasks
While dependent Script Task elements must run sequentially, run non-dependent Script Task elements in parallel to optimize time for each incident of that Process. An incident of a Process is called a Request.
Web Entries
Review the following best practices and restrictions when using tasks as a Web Entry. For more information, see Web Entry Panel Settings.
Web Entry as Task
When sending files through a Script to an external database like ProcessMaker Intelligent Document Processing (IDP), the Request ID becomes essential. To ensure smooth functionality, it's advisable to follow these steps:
Create a Start Event as a Web Entry.
Assign a Form-type Screen to the Start Event element for uploading files.
Assign a Form-type Screen to the Form Task for processing the uploaded files via a Watcher to call the Request ID.
Copy the URL of the Form Task and paste it into the Redirect URL setting of the Start Event. The redirection will occur when all files have been uploaded.
Trying to configure the Request ID within the same Form-type Screen used for uploading files in the Start Event element will not work correctly. This is because the Request ID is generated after the form is submitted. Therefore, it becomes available in the form opened using the Redirect URL setting.
Gateways
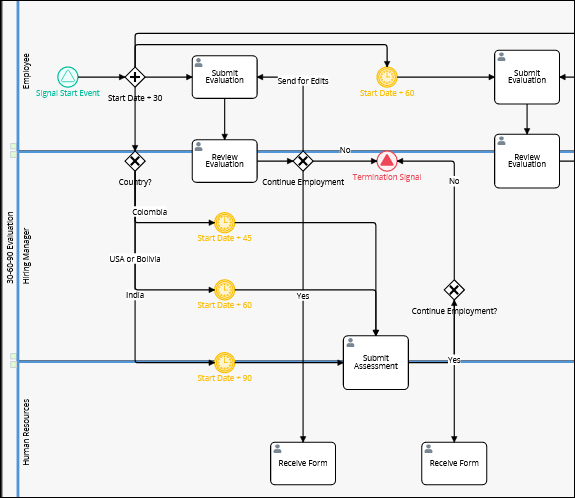
Gateway Naming Conventions
Use descriptive names for Gateway elements to help clarify their purpose and their role in the business logic of a Process. Follow these naming conventions:
Use a verb to describe the action, a noun to describe the task or subject and a question mark to indicate a pending decision. For example,
Application Approved?andResend Notifications?Use a brief interrogative statement to clarify the purpose of a Gateway. For example,
Is Start Date > 30 days?
A Process showing correctly named Gateways
Use Gateways for Business Decisions
Use a Gateway element whenever a business decision requirement occurs in the Process workflow.
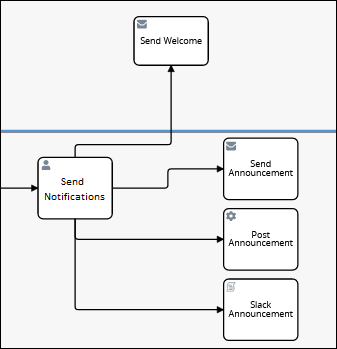
Bad Practice
Absence of Gateway elements makes the Process look disorganized.
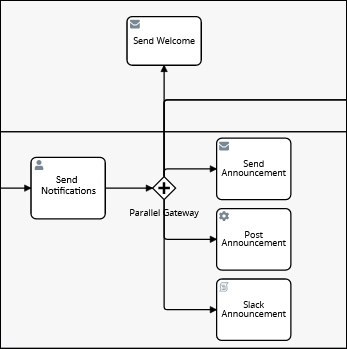
Good Practice
Proper use of Gateway elements for branching makes the Process flow clear and organized.
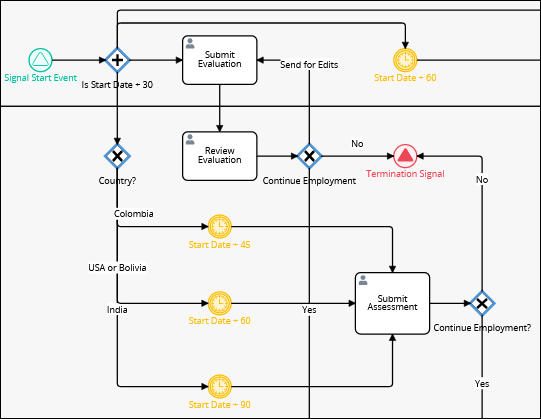
Use Separate Gateways for Splitting and Joining Workflows
Use one Gateway element to split the Request workflow and another to join it. Do not divert the workflow back to the splitting Gateway element. Moreover, use the same Gateway-type element to split and join. For example, when using a Parallel Gateway element to split workflow, use the same type of Gateway element to join it.
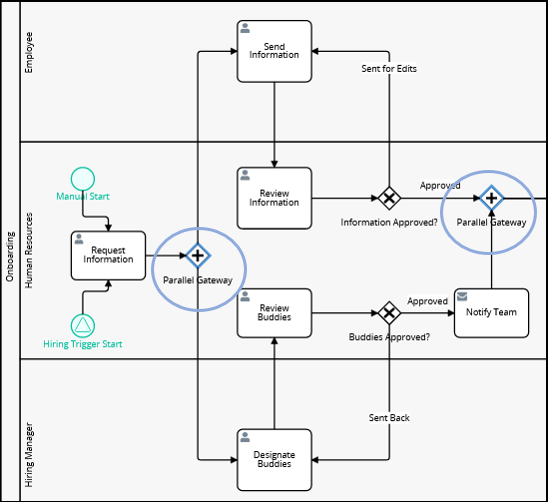
A Process using Parallel Gateways to split and join the Process Flow.
Events
Use Start and End Events
Every Process must have at least one Start Event element and one End Event element to clearly define the beginning and the culminating elements of a Process.
Bad Practice
This Process is incomplete without an End Event element.
Good Practice
The presence of Start and End Event elements clearly define how/when the Process starts and ends.
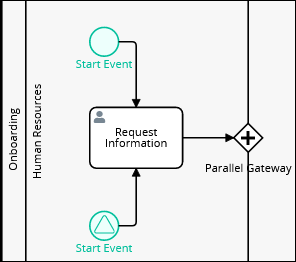
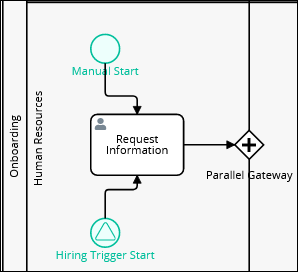
Multiple Start and End Event Elements
When using more than one Start or End Event element in a Process, name them uniquely to clarify their purposes.
Bad Practice
Using the same name for multiple Start Events creates confusion regarding their purposes.
Good Practice
Multiple Start Event elements in this Process have been labelled uniquely to depict their purposes.
Signal and Message Events
Differentiate the use of Signal and Message type Events in all Event-type elements.
Bad Practice
Avoid using Signal-type events for design situations when the purpose is to send only a message in a workflow.
Good Practice
As a best practice for this use case, use Message Events instead of Signal Events.
End Events After Boundary Signal Events
Bad Practice
After adding a Boundary Signal Event element, using an End Event closes the Request without sending the Signal.
Good Practice
After adding a Boundary Signal Event element, as a best practice avoid using an End Event because it closes the Request without sending the Signal.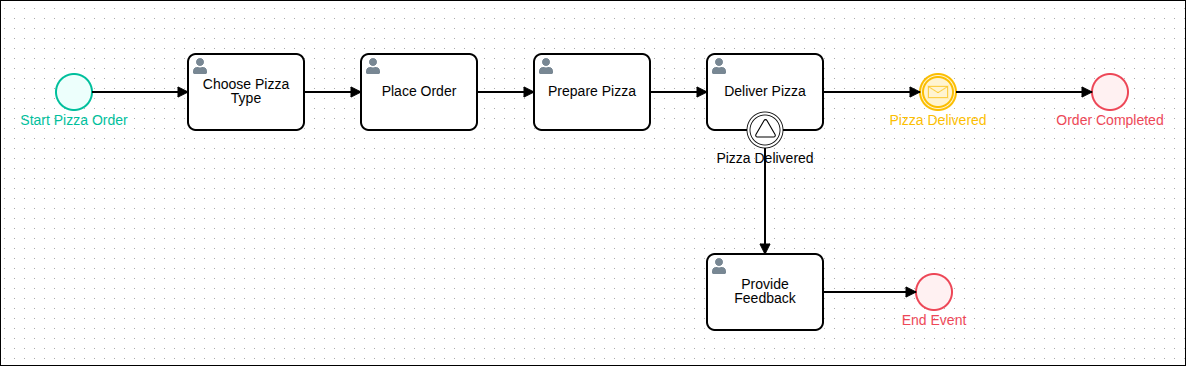
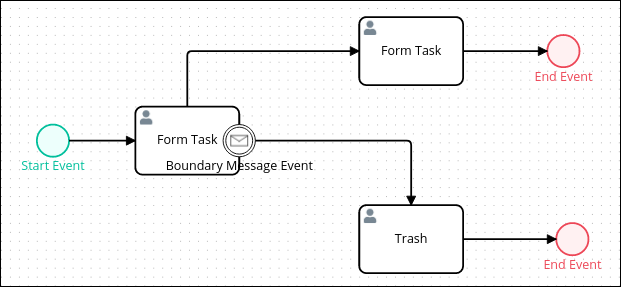
"Dummy" Tasks For Interrupted Workflows
If using the Interrupting setting in a Boundary-type Event element, except Boundary Error Event elements, as a best practice use a "dummy" Task ("Trash" in the example below) to store interrupted Tasks caused by the Boundary-type Event element.
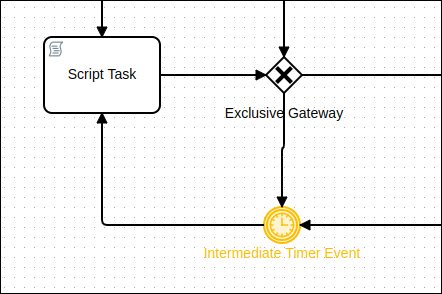
Loops with an Intermediate Timer Event Element
As a best practice, avoid modeling a Script Task element's result to be evaluated by an Exclusive Gateway element, and then returned to the Script Task element on a timed interval set by an Intermediate Timer Event element.
Bad Practice
The Script Task element runs each time the Intermediate Timer Event element triggers until the Exclusive Gateway element's condition is met. However, if the condition is not met and the loop continues for an extended time, ProcessMaker Platform errors often occur when accessing the Request through the user interface, such as a Task.
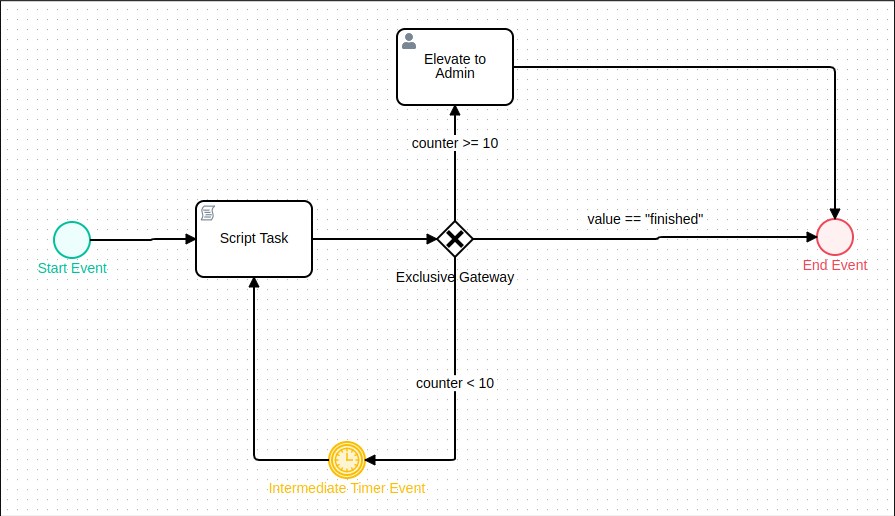
Good Practice
To avoid this scenario, add a counter to control iterations. For example, the next design shows that the counter can not exceed more than nine iterations to run the Intermediate Timer Event. If the timer is set to run every hour, then, it will be escalated to a task that an administrator can handle to not exceed nine hours.
Process Documentation
Write Process Documentation
Use Text Annotation elements to provide a brief notation for general descriptions, Process logic, and exception handling. However, Text Annotation elements should be used in moderation and for brief information only. For detailed information about Process elements, use the features available through the Documentation panel.