The Process Modeler, or simply Modeler, is a design tool to create and edit processes. The intuitive interface of the Modeler provides ample design space, uses collapsible menu options, and auto-saves your changes. Moreover, you can use the click-n-drop motion to insert process objects, pin the most commonly used elements, and keep the rest hidden.
Watch the following product tour to learn how to use the Modeler.
Permissions
Your user account or group membership must have the following permissions to pin or unpin a Process model object unless your user account has the Make this user a Super Admin setting selected:
Processes: Edit Processes
Processes: View Processes
See the Process permissions or ask your Administrator for assistance.
Add Modeling Objects to a Process
Follow these steps to add a modeling object to a process:
Click the Add icon
 from the Objects bar at the bottom to view the Object menu on the left.
Click an object to select it. The icon adjacent to the mouse cursor changes to indicate that an object has been selected.
Click the location in the Process model to place this object.
For detailed information on each object, see Modeling Objects.
Pin and Unpin Objects
Pinning process model objects makes them readily accessible for placement within a process model. Pin an object if you frequently use it in your models. Any BPMN object, External Integration, connector, or PM Block may be pinned or subsequently unpinned. When an object is pinned, it is displayed in the following locations:
The Pinned Objects section of the Add Object tab within the Objects menu on left.
The the Objects bar at the bottom of the Process Modeler canvas for easy and quick access.
Follow these steps to pin a Process model object:
Ensure that the Objects menu is visible. If not, click the Add icon
from the Objects bar to display the Objects Menu.Any pinned objects will display under the Pinned Objects section
 .
.Select an object from the Object Category section and click the Unpinned icon
 .
.The object now displays in the Pinned Objects section with the Pinned icon.
The object also displays in the Objects bar at the bottom for quick access.
Select the Pinned icon again to unpin an object.
Snap a Modelling Object onto an Existing Flow
Manage and modify the activity flows within the system while maintaining the integrity of the process.
Follow these steps to snap a process model object onto a sequence flow:
Select the Process model object to snap onto a sequence flow.
Drag it over a sequence flow between two other objects.
Hold it for a few seconds until the cursor shows the pointing hand or until the flow line turns blue and Drop to add to this flow message displays.
Drop the object onto the flow. It will snap to the flow, effectively splitting it between the two other objects. The existing flow configuration of the split flow is preserved on the inbound flow of the added object, while the outbound flow is new.
Copy Process Model Objects into the Clipboard
Copying one or more Process model objects places those selected items and their respective settings into the Clipboard. The copied item(s) may be copied and then pasted using keyboard shortcuts.
Copied items cannot be pasted into another Process model.
When a Pool element or Lane element is copied, all items it contains are also copied to the Clipboard with their respective settings.
When pasted, the copied Process model element(s) display below the original. Any Sequence Flow and/or Message Flow elements incoming to or outgoing from the original are not copied.
Follow these steps to copy Process model object(s):
Select the item(s) to copy.
Use Control+C (Command+C) to copy.
Use Control+V (Command+V) to paste into the same Process model. The selected item(s) display below the original item(s).
Clone Process Model Objects
Cloning one or more Process model objects immediately clones the selected item(s) and their respective settings below the original item(s). Unlike copying items, which places the selected item(s) into the Clipboard to be then pasted, cloning selected items immediately duplicates them.
When a Pool element or Lane element is cloned, all Process model objects are also duplicated with their respective settings.
When cloning, any Sequence Flow and/or Message Flow elements incoming to or outgoing from the original are not duplicated.
Follow these steps to clone Process model object(s):
Select the item(s) to clone. Available options display above the selected item(s).
Click the Clone Element icon
 . The item(s) display below the original item(s).
Select Multiple Process Model Objects
Select multiple Process model objects to do any of the following:
Move multiple selected items at the same time in relation to each other.
Align multiple items, such as to left-align selected objects in different Lane elements.
Horizontally or vertically distribute three (3) or more selected items.
Follow these steps to select multiple Process model objects:
Press the Shift key, and then do one of the following:
Drag and surround the Process model objects for selection. As you drag, a box displays to indicate which items are selected.
Click each Process model object for selection.
Align Process Model Objects
Align and/or distribute multiple Process model objects placed in your Process model for greater legibility.
The following guidelines apply to aligning or distributing Process model objects:
Two (2) or more objects must be selected to align those objects.
Three (3) or more objects must be selected to distribute those objects.
Boundary-type elements associated with any selected item are not affected: they remain with their respective object.
Sequence Flow elements and Message Flow elements adjust their placement and contours automatically to maintain connections between their respective objects.
Association elements cannot be aligned or redistributed. Association elements adjust automatically between their Text Annotation elements and the element/connector they reference when their Text Annotation elements' placement change.
Lane elements cannot be aligned nor redistributed from their default positions.
If a Pool element is among the selections, items in that Pool element cannot be redistributed. However, the Pool element(s) can be redistributed.
Icons to align and distribute multiple selected Process model objects display above the selected objects when the Align button is selected.
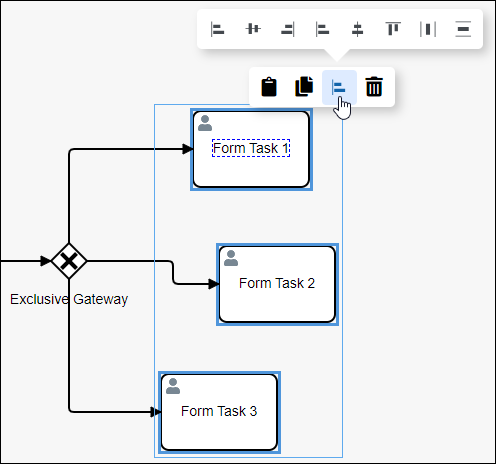
Follow these steps to align Process model objects:
Select at least two (2) Process model objects and/or PM Blocks to align. Note that Lane elements cannot be aligned from their default alignments in their Pool element.
Click the Align
 button.
Select from the following alignment options:
Align left: Click the Align Left icon
 to left-align the selected items based on the left-most object selected.
Center horizontally: Click the Center Horizontally icon
 to horizontally center the selected items.
Align right: Click the Align Right icon
 to right-align the selected items based on the right-most object selected.
Align bottom: Click the Align Bottom icon
 to bottom-align the selected items based on the bottom-most object selected.
Center vertically: Click the Center Vertically icon
 to vertically center the selected items.
Align top: Click the Align Top icon
 to top-align the selected items based on the top-most object selected.
Optionally, distribute the selected Process model objects and/or PM Blocks. Note that at least three (3) items must be selected to distribute them.
Distribute Process Model Objects
Follow these steps to distribute Process model objects:
Select at least three (3) Process model objects to distribute. Note that Lane elements cannot be distributed from their default positions in their Pool element.
Select from the following alignment options:
Distribute horizontally: Click the Distribute Horizontally icon
 to horizontally distribute the selected objects based on the left-most and right-most selected objects. If a Pool element is among the selections, the object(s) in that Pool element are not affected, but instead affect the Pool element.
Distribute vertically: Click the Distribute Vertically icon
 to vertically distribute the selected objects based on the top-most and bottom-most selected objects. If a Pool element is among the selections, the object(s) in that Pool element are not affected, but instead affect the Pool element.
Optionally, align the selected Process model objects.
Move Process Model Objects
After an object placed into the Process model, you may adjust its location in the following ways:
Move the object by dragging it to a new location.
Select the object with other objects, and then move them collectively by dragging them to new locations.
Align and/or distribute the object in relation to other selected elements and/or connectors.
Moving an object has the following limitations:
Pool element: If the object is inside of a Pool element, it cannot be moved outside of the Pool element. If you attempt to do so, Process Modeler places the object inside the Pool element closest to where you attempt to move it.
Lane element: If the object is inside of a Lane element, it can be moved to another Lane element.
Delete Process Model Objects
Delete Process model objects placed in your Process model. Doing so also deletes any Sequence Flow and/or Message Flow elements incoming to or outgoing from the item(s). For example, if a Process model object is deleted that has both incoming and outgoing Sequence Flow elements, the Sequence Flow elements must be reconnected for the remaining objects.
When a Pool element is deleted, all Process model objects within it are also deleted. If you want to keep the objects within a Pool element, you must add those objects outside of the Pool element prior to deleting the Pool element.
If you accidentally delete a Pool element with other Process model objects you want to keep, then select the Undo button.
Follow these steps to delete a Process model object:
Select the Process model object(s) to delete. Available options display above the selected object(s).
Click the Delete icon
 . The selected object(s) deletes.
Undo Changes in Your Process Model
Process Modeler displays the Undo button ![]() and the Redo button
and the Redo button ![]() at the bottom of the Process Modeler canvas. The buttons are disabled when a Process is initially created or opened until a change in the Process model or any of its configuration settings is made.
at the bottom of the Process Modeler canvas. The buttons are disabled when a Process is initially created or opened until a change in the Process model or any of its configuration settings is made.
The Undo/Redo buttons can be used as many times as necessary or until the Process model's state when the Process model was created/opened.
Follow these steps to use the Undo/Redo buttons in Process Modeler:
Make a change in the Process model or any of its items' settings.
Click the Undo button to undo the most recent changes.
Click the Redo button to redo any revision undone by the Undo button up to the current state.