Manage your Screen Categories.
What are Screen Categories?
Use Screen Categories to organize your Screens. Organizing your Screens into Categories makes it easier to search for a Screen based on its assigned Category. Assign multiple Screen Categories to a Screen if necessary. For example, assign a Screen named "Personal Information Form" to the "Banking Forms" and "Human Resources Forms" Screen Categories.

Screen Categories can be in active or inactive status. Following is a description of each status:
Active: Active Screen Categories can have Screens assigned to them.
Inactive: Inactive Screen Categories cannot have Screens assigned to them.
View Screen Categories
Permissions
Your user account or group membership must have the following permissions to view Screen Categories unless your user account has the Make this user a Super Admin setting selected:
Screens: View Screen Categories
Screens: View Screens
See the Screens permissions or ask your Administrator for assistance.
Follow these steps to view Screen Categories:
Log on to ProcessMaker Platform.
Click the Designer option from the top menu. The Designer Welcome Screen displays.
Click the Screens icon
 from the left sidebar to view all Screens.
Click the Categories tab. The Screen Categories display.

The Categories tab displays the following information in tabular format about Screen Categories:
Name: The Name column displays the name of the Screen Category. The Screen Category named Uncategorized is the default Category.
Status: The Status column displays the status of the Screen Category. Below is a description of each status:
Active: Active Screen Categories can have Screens assigned to them. The Screen Category named Uncategorized is active by default.
Inactive: Inactive Screen Categories cannot have Screens assigned to them.
Screens: The # Screens column displays how many Screens in your organization have been assigned to that Screen Category.
Modified: The Modified column displays the date and time the Screen Category was last modified.
Created: The Created column displays the date and time the Screen Category was created. Note: All time zone settings are according to the ProcessMaker Platform instance or the Time zone setting your user profile.
No Screen Categories?
If no Screen Categories exist, the following message displays: No Results.
Search Screen Categories
Use the Search setting to filter Screen Categories by their names.
Display Information the Way You Want It
Control how tabular information displays, including how to sort columns or how many items display per page.
Create a New Screen Category
Permissions
Your user account or group membership must have the following permissions to create a new Screen Category unless your user account has the Make this user a Super Admin setting selected:
Screens: Create Screen Categories
Screens: View Screen Categories
Screens: View Screens
See the Screens permissions or ask your Administrator for assistance.
Follow these steps to create a new Screen Category:
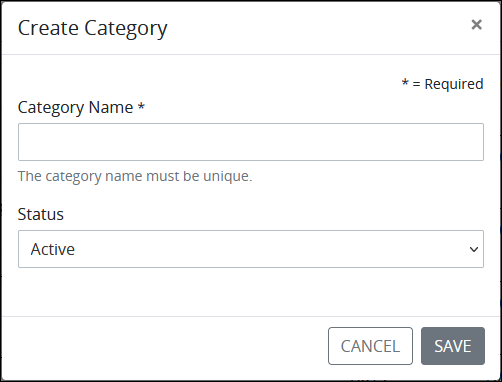
Click the +Category button. The Create Screen Category screen displays.

In the Category Name setting, enter the name of the new Screen Category. The Screen Category name must be unique from all other Screen Category names in your organization and can only use apostrophe characters (
') and spaces. This is a required setting.From the Status drop-down menu, select one of the following options for the Screen Category's status:
Active: Active Screen Categories can have Screens assigned to them.
Inactive: Inactive Screen Categories cannot have Screens assigned to them.
The Active option is selected by default. This is a required setting.
Click Save.
Search for a Screen Category
Permissions
Your user account or group membership must have the following permissions to search Screen Categories unless your user account has the Make this user a Super Admin setting selected:
Screens: View Screen Categories
Screens: View Screens
See the Screens permissions or ask your Administrator for assistance.
Follow these steps to search for Screen Categories:
Enter in the Search setting the text to filter Screen Categories by name.
As you enter text into the Search setting, Screen Categories display that match your entered text.
If there are no search results, the following message displays: No Results.
Edit a Screen Category
Permissions
Your user account or group membership must have the following permissions to edit a Screen Category unless your user account has the Make this user a Super Admin setting selected:
Screens: Edit Screen Categories
Screens: View Screen Categories
Screens: View Screens
See the Screens permissions or ask your Administrator for assistance.
Follow these steps to edit a Screen Category:
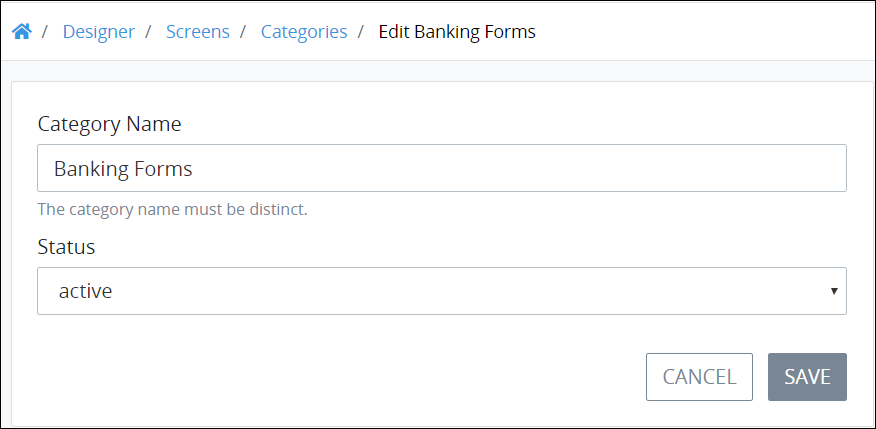
Click the
 menu, and then select the Edit Category option for the Screen Category to edit. The Edit Screen Category page displays.
Edit the following information about the Screen Category as necessary:
In the Category Name setting, edit the name of the Screen Category if necessary. The Screen Category name must be unique from all other Screen Category names in your organization. This is a required field.
From the Status drop-down menu, change the status of the Screen Category, if necessary, from the following options:
Active: Active Screen Categories can have Screens assigned to them.
Inactive: Inactive Screen Categories cannot have Screens assigned to them.
This is a required setting.
Click Save.
Delete a Screen Category
Permissions
Your user account or group membership must have the following permissions to delete a Screen Category unless your user account has the Make this user a Super Admin setting selected:
Screens: Delete Screen Categories
Screens: View Screen Categories
Screens: View Screens
See the Screens permissions or ask your Administrator for assistance.
To delete a Screen Category, no Screens can be assigned to it.
Deleting a Screen Category cannot be undone.
Follow these steps to delete a Screen Category:
Click the
 menu, and then select the Edit Category option for the Screen Category to delete. A message displays to confirm deletion of the Screen Category.
Click Confirm to delete the category.