Customize how the user interface (UI) displays in ProcessMaker Platform. The following aspects of the ProcessMaker application may be changed:
Login logo: Change the logo that displays in the Login Screen. By default the ProcessMaker logo displays.
.png)
Default logo: Change the logo that displays in the upper-left of all sidebars when the icon in the left sidebar is clicked. By default the ProcessMaker logo displays.
.png)
Default icon: Change the icon that displays in the collapsed upper-left of all sidebars. By default the ProcessMaker icon displays.
.png)
Logos or icons uploaded during site customization cannot be edited or downloaded via the File Manager. To make adjustments, upload a new image to replace the current one.
Alternate text: Optionally enter text to display if the image linked to the default logo or icon is not available.
Default color scheme: Change any of the colors that comprise a ProcessMaker Platform color scheme. Below are the default Hex-formatted color settings for each component of a ProcessMaker application color scheme and how each is used in the color scheme:
Primary
The Primary color setting affects these components of the UI
All left sidebars.
The selected top menu option.
Breadcrumb links that lead to the displayed page.
Icons that display to manage ProcessMaker Platform assets, including but not limited to Edit, Configure, and Delete icons.
The Completed Request tab.
The Completed icon that represents a Request or Task is completed.
Default for the background color, text color, and button color in all Screen controls.
Default hex color: #3397E1.
Secondary
The Secondary color setting affects in the following components of the UI:
Color for all primary action buttons in pages and screens, including but not limited to the Save and Cancel buttons.
Primary action buttons in Script Editor and Screen Builder.
Default color for the Secondary option in the Variant setting for Screen controls.
Default hex color: #788793.
Success
The Success color setting affects in the following components of the UI:
The +Request button that persistently displays in ProcessMaker Platform.
The In Progress Request tab.
The In Progress icon that represents a Request is in-progress.
The Success color displays in messages that display when an application action is performed successfully.
Default color for the Success option in the Variant setting for Screen controls.
Default hex color: #00BF9C.
Info
The Info color setting affects in the following components of the UI:
The My Requests tab.
Primary action buttons and text for notifications.
Default color for the Info option in the Variant setting for Screen controls.
Default hex color: #17A2B8.
Warning
The Warning color setting affects in the following components of the UI:
The All Requests tab.
Default color for the Warning option in the Variant setting for Screen controls.
Default hex color: #FBBE02.
Danger
The Danger color setting affects in the following components of the UI:
The Canceled icon that represents a Request is canceled.
Default color for the Danger option in the Variant setting for Screen controls.
Default hex color: #ED4757.
Dark
The Dark color setting affects the Dark option in the Variant setting for Screen controls. Default hex color: #000000.
Light
The Light color setting affects in the following components of the UI:
Background color of the top menu.
Color of icons in the left sidebar.
Default color for the Light option in the Variant setting for Screen controls.
Default font
Change the default font that displays in your ProcessMaker Platform instance.
Login Page Footer
By default the Login Page Footer setting that displays rich text below the log on settings does not contain a value. Use this setting to display information users must be aware of prior to logging on, such as terms and conditions.
Customize Site Design
Permissions
Your user account must have the Make this user a Super Admin option selected to customize the ProcessMaker Platform user interface.
See Edit a User Account or ask your Administrator for assistance.
Note
Changes made to the site design are reflected upon a new login. To see the updates, log out and log back in.
Follow these steps to customize the user interface (UI) in your ProcessMaker Platform instance:
Log on to ProcessMaker Platform.
Click the Admin option from the top menu. The Users page displays.
Click the Customize UI icon
 . The Customize UI page displays:
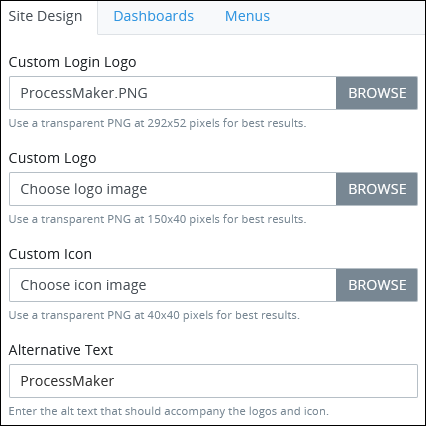
From the Custom Login Logo setting, click the Browse button, and then locate the image to display in the Login Screen. For best results, use a transparent PNG image at 292 by 52 pixels.
The Custom Logo and Custom Icon settings work together: the logo represents the complete name, tagline and any other trademarked assets for the brand; the icon represents the stand-alone icon for the brand.
Follow these guidelines to change the default logo and icon, if necessary:
From the Custom Logo field, click the Upload File button, and then locate the image to display as the brand's logo. Use a transparent PNG image at 150 by 40 pixels for best results.
From the Custom Icon field, click the Upload File button, and then locate the image to display as the brand's icon. Use a transparent PNG image at 40 by 40 pixels for best results.
From the Custom Favicon setting, click the Browse button, and then locate the favicon image to display in the browser tab. For best results, use a transparent PNG image at 32 by 32 pixels.
In the Alternative Text setting, enter text to display if the image linked to the custom login logo, custom logo or icon is not available.
Follow these guidelines to change any of the colors that comprise a color scheme (as described in the Overview section), if necessary:
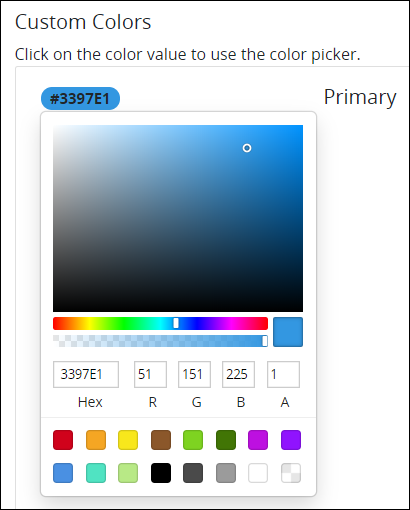
Click the hex color value for the color that you want to change. The color picker palette displays.

Do one of the following:
In the Hex field, enter the hex color value for your selected color, and then press Enter.
Enter the RGBA (red, green, blue and alpha) color values for your selected color.
Click one of the color swatches (or the transparency swatch) to select your color.
Click inside the color palette to select your color.
From the Custom Font drop-down menu, optionally select one of the fonts described in the Overview section to display all text in ProcessMaker Platform.
In the Login Page Footer setting, optionally enter rich text that displays below the log on settings displaying information users must be aware of prior to logging on, such as terms and conditions.

Follow these guidelines to use the WYSIWYG rich text editor to stylize your text:
Source Code: Click on the Source Code icon
 to display the Source Code screen, and then enter HTML syntax that displays the content to display below the log on settings.
Undo changes: Click on the
 icon to undo the last action.
Redo changes: Click on the
 icon to redo the last undone action.
Insert/Edit links: Click on the
 icon to convert the selected text into a hyperlink. Follow these steps to create a hyperlink:
Select the required text from the Rich Text control.
Click on the
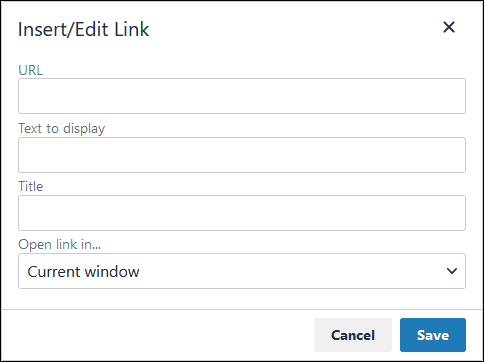
 icon. The Insert/Edit Link screen displays.
In the URL setting, enter the destination URL.
In the Text to display setting, edit or enter the text displayed in the log on page footer text.
In the Title setting, enter the text to display when a user hovers over the displayed text.
From Open link in… drop-down menu, select one of these options:
New window: Select this option to open the destination page in a new browser window.
Current window: Select this option to open the destination page in the current browser window.
Click Save.
Format text: Follow these guidelines to format text:
Headings: From the Formats menu, select Headings and then select a heading size.
Bold: Do one of the following:
From the editor toolbar, select the
 icon.
icon.From the Formats menu, select Inline and then Bold.
Italics: Do one of the following:
From the editor toolbar, select the
 icon.
icon.From the Formats menu, select Inline and then Italic.
Change text color: Use the Text Color drop-down to change text color. Click on the
 icon. The color palette displays. Do one of the following:
Select one of the color swatches from the color palette. The selected text changes to that color.
Click the
 icon to select a custom color from the Color Picker.
Click the
 icon to reset the text to its default color.
Align text: Follow these guidelines to align text:
Left align: Do one of the following:
From the editor toolbar, use the
 icon to left-align text.
From the Formats menu, select Align and then Left.
Center align: Do one of the following:
From the editor toolbar, use the
 icon to center-align text.
From the Formats menu, select Align and then Center.
Right align: Do one of the following:
From the editor toolbar, use the
 icon to right-align text.
From the Formats menu, select Align and then Right.
Justify: Do one of the following:
From the editor toolbar, use the
 icon to justify text.
 From the Formats menu, select Align and then Justify.
Insert a bullet list: Use the
 icon to format text as a bulleted list.
Insert a numbered list: Use the
 icon to format text as a numbered list.
Indent text: Click on the
 icon to increase text indenting.
Outdent text: Click on the
 icon to decrease text indenting.
Click Save. ProcessMaker regenerates the UI.

Clear the current web browser session (Ctrl+F5 for most web browsers). Your web browser window refreshes to display your changes to the ProcessMaker Platform UI.