An Intermediate Message Throw Event object sends a message to a Message Start Event or an Intermediate Message Catch Event object. The purpose of the message transfer is to send data between Requests running from the same Process model since each Pool object represents its own Request with its own distinct Request data.
A Message Flow object can connect from the Intermediate Message Throw Event object to the object listening for its message.
An Intermediate Message Throw Event object functions as follows during a Request:
The Intermediate Message Throw Event object triggers.
The Intermediate Message Throw Event object sends its message. The message has a name which is a placeholder for the Request data it sends to the catching object.
If the message name matches that for which the catching object is listening, then that object triggers. Otherwise, the message is ignored.
See the Intermediate Message Catch Event object description for a simple example how an Intermediate Message Throw Event object works.
Add an Intermediate Message Throw Event to a Process
Permissions
Your user account or group membership must have the following permissions to configure an Intermediate Message Throw Event object in the Process model unless your user account has the Make this user a Super Admin setting selected:
Processes: Edit Processes
Processes: View Processes
See the Process permissions or ask your Administrator for assistance.
Add an Intermediate Message Throw Event object from one of the following locations in Process Modeler:
Object Panel: Located to the left of the Process Modeler, the Object Panel contains various process modeling objects.
Object Bar: Located at the bottom of the Process Modeler, the Object Bar contains pinned Process modeling objects for quick access.
Follow these steps to add an Intermediate Message Throw Event from the Object panel to the Process model:
Ensure that the Object panel is visible. If not, click the Add icon
 from the Object bar at the bottom.
Click the Intermediate Event object
 from the Object panel to select it.
Click the location in the Process model to place this object. Follow these guidelines when placing this object:
If your process has a Pool object, the object cannot be placed outside of the Pool.
To place this object between two existing objects, follow these instructions.
Click the Objects drop-down menu, and then select the Intermediate Message Throw Event option.
The Intermediate Message Throw Event object displays.

Follow these steps to add an Intermediate Message Throw Event object from the Object bar to the Process model:
Ensure that the object is pinned to the Object bar. If not, see instructions to pin it.
In the Object bar at the bottom center, click the object's icon.
Click the location in the Process model to place this object. Follow these guidelines when placing this object:
If your process has a Pool object, the object cannot be placed outside of the Pool.
To place this object between two existing objects, follow these instructions.
Click the Objects drop-down menu, and then select the Intermediate Message Throw Event option.
The Intermediate Message Throw Event object displays.
Replace an Intermediate Message Throw Event Object with a Different Intermediate Request Event Object
After an Intermediate Message Throw Event object is added to a Process model, you may replace it with a different intermediate Request event object:
Intermediate Timer Event object
The selected Intermediate Message Throw Event object is replaced by the default settings and color of the replacing object.
Follow these steps to replace an Intermediate Message Throw Event object with a different intermediate Request event object:
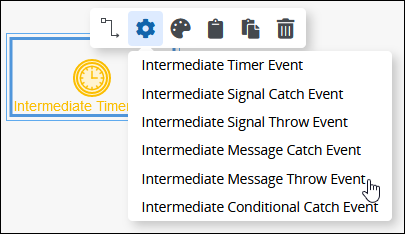
Select the Intermediate Message Throw Event object to change to another intermediate Request event object. Available options display above the selected object.
Click the objects icon. The objects drop-down menu displays the intermediate Request event objects.
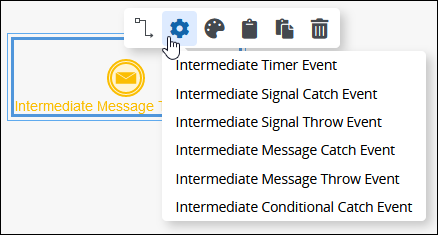
Select the object to replace the Intermediate Message Throw Event object. The Change Type screen displays to confirm replacing the currently selected object.
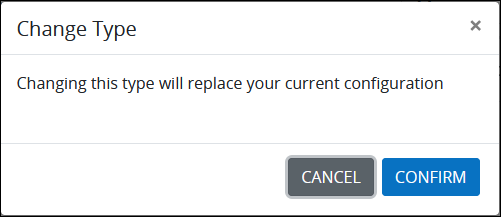
Click Confirm. The new object replaces the Intermediate Message Throw Event object with its default settings and color.
Settings
The Intermediate Message Throw Event object has the following panels that contain settings:
Configuration panel
Advanced panel
Configuration Panel Settings
The intermediate-message-throw-event object has the following settings in the Properties panel:
Edit the object Name
An object name is a human-readable reference for a Process object. Process Modeler automatically assigns the name of a Process object with its object type. However, an object's name can be changed.
Follow these steps to edit the name for an Intermediate Message Throw Event object:
Select the Intermediate Message Throw Event object from the Process model in which to edit its name.
Ensure that the Configuration panel displays. If not, show it. The Name setting displays. This is a required setting.
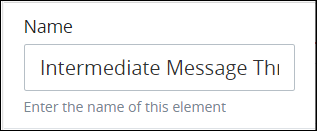
In the Name setting, edit the selected object's name and then press Enter.
Edit the Message Name
The Intermediate Message Throw Event object uses a message name as a placeholder for the Request data that this object sends to a catching object. When a Message Start Event object or an Intermediate Message Catch Event object listens for a message, it references the Intermediate Message Throw Event object's message name.
Follow these steps to configure the message name for an Intermediate Message Throw Event object:
Select the Intermediate Message Throw Event object from the Process model in which to configure its message name.
Ensure that the Configuration panel displays. If not, show it. Panels to configure this object display.
Expand the Properties panel if it is not presently expanded, and then locate the Message Name setting.

In the Message Name setting, edit the message name that a catching object references to listen for the Intermediate Message Throw Event's message.
Data Inputs & Assignments Panel Settings
The Data Inputs & Assignments panel allows designers to define and map fields that make up the message payload. Each payload field can be built using FEEL Expression Syntax to generate dynamic content.
Add Data Inputs & Assignments
Follow these steps to configure Data Inputs & Assignments for an Intermediate Message Throw Event:
Select the Intermediate Message Throw Event in the Process model.
Ensure the Configuration panel is visible. If it is hidden, show it. Panels to configure this object display.
Expand the Data Inputs & Assignments panel if it is not already expanded.
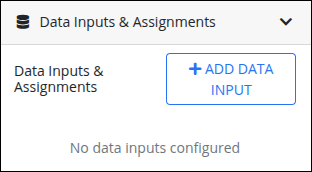
Click +Add Data Input. A new Data Input Name entry displays.
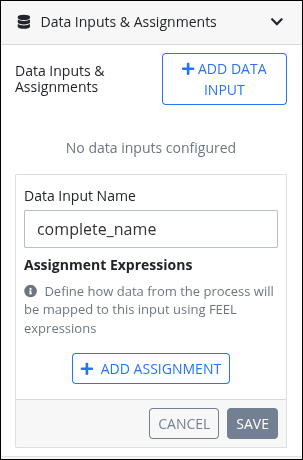
In Data Input Name, enter the name of the data input.
Click +Add Assignment to define the payload fields.
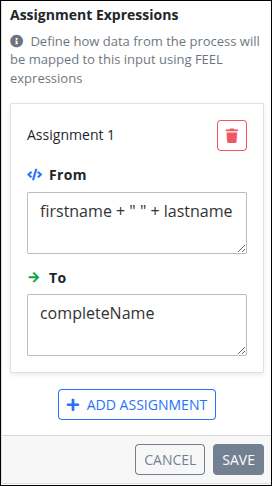
In the From, enter the data to map. Use FEEL expressions to construct dynamic values, for example, concatenate the variables
firstnameandlastnameusingfirstname + " " + lastname.In the To, enter the target payload field name. For example, enter
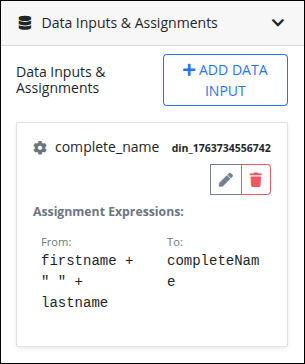
completeName.Add additional assignments as needed, then click Save. The assignment expressions displays in the list.
Advanced Panel Settings
Edit the Node's Identifier Value
Process Modeler automatically assigns a unique value to each Process node added to a Process model. However, a node's identifier value can be changed if it is unique to all other nodes in the Process model, including the Process model's identifier value.
All identifier values for all nodes in the Process model must be unique.
Follow these steps to edit the identifier value for an Intermediate Message Throw Event object:
Select the Intermediate Message Throw Event object from the Process model in which to edit its identifier value.
Ensure that the Configuration panel displays. If not, show it. Panels to configure this object display.
Expand the Advanced panel if it is not presently expanded. The Node Identifier setting displays. This is a required setting.
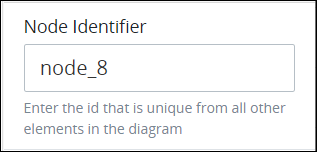
In the Node Identifier setting, edit the Intermediate Message Throw Event object's identifier to a unique value from all nodes in the Process model and then press Enter.