Email Listeners allow you to automatically trigger workflows when an email is received. This is useful for automating an Email Start Event.
An Email Start Event listens for incoming emails based on pre-configured criteria, and once matched, it initiates a new request in the associated process. This configuration removes the need for manual form submissions and enhances real-time process automation.
Availability
Email Listeners support IMAP and Azure (Microsoft Entra credentials).
View Email Listeners
Permissions
Your user account or group membership must have the "Settings: View Settings" permission to view email listeners unless your user account has the Make this user a Super Admin setting selected.
See the Settings permissions or ask your Administrator for assistance.
Follow these steps to view the email server default settings:
Ensure that you are logged on to ProcessMaker Platform.
Click the Admin option from the top menu. The Users page displays.
Click the Settings icon
 from the left sidebar to view all settings.
From the Settings panel on the left, expand the Email section.
Select Email Listener Default to view the following details:
Email Address: Displays the email account configured to receive and process incoming requests. This is the address monitored by the listener.
Scheduler: Indicates how frequently the system checks the configured inbox for new emails (e.g., every 5 minutes, hourly).
Status: Shows whether the email listener is currently active or inactive. An active listener is currently monitoring emails according to the defined schedule.

IMAP Server Settings
Before creating an Email Listener, ensure that IMAP settings are configured in your email account settings by an administrator. Follow these instructions based on your email provider:
Create an IMAP Email Listener
Permissions
Your user account or group membership must have the "Settings: View Settings" permission to create an email listener unless your user account has the Make this user a Super Admin setting selected.
See the Settings permissions or ask your Administrator for assistance.
Follow these steps to create or edit an email server configuration:
View your email listeners. The Email Listeners displays.
Click on the +Listener button at the top-right of the Email Listeners panel.
Select the IMAP option. The Email Settings section displays.
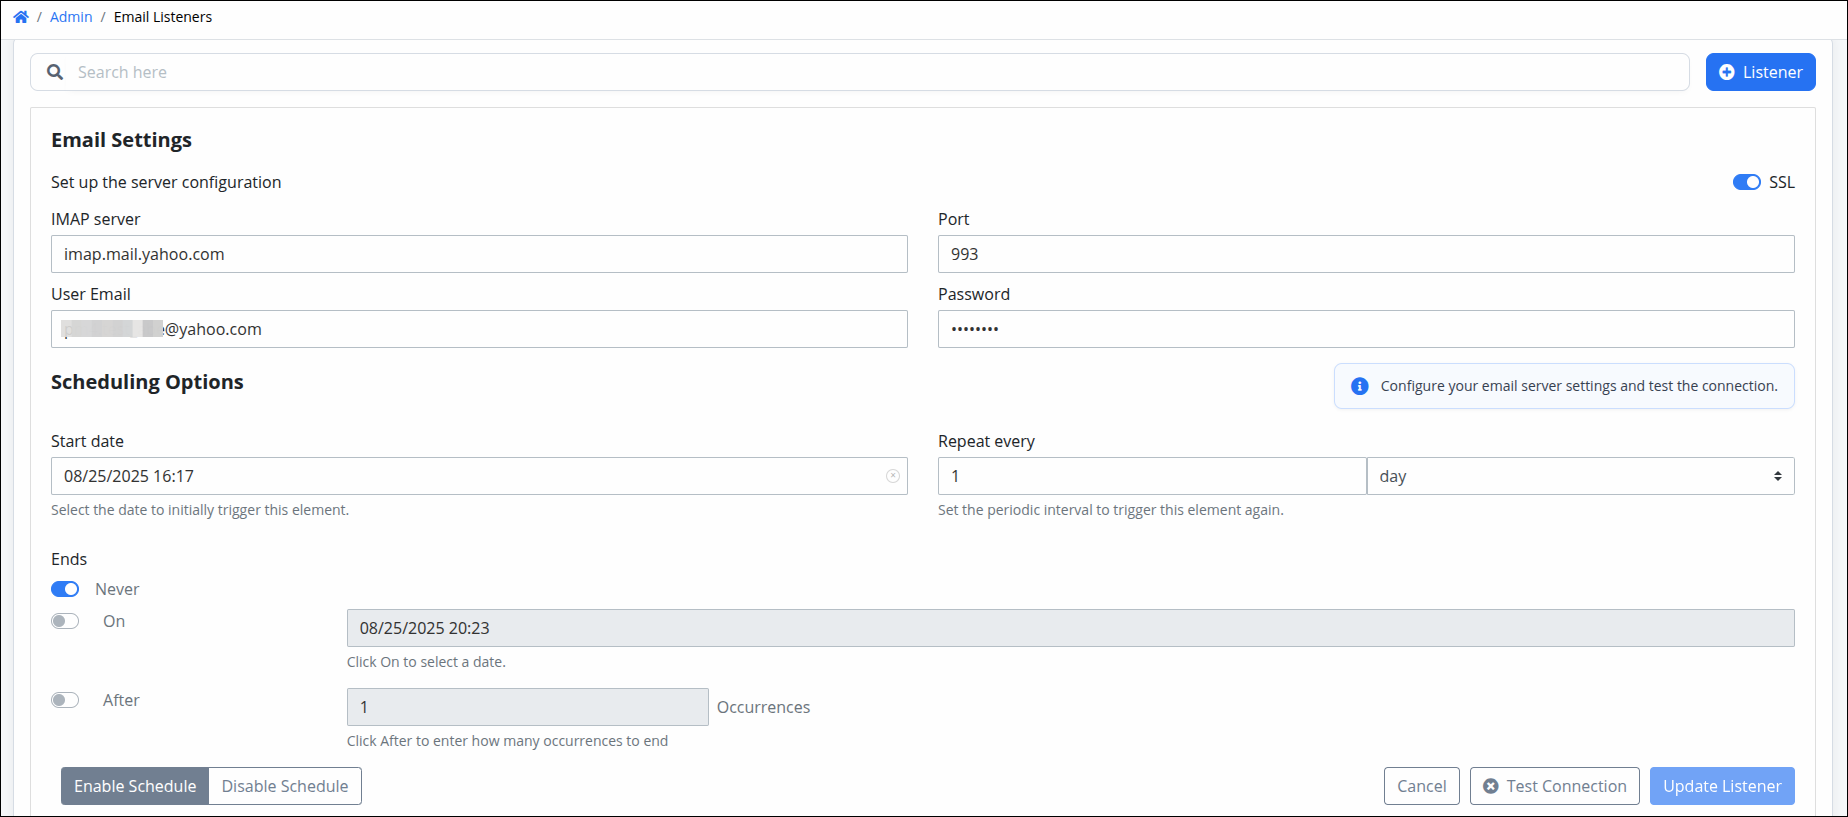
Enable the SSL option to ensure a secure connection with IMAP email providers that support encrypted access.
In the IMAP server, enter the IMAP email host provider. For example:
imap.gmail.comfor Gmailimap.mail.yahoo.comfor Yahoooutlook.office365.comfor Outlook
In the Port, enter the IMAP provider port. For example common ports are:
993for IMAP with SSL.143for IMAP without SSL.
In the User Email, enter the same email address that was used when enabling IMAP access in your email account settings.
In the Password, enter the same email password that was used when enabling IMAP access in your email account settings.
In the Scheduling Options section in the Start date, select the date to start listening emails.
In the Repeat every, specify how often the listener should run by entering a number and selecting the desired time unit (day, week, month, or year).
Ends: Choose one of the following options to define when the email listener should stop:
Never – The listener will run indefinitely without an end date.
On – Select a specific date when the email listener will stop running.
After – Enter the number of occurrences after which the listener should stop.
If the email listener is already active and scheduled, click Disable Schedule to deactivate it.
Click Test Connection to verify the configuration and ensure the IMAP email provider is working correctly.
Click Update Listener to save and finalize your changes.
Azure for Email Listeners
Email Listeners now support Microsoft Azure configuration, allowing organizations to leverage Microsoft 365 mailboxes to trigger email-driven workflows in Email Start Events. This integration simplifies the process of managing email-driven workflows by enabling administrators to configure Azure-based email listeners directly from the Admin interface using Microsoft Entra credentials.
To set up an Azure-based Email Listener, follow these steps:
View your email listeners. The Email Listeners displays.
Click on the +Listener button at the top-right of the Email Listeners panel.
Select the Azure option from the available configurations. The Azure settings window displays.
Enter the required Azure credentials, including the Tenant ID, Client ID, and Client Secret, which you can obtain from your Azure Active Directory application.
Configure the IMAP settings as per your organization's requirements, ensuring that the SSL option is enabled for secure connections.
Set the scheduling options to define how frequently the listener checks for new emails.
Click Test Connection to verify that the configuration is correct and that the listener can successfully connect to the Azure email account.
Finally, click Update Listener to save your settings and activate the listener.
This integration not only streamlines the process of managing email workflows but also enhances security and compliance by utilizing Azure's robust authentication mechanisms.
Email Start Event Logs
The Email Listener Logs page provides a detailed record of email processing events related to Email Start Events in ProcessMaker Platform. This feature helps administrators monitor, audit, and troubleshoot incoming emails that trigger workflow requests.
When an email listener runs, the logs are stored and displayed in three separate tables: Error Logs, Matched Logs, and Total Logs.
Why It Matters
These three tables offer visibility into:
System reliability – See whether emails are being handled correctly.
Error diagnosis – Understand why an email may have failed.
Auditing – Track who received, triggered, or missed workflow actions.
View Logs
To access the logs for Email Start Events:
Go to the Admin panel.
From the left menu, click the Logs icon
 . The Email section displays the Email Start Event logs.
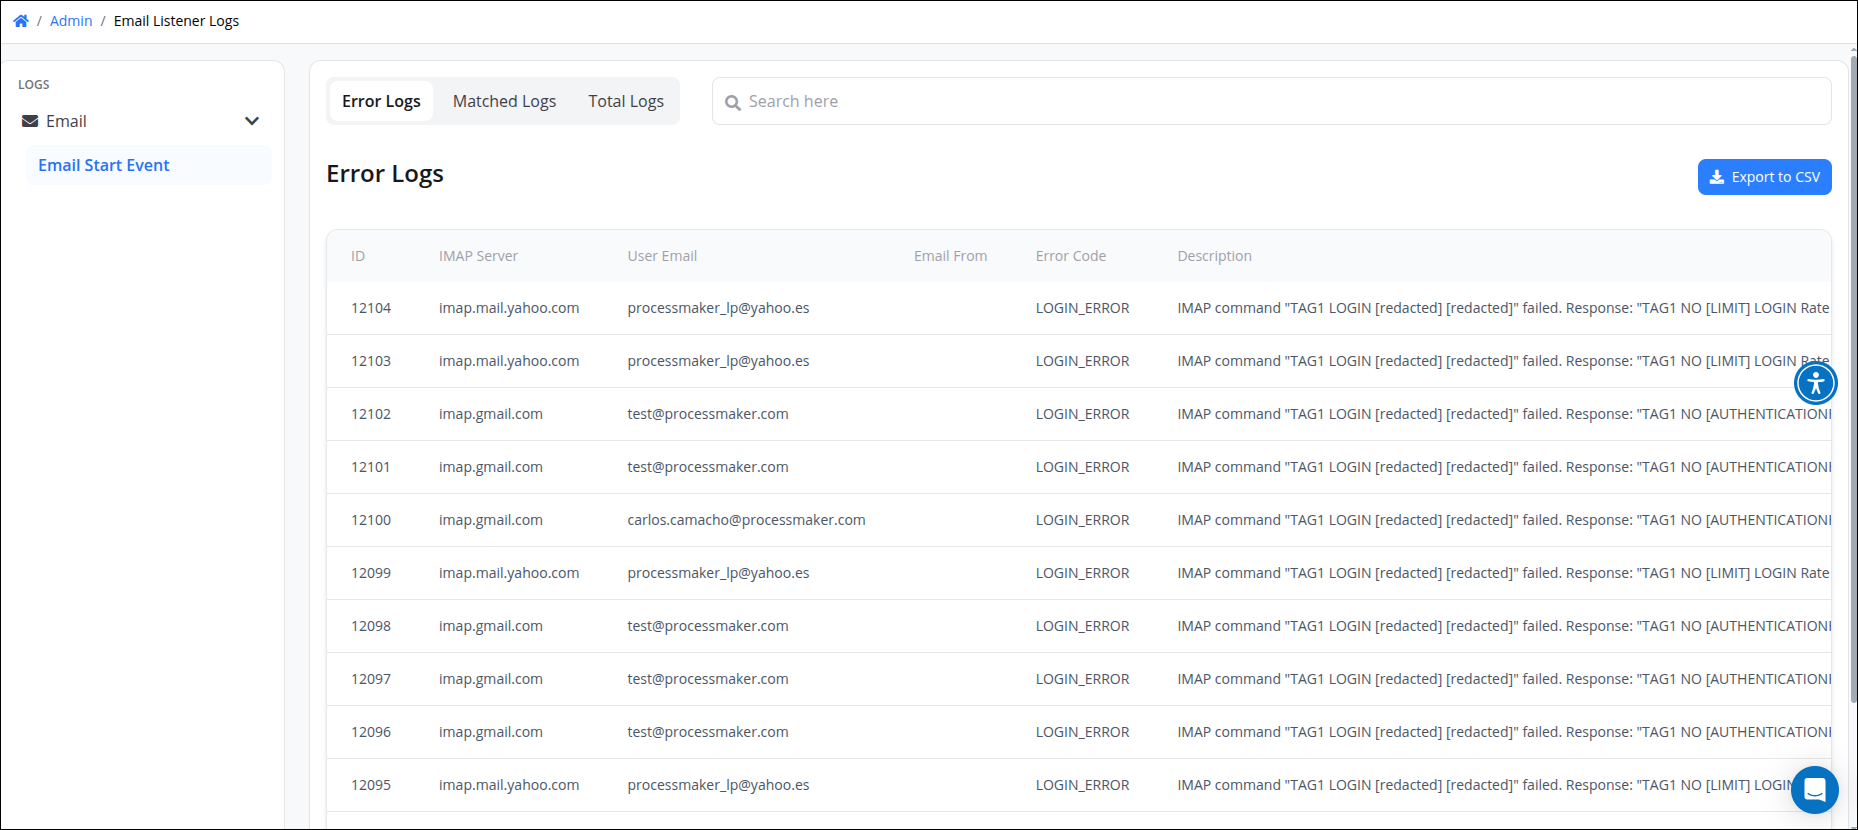
Click a table list you want to inspect. Or click Export to CSV if you want to export them.
The Error Logs table displays any emails that failed to process correctly. These entries help diagnose why a process wasn’t triggered.
Each entry shows:
ID – Unique log identifier
IMAP Server – Mail server used for processing
User Email – The listening email address
Email From – Sender of the email
Error Code – Internal error reference
Description – Explanation of the error
Date – Timestamp of when the error occurred
Use this log to investigate failures due to format, invalid attachments, or configuration issues.
The Matched Logs table records emails that successfully triggered a ProcessMaker request. This is helpful for auditing and confirming proper execution.
Each matched entry includes:
ID – Unique log identifier
IMAP Server – Mail server used
User Email – Listening address
Email From – Sender address
Subject – Email subject line
Body – Body content of the email
Date Email – Timestamp when the email was received
Process – Name of the triggered process
Request ID – ID of the created request
User – User who owns the request
Files Attached – Indicates if the email included attachments
Created At – Timestamp when the request was generated
The Total Logs table summarizes the entire execution of the listener job, showing the outcome of each scheduled run.
Each log shows:
ID (Execution ID) – Unique identifier for the listener run
IMAP Server – Server checked for emails
User Email – Email account used
Total Emails – Number of emails retrieved
Total Matches – Number of emails that matched criteria and triggered a process
Date – Timestamp of when the listener executed