Centralized and streamlined case management with a unified interface that provides a comprehensive view of all your cases. This organized layout allows for efficient handling of cases, requests, and tasks within a single, structured platform.
View essential details such as case number, title, associated processes, recipient, dates, and status in one place.
The Process column clearly shows when a case has multiple requests.
Filter and sort columns to organize and prioritize information as needed.
Easily access and manage any requests associated with a case.
Quickly search for specific cases using the search functionality.
This interface ensures seamless navigation and improved productivity by keeping all relevant case information at your fingertips.
What’s new in Winter 2025
Easier navigation and access to cases, with real-time counters for case status.
Case information now includes a dedicated Requests tab for improved tracking and organization.
Simplified view of case details, requests, and related processes.
Conveniently access cases and their related requests in a single location, clearly indicating when multiple requests are associated with one case.
View All Cases
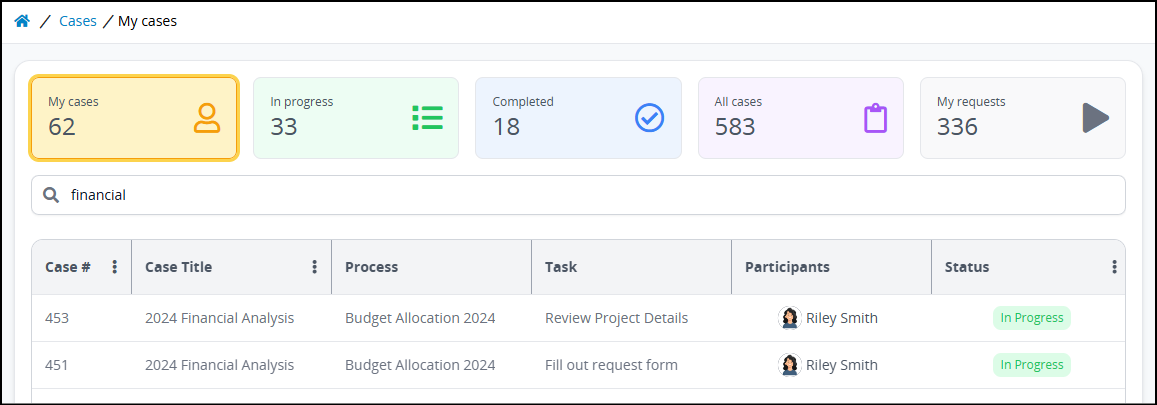
The My Cases page displays all the cases you have started. Follow these steps to view all your cases:
Ensure that you are logged on to ProcessMaker Platform.
Click the Cases option from the top menu to view the My Cases page.
.png)
Columns in the My Cases list
The My Cases page displays the following information in tabular format:
Case #: The Case # column displays the Case number associated with the Process. This number represents the sequential occurrence of that Process. Click the case number to view the case.
Case Title: The Case Title column displays the title of the Case, which displays the process name by default. The Case title may vary for each Case based on case variable values for that Case. Process Managers specify which Request variables to reference from that Process's configuration.
Process: The Process column displays the parent Process name associated with the case. Click the
 icon to view the available workflow routings in the process.
Task: The Task column displays the name of the in-progress and completed Tasks to date in that case. Tasks display in this column from top to bottom in chronological order of assignment. The Task assignee may click on that Task to view it. Other users not assigned that Task receive a message that they are not authorized to view that content.
Participants: The Participants column displays each case participant's avatar and full name. Avatars display in this column from top to bottom the chronological order in which those users participated in that case.
Status: The Status column displays the status of the case. It displays In Progress.
Started: The Started column displays the date and time you started the case. The timezone setting to display the time is according to the ProcessMaker Platform instance unless your user profile's Time zone setting is specified.
Completed: The Completed column displays the date and time the case was completed. If the case is not completed, this field displays no value for that case. The timezone setting to display the time is according to the ProcessMaker Platform instance unless your user profile's Time zone setting is specified.
Open a Case
Access a comprehensive view of all case details, including all associated requests, when the process involves alternative workflows.
Follow these guidelines to open a case:
From the cases list, click the Case # or the Case Title for the selected case to view it.
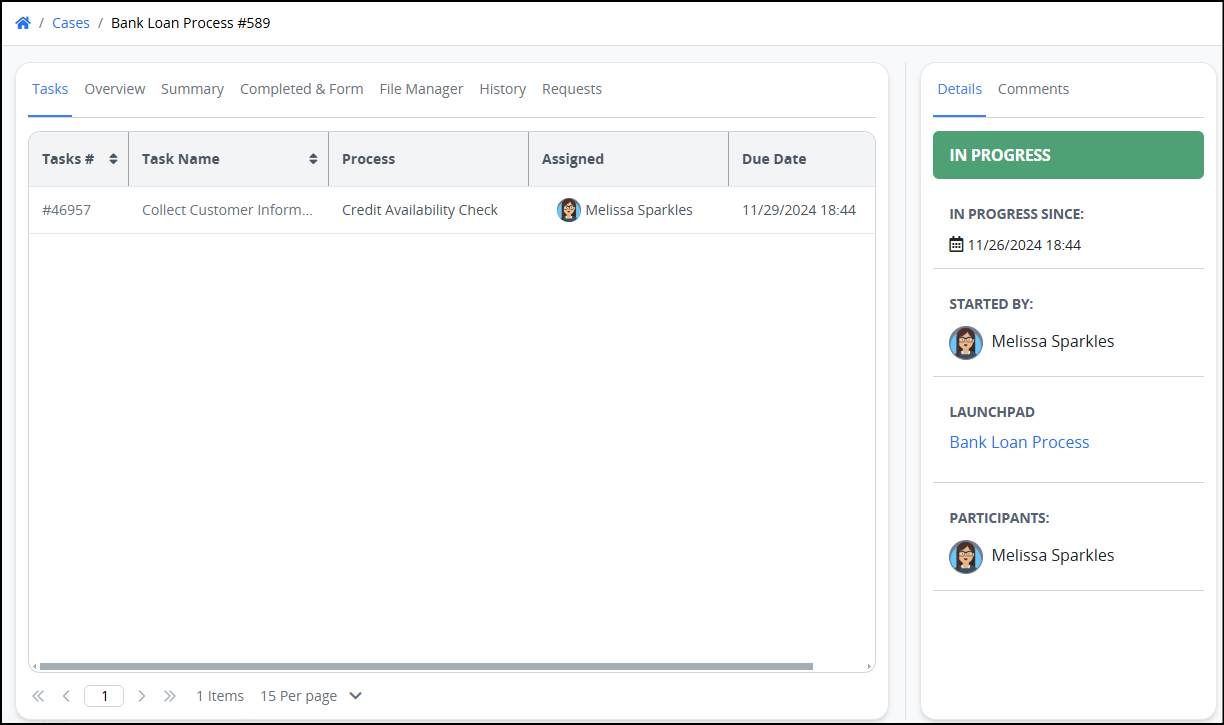
The Details and Comments menu panel on the right can be collapsed using the
icon, providing more space to view processes. This setting is remembered for each user session.
Watch the following product tour to learn how to view details of a case.
View In-Progress Cases
The In Progress page displays in-progress cases in which you are participating. You are a case participant because you started that case or have been assigned a Task in that case.
Follow these steps to view your in-progress cases:
Ensure that you are logged on to ProcessMaker Platform.
Click the Cases option from the top menu.
Click the In Progress tab or click the In Progress icon
 from the left sidebar to view all in-progress cases.
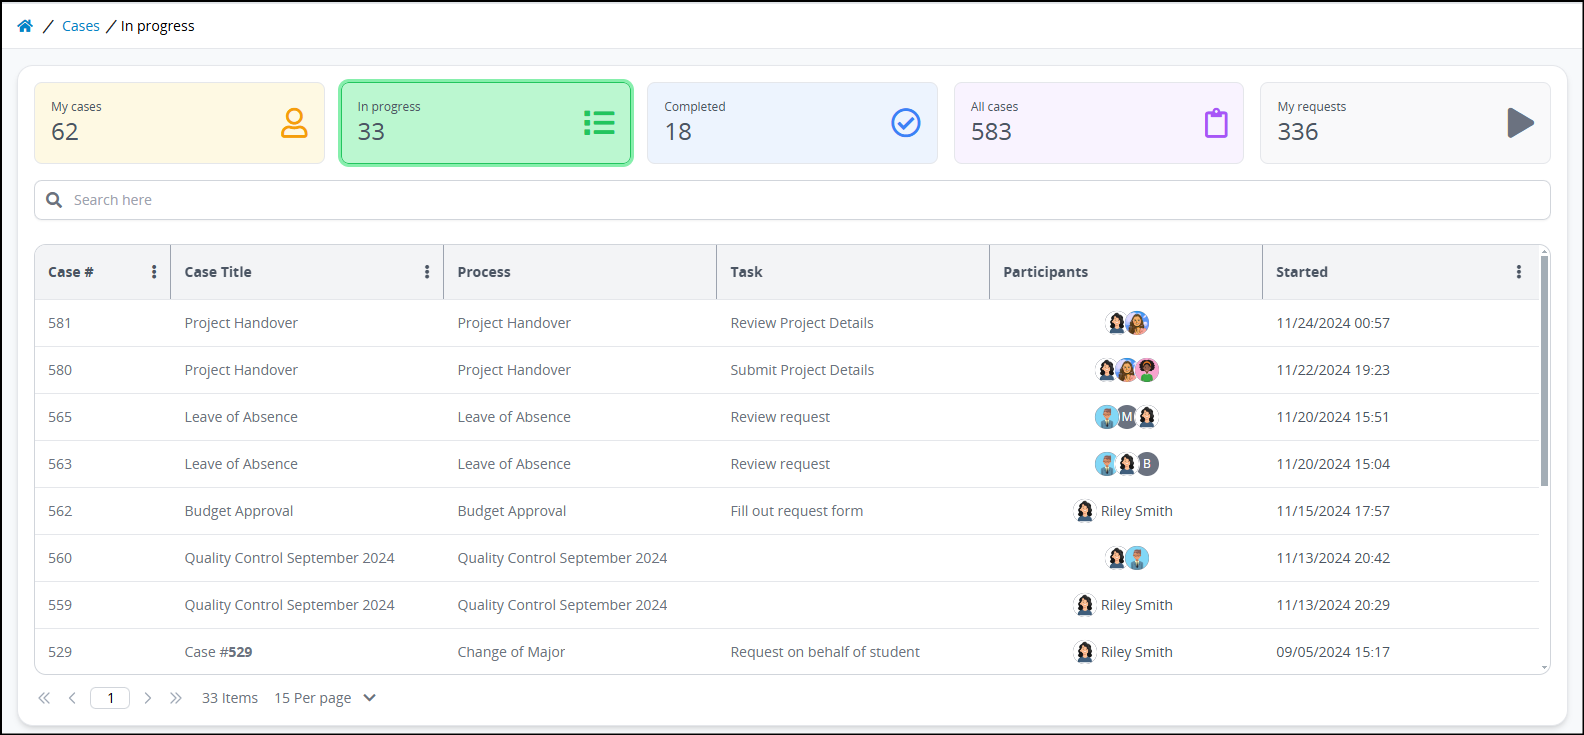
Columns in the In-Progress list
The In Progress page displays the following information in tabular format about in-progress cases:
Case #: The Case # column displays the Case number associated with the Process. This number represents the sequential occurrence of that Process. Click the Process name to view the case.
Case Title: The Case Title column displays the title of the Case, which displays the process name by default. The Case title may vary for each case based on case variable values for that case. Process Managers specify which Request variables to reference from that Process's configuration.
Process: The Process column displays the parent Process name associated with the case. Click the
 icon to view the available workflow routings in the process.
Task: The Task column displays the name of the in-progress and completed Tasks to date in that case. Task names display in this column from top to bottom in chronological order of assignment. The Task assignee may click on that Task to view it. Other users not assigned that Task receive a message that they are not authorized to view that content.
Participants: The Participants column displays each case participant's avatar and full name. Avatars display in this column from top to bottom the chronological order in which those users participated in that case.
Status: The Status column displays the status of the case. It displays In Progress.
Started: The Started column displays the date and time you made the case. The timezone setting to display the time is according to the ProcessMaker Platform instance unless your user profile's Time zone setting is specified.
Completed: The Completed column displays the date and time the case was completed. Since case in this tab are in-progress, this column is empty.
View Completed Cases
The Completed page displays completed cases in which you participated. You were a case participant because you started that case or were assigned a Task in that case.
Follow these steps to view completed cases in which you participated:
Ensure that you are logged on to ProcessMaker Platform.
Click the Cases option from the top menu.
Click the Completed tab or click the Completed icon
 from the left sidebar to view all completed cases.
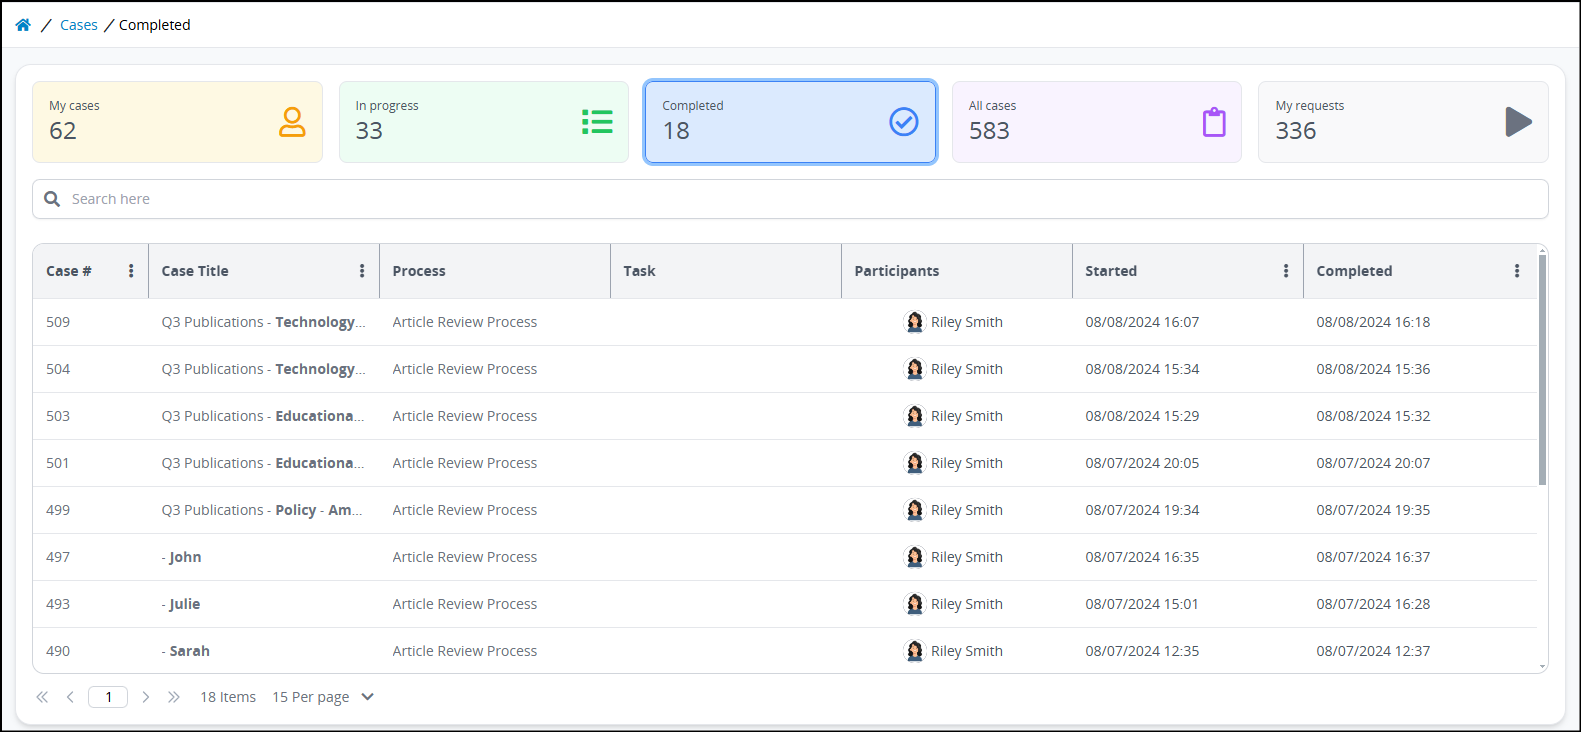
Columns in the Completed list
The Completed page displays the following information in tabular format about completed cases:
Case #: The Case # column displays the Case number associated with the Process. This number represents the sequential occurrence of that Process. Click the Process name to view the case.
Case Title: The Case Title column displays the title of the Case, which displays the process name by default. The Case title may vary for each case based on case variable values for that case. Process Managers specify which Request variables to reference from that Process's configuration.
Process: The Process column displays the parent Process name associated with the case. Click the
 icon to view the available workflow routings in the process.
Task: The Task column displays the name of the in-progress and completed Tasks to date in that case. Task names display in this column from top to bottom in chronological order of assignment. The Task assignee may click on that Task to view it. Other users not assigned that Task receive a message that they are not authorized to view that content.
Participants: The Participants column displays each case participant's avatar and full name. Avatars display in this column from top to bottom the chronological order in which those users participated in that case.
Status: The Status column displays the status of the case. It displays In Progress.
Started: The Started column displays the date and time you made the case. The timezone setting to display the time is according to the ProcessMaker Platform instance unless your user profile's Time zone setting is specified.
Completed: The Completed column displays the date and time the case was completed. Since case in this tab are in-progress, this column is empty.
View All Cases in Your Organization
The All Cases page displays all cases in your organization regardless of whether you participated in them if you have the following permissions granted.
Permissions
Your user account or group membership must have the "Requests: View All Cases" permission to view the list of all Requests unless your user account has the Make this user a Super Admin setting selected.
See the Cases and Requests permissions or ask your Administrator for assistance.
Follow these steps to view all requests in your organization:
Ensure that you are logged on to ProcessMaker Platform.
Click the Cases option from the top menu.
Click the All Cases tab or click the All Cases icon
 from the left sidebar to view all cases.
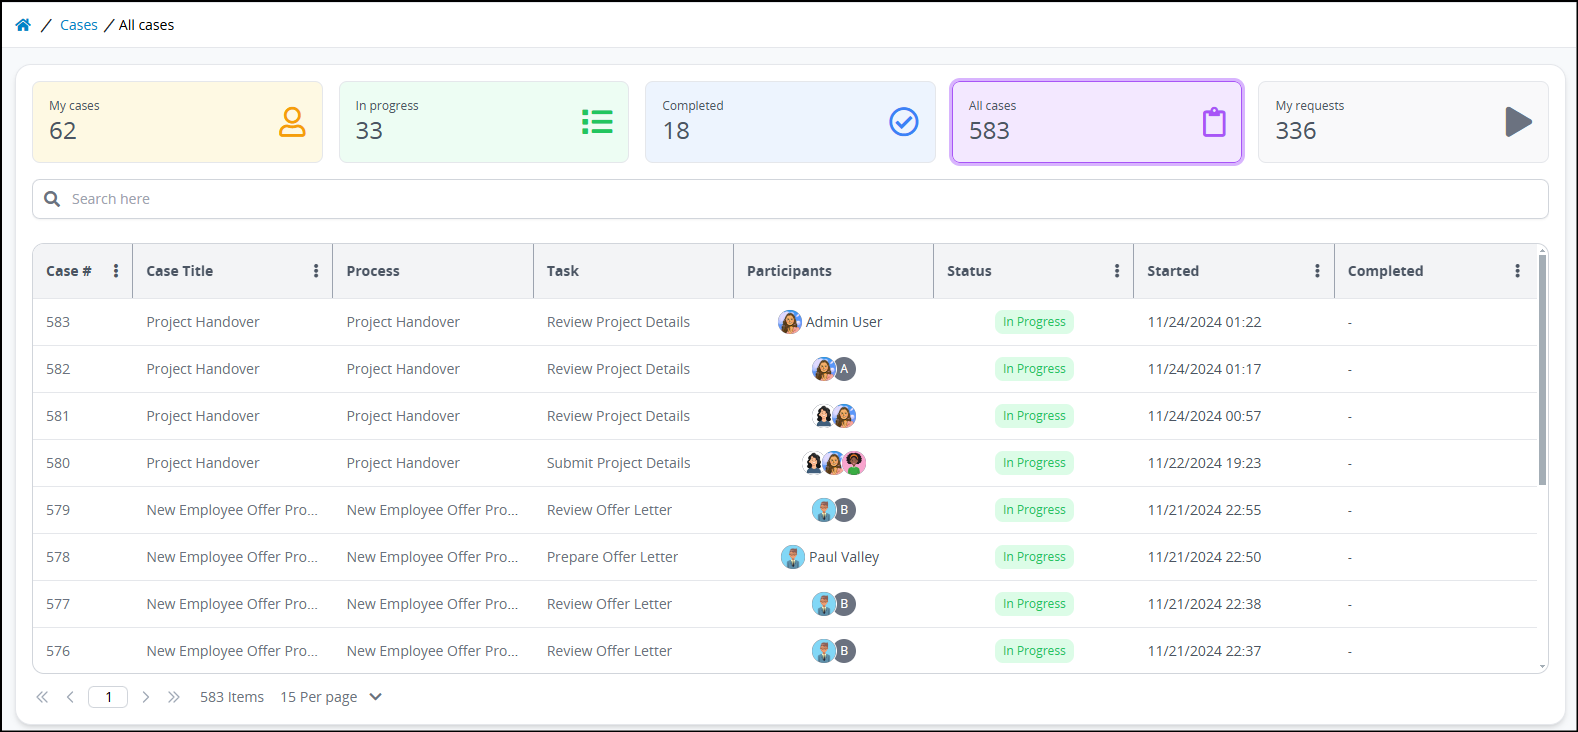
Columns in the All Cases list
The All Cases page displays the following information in tabular format about all cases:
Case #: The Case # column displays the Case number associated with the Process. This number represents the sequential occurrence of that Process. Click the Process name to view the case.
Case Title: The Case Title column displays the title of the Case, which displays the process name by default. The Case title may vary for each case based on case variable values for that case. Process Managers specify which Request variables to reference from that Process's configuration.
Process: The Process column displays the parent Process name associated with the case. Click the
 icon to view the available workflow routings in the process.
Task: The Task column displays the name of the in-progress and completed Tasks to date in that case. Task names display in this column from top to bottom in chronological order of assignment. The Task assignee may click on that Task to view it. Other users not assigned that Task receive a message that they are not authorized to view that content.
Participants: The Participants column displays each case participant's avatar and full name. Avatars display in this column from top to bottom the chronological order in which those users participated in that case.
Status: The Status column displays the status of the case. The following are possible statuses:
In Progress: The case is in-progress.
Completed: The case is completed.
Canceled: The case has been canceled. See
Cancel a Case.Error: An error occurred with the Case.
View the case summaryto see the error.
Started: The Started column displays the date and time you made the case. The timezone setting to display the time is according to the ProcessMaker Platform instance unless your user profile's Time zone setting is specified.
Completed: The Completed column displays the date and time the case was completed. Since case in this tab are in-progress, this column is empty. The timezone setting to display the time is according to the ProcessMaker Platform instance unless your user profile's Time zone setting is specified.
Search for a Case
Search for cases through the Case # and the Case Title columns. Follow these guidelines to do a search for a case:
View one of the following pages:
My Cases page. See View Your Cases That You Started.
In Progress page. See View Cases That Are In Progress.
Completed page. See View Your Completed Cases.
All Cases page. See View All Cases. (Note that your user account must have the Requests: View All Requests permission to view the All Cases page.)
Go to the search bar at the top of the page and enter the Case # or Case Title.

Press the Enter key to filter matching results.
No Cases?
If there is no search criteria, all cases display.
Go to Home
Click the Home breadcrumb trail icon
to go to the Participant Home Screen.