Validate and Publish a Screen

Validate That Your Screen is Ready for Use in Processes.

Overview

Before you deploy your Screen to production, validate that it is ready for use in Processes for the following reasons:

  • Minimize problems when previewing your Screen.

  • ProcessMaker Platform represents Screens as JSON data models. You can view any JSON data model in Preview mode to test how a Process's JSON data model or another Screen's data model interacts with your Screen. When testing a JSON data model, the Screen Validation feature indicates when that data model is not valid.

  • Minimize problems when Process designers test your Screen in their Processes. Since your Screen may be used in multiple Processes in your organization, ensure that your Screen won't cause production problems later.

  • If a Process designer exports a Process that references your Screen, your Screen is also exported and referenced in all Task elements that use it. Therefore, by validating your Screen, those Processes that reference your Screen can successfully be imported later.

Validate a Screen

Permissions

Your user account or group membership must have the following permissions to validate a Screen unless your user account has the Make this user a Super Admin setting selected:

  • Screens: Edit Screens

  • Screens: View Screens

See the Screens permissions or ask your Administrator for assistance.

Follow these steps to validate a Screen:

  1. Screen Validation is enabled by default. If the Screen Validation toggle key is disabled, enable the Screen Validation toggle key so that Screens Builder automatically validates your Screen as you work.

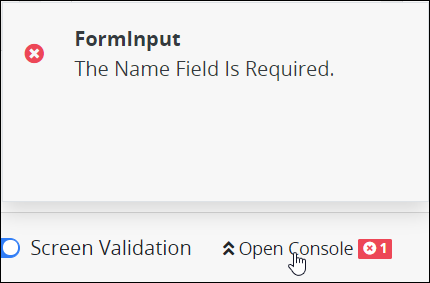
  2. Work on your Screen. Screens Builder indicates any validation issues as you work. The following indicators may occur:

    • No errors found: If no errors are found, the following text displays to the right of the Open Console button: 0. The green check mark displays. Your Screen is valid.

    • Furthermore, controls that are associated with errors display a red-colored highlight.

  3. If errors are found, click the Open Console button again to hide the error summary. Make changes to your Screen or JSON data model and then repeat steps 3 and 4 again until Screens Builder finds no validation errors.

Publish Your Screen

A Screen can be saved in Design mode.

Permissions

Your user account or group membership must have the following permissions to publish a Screen unless your user account has the Make this user a Super Admin setting selected:

  • Screens: Edit Screens

  • Screens: View Screens

See the Screens permissions or ask your Administrator for assistance.

A Screen can be published in two ways. See the following sections regarding how a Screen may be published:

  • Publish a single version of your Screen.

  • Publish distinct versions of your Screen.

Publish a Single Version of a Screen

Click the Publish button from Screen Builder's top menu to save the Screen.‌ This action overwrites the previous publication of this Screen without maintaining a record of its previous publication(s).

Publish Distinct Versions of a Screen

Distinct versions of a Screen can be published. A version is a set of changes published for a Screen since the last publication. Versioning maintains a record of all named and unnamed publications to that Screen. Any of these versions may be viewed or retrieved, if needed.

Follow these guidelines to publish a new distinct version of your Screen:‌

  1. Click the Publish button from Screen Builder's top menu.‌

  2. The Commit Changes screen displays to name that published version of this Screen.

  3. Do one of the following:

    • Publish an unnamed version:

      Follow these steps to publish an unnamed version:

      1. Click Save to publish an unnamed version. Otherwise, click Cancel to return to Screen Builder without publishing. As a best practice, name each published version to provide auditing and documentation to what has changed in each publication. Otherwise, Process Designers that manage versions of this Screen do not view unnamed versions when the Only show named versions toggle key is enabled while viewing that Screen's version history.

    • Save a named version:

      Follow these steps to publish a named version:

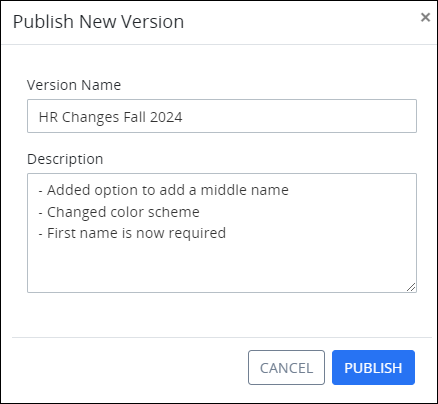
      1. In the Version Name setting, enter a name for this version. The version name displays when viewing the version history of that Screen and helps identify this version. Although this setting is not required, as a best practice name each version for easier maintenance, documentation, and auditing purposes. Name the version that describes changes in this Screen.

      2. In the Additional Details (optional) setting, optionally enter details of the changes made in this version. The additional details display when viewing the version history of that Screen and helps other Process Designers or Administrators understand the changes made in that version. Enter details which concisely summarize the changes made in this version.

      3. Click Save to save this version. Otherwise, click Cancel to return to the Screen Builder without publishing.

Logo

© 2024 ProcessMaker, Inc. All Rights Reserved. Except as otherwise permitted by ProcessMaker, this publication, or parts thereof, may not be reproduced in any form, by any method, for any purpose.