Alternative Testing in Process Modeler
Manage which alternative is being tested and carry out tests to see how each alternative performs.
Permissions
Your user account or group membership must have the following permissions unless your user account has the Make this user a Super Admin setting selected:
Processes: Edit Processes
Processes: View Processes
See the Process permissions or ask your Administrator for assistance.
Open a process model for a process that has A/B Testing enabled.
Click the
 menu at top right of the Modeler, and select Run Test.
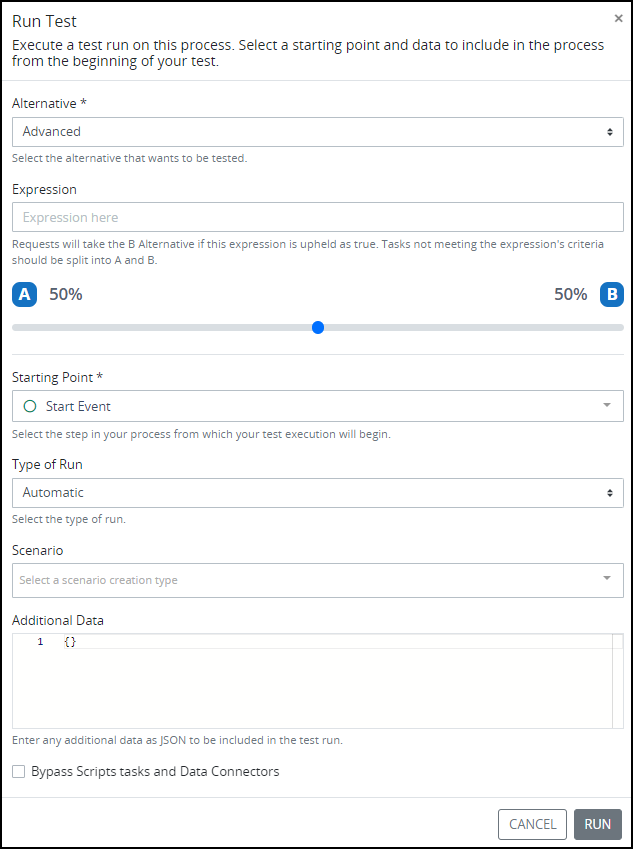
From the Run Test screen, select the Advanced option to enter expression and percentage settings for A/B testing.

In the Expression setting, optionally enter a Boolean expression to use advanced configurations for determining how requests are distributed between the two alternatives.
If the expression is
TRUE, requests will follow alternative B.If the expression is
FALSE, requests will be distributed between alternatives A and B according to the selection in the percentage slider.Leave the Expression setting blank to use only the percentage slider for request distribution.
Adjust the slider to select distribution percentage between the two alternatives.
From the Starting Point settings, select the step from which the test should begin.
From the Type of Run setting, choose Automatic to complete the rest without user intervention. Select Manually to manually complete tasks in the process model.
Optionally, in the Scenario setting, select a created Scenario that contains the mock Request data from which to test. A test can be run without a Scenario.
Optionally in the Additional Data setting, add a JSON data object that supplements or contains the entirety of the mock Request data for the test. JSON data object can be used in place of a Scenario.
Select Bypass Scripts tasks and Data Connectors to skip running running any script tasks or data connectors in the process.
Click Run to run one test of the process. The test will run as configured and tasks will be highlighted as follows:
Active tasks will show as blue.
All completed tasks will be highlighted as green.
Any errors will be highlighted in red.
To run additional tests, click the Run button multiple times.
Review the Test Run
After running a Process Test, Process Modeler simulates workflow routing based on the provided Scenario and/or JSON data. A colored highlight appears on each Process model object triggered during the simulated workflow.
Hover over a highlighted task. The following information displays regarding the status of that Task:
Node number in the Process model
Status of the Process model
Hyperlink to the sequentially numbered test
The following highlights represent event states during the simulation:
Green-colored highlight: The Process model object completed.
 Green-colored highlight denotes that the Process model object completed
Yellow-colored highlight: This is the breakpoint in the automated simulation from which manual testing begins.
Follow these steps to proceed with manual testing:
Mouse-hover over the Task with the yellow highlight.
Click on the hyperlink of the sequentially numbered test. The Task opens. Manually submit the Task.
Red-colored highlight: An error occurred on the Process model object, and simulation has stopped.
Consider the following when troubleshooting why the error occurred:
Script Task or Data Connector connector error:
Run the test again. When setting up the test, select the Check to bypass Script tasks and Data Connectors option.
Exclusive Gateway element error:
Evaluate if the Scenario and/or the provided JSON data contains mock Request data from which to evaluate conditions.
Review the conditions configured for the outgoing Sequence Flow element(s) from the Exclusive Gateway element, and then review the mock Request data.
 Red-colored highlight denotes an error or that the Process model object stopped the test at that point.
Review a Test Run Again
Click the Play button (left) at the bottom of Process Modeler to replay the current Process Test.
Click the Reset button (center) to reset the test and remove the highlights that represent event states.
Click the Stop button (right) to stop Process Testing and return to editing the Process model.
Cancel a Test Run
Follow these steps to cancel a Test run:
Mouse-hover over the Task with the yellow highlight.
Click on the hyperlink of the sequentially numbered test. The Task opens.
Click the Cancel button in the Cancel Test section of the Task summary.

The Caution screen displays to confirm the cancellation of the test run.

Click Confirm.