Configure LDAP settings for Microsoft Active Directory.
Overview
The LDAP for Microsoft Active Directory configuration allows ProcessMaker Platform users to log on by authenticating directly into a Microsoft Active Directory server.
Considerations when Configuring LDAP for Active Directory
Consider the following:
For security reasons, do not use anonymous connections.
ProcessMaker Platform does not support sub-groups or sub-departments. Therefore, user groups cannot be organized hierarchically, and nested groups or departments cannot be created.
Configure LDAP for Microsoft Active Directory
Follow these steps to configure LDAP for Microsoft Active Directory:
View your LDAP Settings. The LDAP tab displays.
Enable the Enabled toggle key to always synchronize your Active Directory whenever your hierarchy of entities changes to keep ProcessMaker Platform synchronized.
From the Synchronization Schedule setting, set at which interval to synchronize with your Active Directory server. Consider that when setting this interval, the more users, groups, and/or departments your Active Directory server contains, the more time ProcessMaker Platform requires to synchronize your Active Directory server. Follow these steps:
Click the Edit icon
 for the Synchronization Schedule setting. The Synchronization Schedule screen displays.
In the Quantity setting, enter how many times to synchronize for each configured frequency. 1 is the default setting.
In the Frequency setting, select the frequency in which to synchronize from the following options:
Minutes (default setting)
Hours
Days
Click Save. The following message displays: The setting was updated.
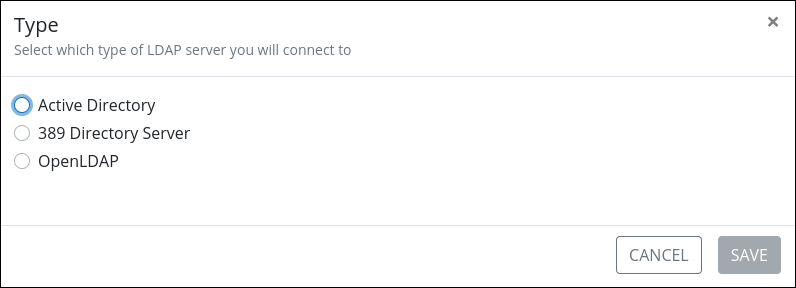
From the Type setting, select to which LDAP server type ProcessMaker Platform connects to synchronize as follows:
Click the Edit icon
 for the Type setting. The Type screen displays.
Select the Active Directory option.
Click Save. The following message displays: The setting was updated.
From the Server Address setting and the Server Port setting configure as follows:
Click the Edit icon
 for the Server Address setting. The Server Address screen displays.
Enter the Active Directory IP address or hostname to which ProcessMaker Platform synchronizes.
Click Save. The following message displays: The setting was updated.
Click the Edit icon
 for the Server Port setting. The Server Port screen displays.
Enter the port number the Active Directory server uses. By default, Active Directory uses port 389.
Click Save. The following message displays: The setting was updated.
Active Directory uses Transport Security Layer (TLS) to connect to the Authentication Source. Then enable the TLS toggle key. The following message displays: The setting was updated.
From the Certificate setting, upload the Active Directory certificate file that will be stored on ProcessMaker Platform. For more information about how to get your Active Directory certificate, see Obtain an Active Directory certificate.
Active Directory uses distinguished names (dn) to identify users, groups, and other types of entities.
The distinguished name describes entities starting from the specific and moving to the general in the hierarchy of entities. For example:
cn=John Doe,ou=managers,ou=regionalbranch,dc=acme,dc=comThen, configure distinguished names as follows:Click the Edit icon
 for the Base DN setting. The Base DN screen displays.
Enter each DC of the Base DN following the guidelines above.
Click Save. The following message displays: The setting was updated.
Enter Active Directory credentials as follows:
Click the Edit icon
 for the Username setting. The Username screen displays.
Enter the username to log on to the Active Directory server.
Click Save. The following message displays: The setting was updated.
Click the Edit icon
 for the Password setting. The Password screen displays.
Enter the password to log on to the Active Directory server.
Click Save. The following message displays: The setting was updated.
Select which groups and departments to synchronize as ProcessMaker Platform groups. Ensure to have the correct previous settings to select groups and departments:
Click the Edit icon
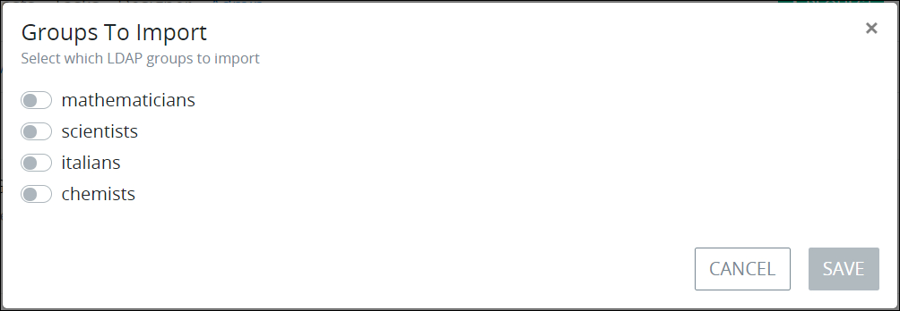
 for the Groups To Import setting. The Groups To Import screen displays the Active Directory groups on your Active Directory server. If your Active Directory server contains no Active Directory groups, this screen displays no groups with which to synchronize.
Enable the toggle key for each Active Directory group to synchronize as ProcessMaker Platform groups.
Click Save. The following message displays: The setting was updated.
Click the Edit icon
 for the Departments to Import setting. The Departments To Import screen displays the Active Directory departments on your Active Directory server. If your Active Directory server contains no Active Directory departments, this screen displays no departments with which to synchronize.
Enable the toggle key for each Active Directory department to synchronize as ProcessMaker Platform groups.
Click Save. The following message displays: The setting was updated.
From the User Identifier setting, enter the Active Directory parameter used to identify users as follows:
Click the Edit icon
 for the User Identifier setting. The User Identifier screen displays.
Enter
samaccountnamethat identifies Active Directory users in ProcessMaker Platform. If unsure, enter*. Synchronization is slower because all object classes are evaluated.Click Save. The following message displays: The setting was updated.
From the Group Identifier setting, enter the Active Directory parameter used to identify groups as follows:
Click the Edit icon
 for the Group Identifier setting. The User Identifier screen displays.
Enter
cnthat identifies Active Directory groups in ProcessMaker Platform. If unsure, enter*. Synchronization is slower because all object classes are evaluated.Click Save. The following message displays: The setting was updated.
From the Variable Map setting, map ProcessMaker Platform user properties to Active Directory attributes as follows:
Click the Edit icon
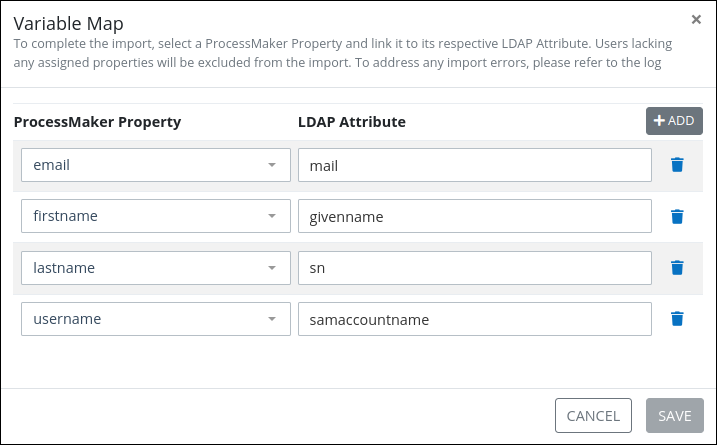
 for the Variable Map setting. The Variable Map screen displays.
Follow these guidelines to map a ProcessMaker Platform user properties to an Active Directory attribute:
Click the +Add button. A new row displays the existing mapped user properties.
In the ProcessMaker Property setting, enter the ProcessMaker Platform user property to which to map the Active Directory attribute. Select the properties in the following order:
email
firstname
lastname
username
In the LDAP Attribute setting, enter the Active Directory attribute from which to map to the ProcessMaker Platform user property. Enter attributes in the following order:
mail
givenname
sn
samaccountname
Click Save. The following message displays: The setting was updated.
From the Chunk Size For User Import setting, enter the number of users that will be imported simultaneously as follows:
Click the Edit icon
 for the Chunk Size For User Import setting. The Chunk Size For User Import screen displays.
Enter the number of users. It is recommended 500 as the maximum.
Click Save. The following message displays: The setting was updated.