The intelligent document processing (IDP) settings allows a ProcessMaker Administrator to configure authentication to a ProcessMaker IDP instance. ProcessMaker Platform must be authenticated to a ProcessMaker IDP instance so IDP connectors configured in business processes may process documents during Requests.
View IDP Settings
Permissions
Your user account or group membership must have the "Settings: View Settings" permission to view ProcessMaker IDP server settings unless your user account has the Make this user a Super Admin setting selected.
See the Settings permissions or ask your Administrator for assistance.
Follow these steps to view the IDP settings:
Ensure that you are logged on to ProcessMaker.
Click the Admin option from the top menu. The Users page displays.
Click the Settings icon
 from the left sidebar to view all settings.
From the Settings panel on the left, expand the Integrations section.
Select IDP to view the following details:
Setting: The Setting column displays the IDP Setting name.
Configuration: The Configuration column displays the value of the setting and how it is configured.
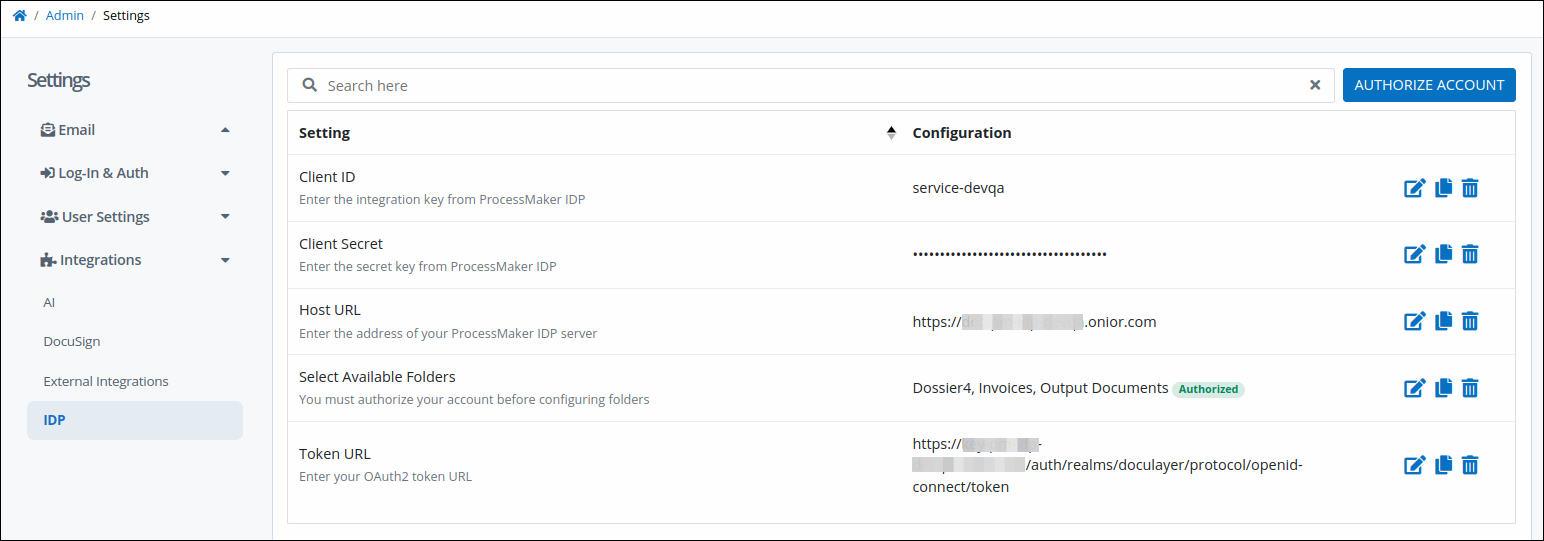
IDP tab displays settings to authenticate to ProcessMaker IDP and configure folders from which to store documents
Edit an IDP Setting
Click the Edit icon
to change a setting. For more information on different IDP configurations, see Configure IDP Settings.
Copy an IDP Setting
Click the Copy to Clipboard icon
to copy the value of a setting.
Clear an IDP Setting
Click the Clear icon
to clear the value of a setting.
Configure IDP Settings
Permissions
Your user account or group membership must have the "Settings: View Settings" permission to view ProcessMaker IDP server settings unless your user account has the Make this user a Super Admin setting selected.
See the Settings permissions or ask your Administrator for assistance.
The following information is required to authenticate with ProcessMaker IDP:
Client ID: The client ID is the unique key for your ProcessMaker Platform instance to authenticate IDP connectors implemented in your ProcessMaker IDP instance.
Client secret: The client secret is the time-sensitive and private code that your ProcessMaker IDP instance acknowledges to authenticate IDP connectors when connecting.
Token URL: The token URL references the valid authentication token that authenticates IDP connectors when during authentication.
To locate the client ID and client secret, both of which are private to your organization, contact your Customer Success Manager. Since the IDP package is part of the ProcessMaker Platform Enterprise edition, this functionality is not available in in the Open Source edition.
As part of this configuration, determine to which folders within your organization that Process designers using the IDP connector can reference to store documents for intelligent document processing. Note that until your ProcessMaker IDP instance authenticates with ProcessMaker Platform, the indicator Unauthorized displays beside the setting from which to select those folders. The indicator Authorized displays after authentication.
Authenticate with ProcessMaker IDP
Follow these steps to authenticate with ProcessMaker IDP prior to selecting which folders to store documents for intelligent document processing:
From the Client ID setting, click the Edit
icon. The Client ID setting displays. This is a required setting.
Enter the integration key for your ProcessMaker IDP instance, and then click Save.
From the Client Secret setting, click the Edit
icon. The Client Secret setting displays. This is a required setting.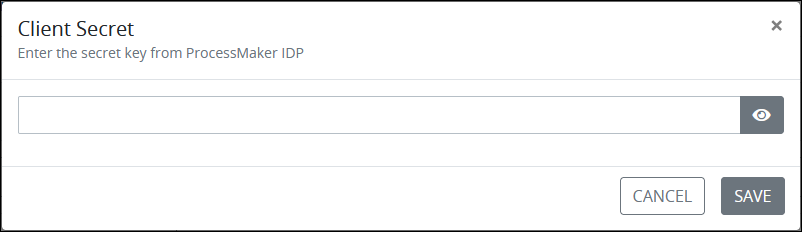
Enter the client secret for your ProcessMaker IDP instance, and then click Save.
From the Host URL setting, click the Edit
icon. The Host URL setting displays. This is a required setting.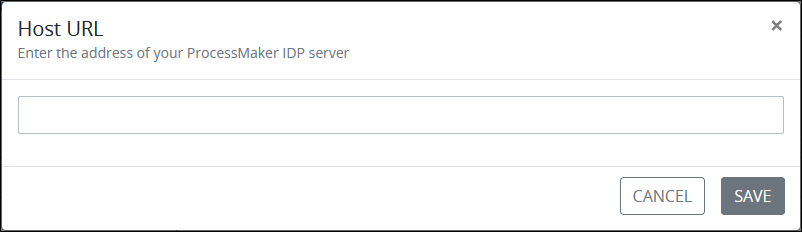
From the Token URL setting, click the Edit
icon. The Token URL setting displays. This is a required setting.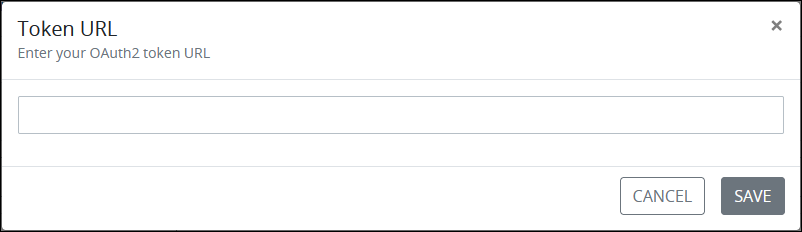
Enter the URL that references the valid authentication token to your ProcessMaker IDP instance, and then click Save.
Click the Authorize Account button.
Select IDP Folders for Saving Processed Documents
Prior to selecting the folders to store documents for intelligent document processing (IDP), ensure the following:
Folders exist in your ProcessMaker IDP instance. If they do not exist, you can create them through a request variable in the IDP Connector.
You have authenticated with your ProcessMaker IDP instance. Note that until your ProcessMaker IDP instance authenticates with the ProcessMaker Platform, the indicator Unauthorized will display beside the setting for selecting those folders. Once authentication occurs, the indicator Authorized will be shown.
Follow these steps to select IDP folders for storing documents uploaded in a Process:
From the Select Available Folders setting, click the Edit
icon. The Select available folders setting displays.
Click the drop-down menu to select one or more existing folders from which to store documents for processing. Click the Remove
 icon to remove an added folder.
Click Save.