What are Email Default Settings?
The default email settings let Administrators configure an outbound email server for user notifications in cases, tasks, and via Actions By Email and Send Email connectors. ProcessMaker Platform provides mailer drivers for the following services:
View Email Server Default Settings
Permissions
Your user account or group membership must have the "Settings: View Settings" permission to view email server default settings unless your user account has the Make this user a Super Admin setting selected.
See the Settings permissions or ask your Administrator for assistance.
Follow these steps to view the email server default settings:
Ensure that you are logged on to ProcessMaker Platform.
Click the Admin option from the top menu. The Users page displays.
Click the Settings icon
 from the left sidebar to view all settings.
From the Settings panel on the left, expand the Email section.
Select Email Default Settings to view the following details:
Setting: The Setting column displays the name of the default email server settings.
Configuration: The Configuration column displays the setting value and how it is configured.
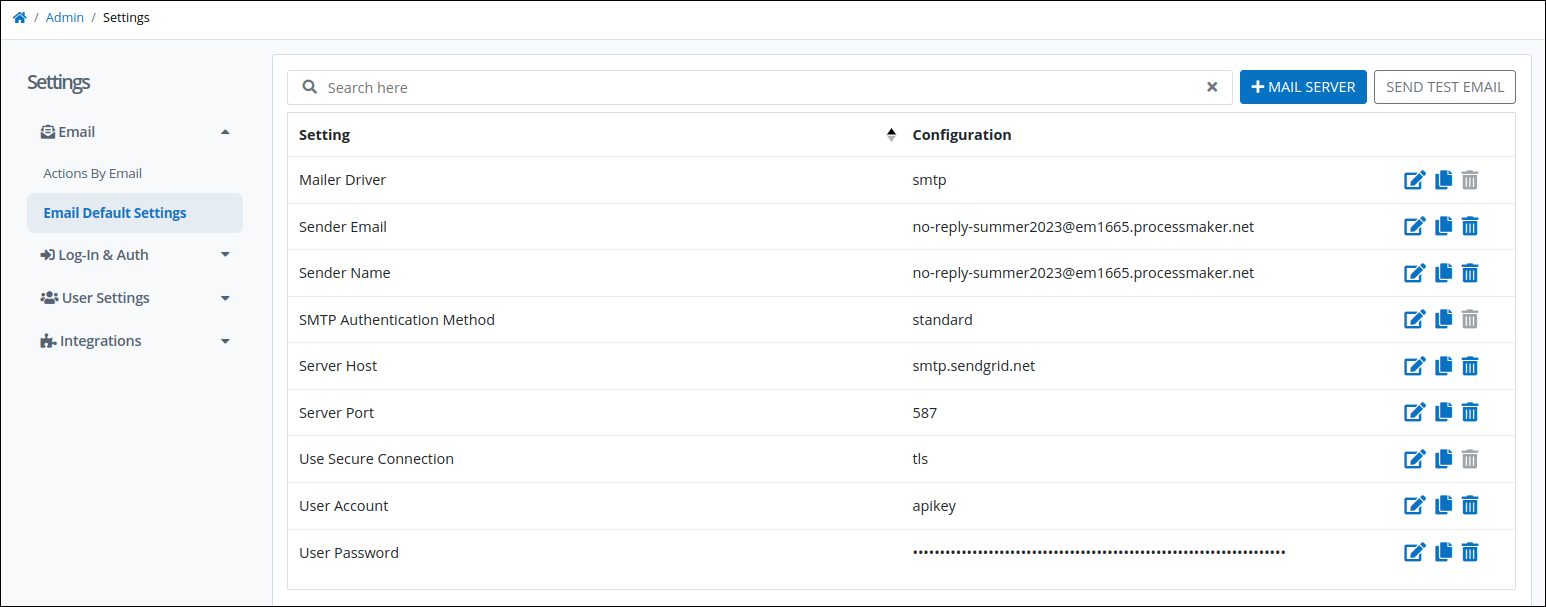
Email Default Settings
Edit an Email Server Setting
Click the Edit icon
to change a setting. For more information on different mail server configurations, see Edit an Email Server Configuration.
Copy an Email Server Setting
Click the Copy to Clipboard icon
to copy the value of a setting
Clear an Email Server Setting
Click the Clear
to copy the value of a setting.
Create a New Email Server Configuration
Permissions
Your user account or group membership must have the "Settings: View Settings" permission to view email server default settings unless your user account has the Make this user a Super Admin setting selected.
See the Settings permissions or ask your Administrator for assistance.
Follow these steps to create or edit an email server configuration:
View your email server default settings. The Email Default Settings tab displays.
Click on the +Mail Server button at the top of the Email Default Settings panel. A new option displays below to the Email Default Settings option called Email Server N, where N is a number of the created email server.
Optionally, change the name of this email server's alias name. Follow these steps:
Click the Edit
 icon for the Mailer Alias Name setting. The Mailer alias name screen displays.
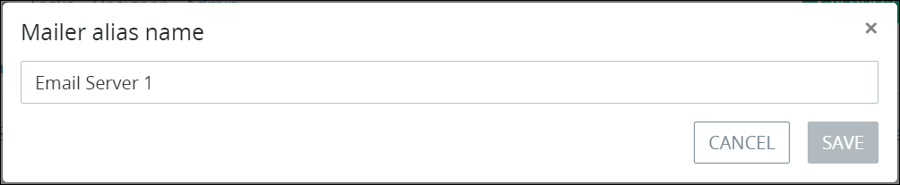
Change the name for this email server's alias, and then click on Save.
Optionally, change which mail driver this email server uses. Follow these steps:
Click the Edit
icon for the Mailer driver setting. The Mailer driver screen displays. 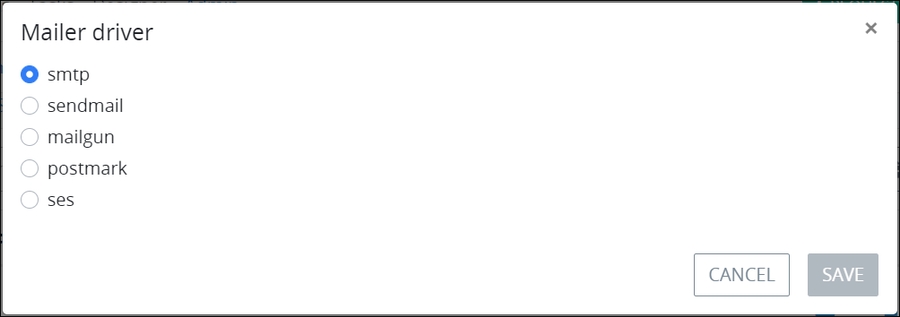
Select one of the following options that represent supported mail drivers:
smtp: Click on the smtp option to use the SMTP mail driver.
sendmail: Click on the sendmail option to use the Sendmail mail driver.
mailgun: Click on the mailgun option to use the Mailgun mail driver.
postmark: Click on the postmark option to use the Postmark mail driver.
ses: Click on the ses option to use the Amazon SES mail driver.
Click Save. Subsequent settings for that email server change based on the selected mail driver. Follow the instructions below for your selected mail driver
Edit an Email Server Configuration
Edit an email server based on the selected mail driver and the mail driver.
Send a Test Email Using an Email Server Configuration
Send a test email using an email server configuration to ensure that your email server configuration sends emails correctly.
Permissions
Your user account or group membership must have the "Settings: Update Settings" permission to delete an email server unless your user account has the Make this user a Super Admin setting selected.
See the Settings permissions or ask your Administrator for assistance.
Follow these steps to send a test email using an email server configuration:
View your Email Default Settings. The LDAP tab displays.
Locate the custom email server setting's tab if not testing the default email server settings.
Click the Send Test Email button. The Testing Email Server screen displays.
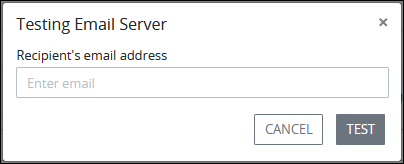
In the Recipient's email address setting, enter the valid email address to send the test email. This is a required setting.
Click Test. Any errors that occur display below the Recipient's email address setting. If no errors display, review the Inbox for the email address to which the test email was sent.